
Open plan kitchen living room layout ideas work best when you choose a kitchen layout by room size, then zone with an island or peninsula, a rug, pendant lighting, and consistent flooring. That system gives you light and social flow without losing order, storage, or a place to sit. It also prevents the most common regret, which is a room that looks open but feels cramped.
An open plan room looks effortless in photos and chaotic in real life when the layout is wrong. A too-big island blocks walkways, a too-big sofa dominates the room, and a missing rug leaves two zones floating. The fix is not more ideas, it is a layout that fits your room size, plus zoning that tells the eye where cooking ends and relaxing begins.
Quick Answer: Best Layout by Room Size and Shape
Open plan kitchen living room layout ideas start with room size and shape, not with a favourite photo. A small loft needs a one-wall kitchen, a square medium room suits an L-shaped kitchen, and a narrow room suits a peninsula or galley. A large great room can handle an island, but only if walkways stay clear.
Choose your kitchen layout first, then your zoning divider, then your furniture scale. That order prevents the classic mistake of buying an island, then discovering it blocks circulation. Measure first, tape the floor second, and buy furniture last, because measurements decide everything else.
Layout Chooser Table
| Room size and shape | Best layout | Kitchen layout | Divider | Avoid |
| Small, under 400 sq ft | One-wall with living area | One-wall | Rug + lighting | Full island, full sofa |
| Small, apartment or loft | One-wall with pocket doors | One-wall | Pocket doors + rug | Fixed island, bulky uppers |
| Narrow room | Peninsula divider | Galley or L-shaped | Peninsula | Floating island |
| Square, medium room | L-shaped facing living | L-shaped | Island or dining table | One-wall that wastes corners |
| Long room | Galley opening to living | Galley | Rug + sofa | Island that blocks length |
| Medium, social cooking | Island layout | One-wall + island | Island | Peninsula that closes off social flow |
| Large, great room | Island + dining table | L-shaped + island | Island + dining table | One-wall that looks lost |
| Noise or smell concern | Broken plan | Any + glass or shelving | Glass partition, fireplace, shelving | Full open plan with no divider |
Key Points
- Layout first: Choose kitchen layout by room size, not by photo, because size decides workflow.
- Zoning second: Island, rug, lighting, flooring, and furniture create zones without walls.
- Measurements third: Walkways 36–48 inches, island clearance 36 inches minimum, narrow island about 24 inches deep.
- Broken plan: Partial dividers keep light but block noise and cooking smells, unlike full open plan.
- Permit check: Load-bearing wall removal needs an engineer and a local permit check in the US.
- Live with it: Tape the layout on the floor and live with it for a month before buying decor.
12 Open Plan Kitchen Living Room Layout Ideas
Each layout below follows the same format: best for, room size, kitchen layout, zoning, furniture, and avoid. Use that format to choose, not just the layout name, because the same island layout fits a large room and fails in a narrow room. Measure walkways before committing to any divider.
1. One-Wall Kitchen With Living Area
One-wall kitchen with living area works best when your home has limited width or a very open floor plan. All cabinets, appliances, and counters stay on one wall, which leaves the rest of the space open for seating and movement. This setup keeps walkways clear and reduces visual clutter, because the kitchen does not spread across the room.
Best for: Small homes, apartments, lofts, minimalists. Room size: Under 400 sq ft, or narrow rooms. Zoning: Rug + lighting, no fixed divider. Furniture: Loveseat, small dining table or counter seating. Avoid: Bulky upper cabinets that dominate the wall, and a full sofa that blocks walkways.
Place the sofa directly across from the kitchen or at a slight angle to keep sightlines open. Storage matters here, so taller cabinets or pantry units help replace lost counter space, because one wall gives less counter than an L-shape. This layout is ideal if you want the kitchen to stay functional without taking attention away from the living area.
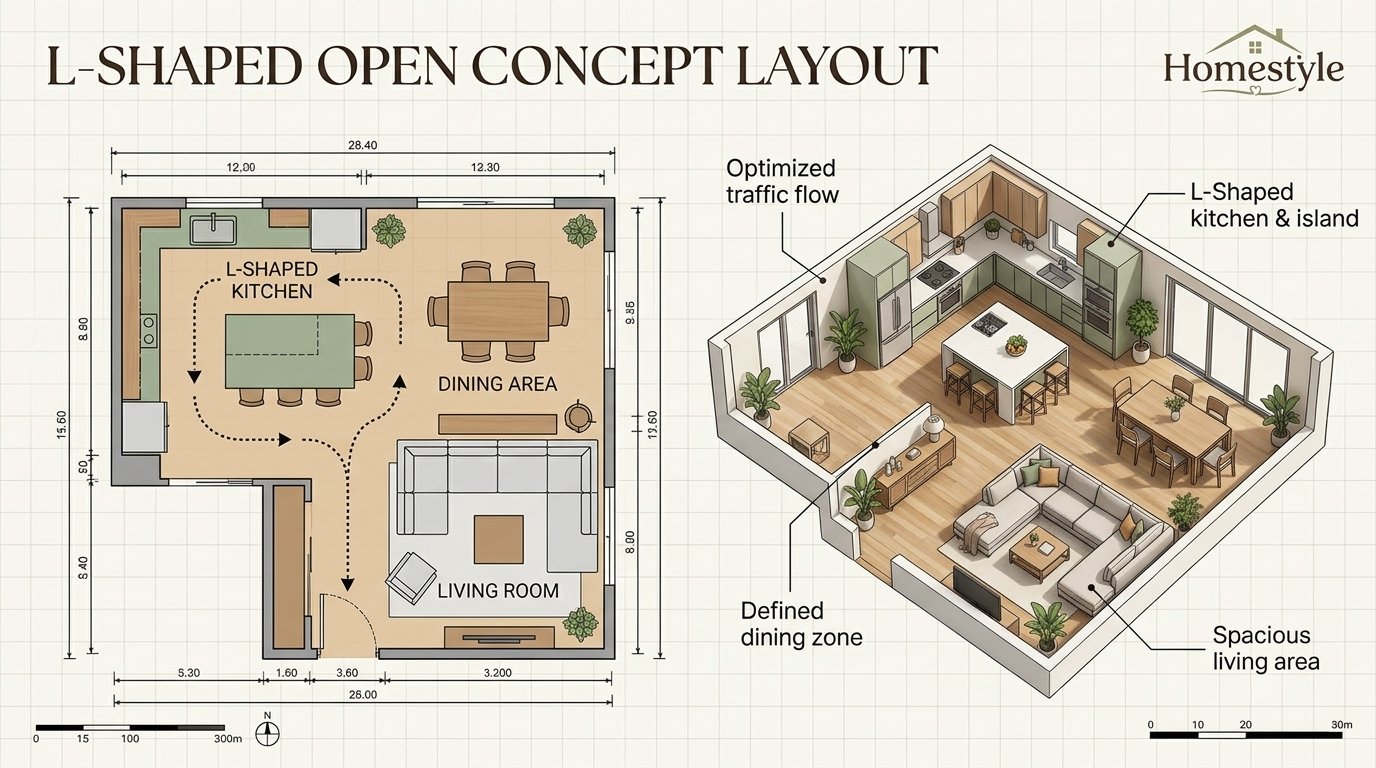
2. L-Shaped Kitchen Facing the Living Room
L-shaped kitchen facing the living room helps define the cooking area while keeping the space open. Cabinets wrap around two connected walls, giving you more counter space without closing anything off. This layout works well when the living room sits directly in front of the kitchen, allowing easy interaction while cooking.
Best for: Square and medium rooms, families, social cooking. Room size: Medium, 400–800 sq ft. Zoning: Island, dining table, or rug. Furniture: Sofa facing kitchen, dining table, bar seating. Avoid: Blocking the work triangle with an island, and letting the kitchen dominate the whole room.
You can add bar seating along one side without blocking movement, because the L-shape leaves an open side for seating. The corner layout also supports better workflow between sink, stove, and fridge, which is the work triangle. In a small house, this setup balances storage and openness, making it easier to keep the kitchen organised while the living area stays calm.
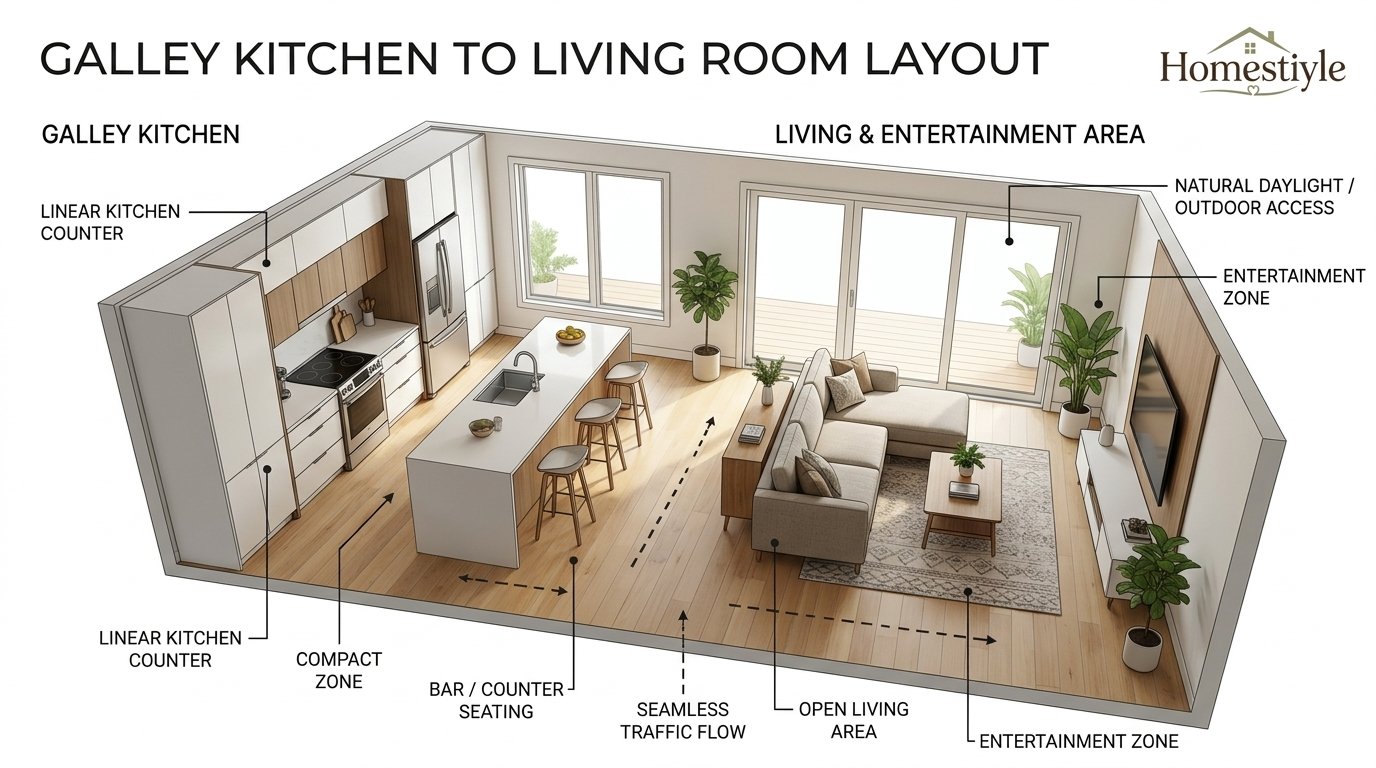
3. Galley Kitchen Opening Into Living Space
Galley kitchen opening into living space suits narrow homes where width is limited but length is available. Cabinets run along two parallel walls, leaving a walkway in the centre, and when one end opens into the living room, the kitchen feels less closed. This setup keeps everything within easy reach, which helps during daily cooking.
Best for: Narrow homes, long rooms, efficient cooks. Room size: Narrow, long, or small. Zoning: Rug + sofa, no island. Furniture: Loveseat, small dining table. Avoid: Bulky upper cabinets, dark colours, and cluttered living room that blocks the transition.
To keep it from feeling tight, use light colours and avoid bulky upper cabinets, because heavy uppers close in a narrow galley. The living room should stay simple so the transition feels smooth, with a rug anchoring the sofa zone. This layout works well when you want strong kitchen function without spreading cabinets across the entire space.
4. U-Shaped Kitchen With Living Area
U-shaped kitchen with living area gives the most counter and storage, because cabinets wrap around three walls. It suits larger rooms where the kitchen can be a distinct zone, while still opening to the living area on the fourth side. This layout is efficient for serious cooks, because everything is within a few steps.
Best for: Larger rooms, serious cooks, storage needs. Room size: Medium to large. Zoning: Peninsula, dining table, or rug. Furniture: Dining table as divider, sofa facing kitchen. Avoid: Closing off the fourth side with a full wall, and letting the U-shape dominate the living area.
Keep the fourth side open, with a peninsula or dining table as a soft divider, so the kitchen does not feel like a separate room. Use light colours on upper cabinets, or skip uppers on one side, to prevent the U-shape from feeling heavy. This layout is ideal if you want maximum storage without sacrificing open flow.
5. Island Layout: Kitchen on One Wall, Island as Divider
Island layout places kitchen units along one wall with an island projecting into the room, and the island becomes a natural divider. If the hob is positioned on the island, you face into the room while cooking, which makes the space feel more social. The island also gives extra counter space, storage, and casual seating in one piece.
Best for: Medium and large rooms, social cooking, entertaining. Room size: Medium to large, with 36 inches clearance all sides. Zoning: Island as mid-height divider. Furniture: Bar stools facing living, sofa facing island. Avoid: Island in a narrow room, island that blocks walkways, island too big for the room.
Position the island so seating faces the living zone, and leave at least 36 inches clearance on every walkway side. A narrow island about 24 inches deep fits smaller rooms, while a standard island with seating for two to three suits medium rooms. If floor space will not allow a fixed island, a portable butcher-block cart on locking casters gives the same boundary you can move.
6. Peninsula Layout: The Zoning King for Narrow Rooms
Peninsula layout is attached to one wall on one side, creating division without restricting circulation, and it is often called the zoning king. It creates a distinct U-shape for the kitchen, effectively blocking traffic from the cooking zone, while offering seating and preparation space. It serves as a physical border between culinary and relaxation zones.
Best for: Narrow rooms, small to medium rooms, divider need. Room size: Narrow, small to medium. Zoning: Peninsula as divider. Furniture: Bar stools on living side, sofa facing peninsula. Avoid: Floating island in a narrow room, peninsula that blocks the only walkway.
A peninsula suits narrower spaces because it does not need clearance on all sides like a floating island. It offers seating and prep space while keeping the layout efficient, and it hides dirty dishes behind the peninsula when seating faces the living zone. Choose a peninsula if you have a narrow room where a floating island would block walkways.
7. Breakfast Bar Layout: Counter Seating Replaces Dining Table
Breakfast bar layout extends the kitchen counter into a seating area, replacing a separate dining table for casual meals. It saves floor space, because a breakfast bar extension frees space that a standard table would consume, according to competitors. It suits small homes, apartments, and casual dining, where formal dining is not a daily need.
Best for: Small homes, apartments, casual dining, couples. Room size: Small to medium. Zoning: Breakfast bar as divider. Furniture: Bar stools, loveseat, side table. Avoid: Formal dining for four to six, and a breakfast bar that blocks walkways.
Use a breakfast bar for morning coffee, homework, and casual dinners, and keep a folding table for formal hosting if needed. That flexibility matters in small rooms, because a fixed dining table consumes floor space every day, while a breakfast bar serves multiple uses. Keep bar stool height matched to counter height, and leave clearance behind stools for movement.
8. Broken Plan Layout: Glass, Fireplace, or Shelving Dividers
Broken plan layout is a hybrid between open and closed plan, using partial dividers to maintain light but stop noise. Examples include a glass-partition wall, a double-sided fireplace, or open shelving units that reach the ceiling. You get the visual connection of open plan, but the acoustic benefits of a separate room.
Best for: Noise concern, smell concern, privacy need, large rooms. Room size: Medium to large. Zoning: Glass, fireplace, shelving, sliding doors. Furniture: Sofa facing fireplace, dining table as divider. Avoid: Full-height partitions that defeat open plan, and dividers that block light.
Glass partitions keep light travelling while blocking noise and smells, which is why they are a popular broken-plan choice. A double-sided fireplace creates a focal point for both zones, while open shelving creates a divider that also stores books and decor. Choose a divider by trade-off: glass for light, fireplace for focal point, shelving for storage, sliding doors for full closure when needed.
9. Dining Table as Divider Layout
Dining table as divider layout places a dining table between the kitchen and living areas, creating a clear dining zone in the middle. It suits families who eat together daily, because the dining zone is distinct, not an afterthought. It also works well in square rooms, where a table fits naturally between kitchen and sofa.
Best for: Families, formal dining, square rooms. Room size: Medium to large. Zoning: Dining table as divider. Furniture: Dining table, dining chairs, sofa facing table. Avoid: Small rooms where a table blocks walkways, and casual-only homes that do not need formal dining.
Position the table so walkways stay clear on both sides, with at least 36 inches clearance behind dining chairs. Use a rug under the dining table to anchor the dining zone, and pendant lights over the table to create a ceiling boundary. That combination makes the dining zone feel intentional, not like a table left in the middle of a room.
10. Sofa as Divider Layout
Sofa as divider layout places the sofa with its back to the kitchen, facing the living zone, to create a visual boundary without a wall. It keeps sightlines open, lets natural light travel, and creates a cosy pocket without losing the sense of space. It is flexible and inexpensive, because it uses furniture you already need.
Best for: Renters, budget, small rooms, flexible layouts. Room size: Small to medium. Zoning: Sofa back + rug. Furniture: Sofa, rug, side table, low shelf behind sofa if needed. Avoid: Full-height partitions, and a sofa that blocks the only walkway.
Add a rug under the sofa zone to anchor it, and a low shelf behind the sofa if you need extra storage without blocking light. Keep the sofa back tidy, because it faces the kitchen and becomes a visual feature, not just a back. This layout is ideal for renters, because it creates open-plan feel without removing walls or making permanent changes.
11. Chimney Breast as Anchor Layout
Chimney breast as anchor layout uses an existing chimney breast to anchor the kitchen area, with a cooker positioned within the recess. The structure itself provides subtle zoning between cooking and living areas, without a new divider. It feels natural, because the cooker sits in a recess that was already part of the room.
Best for: Homes with chimney breasts, period homes, character rooms. Room size: Medium. Zoning: Chimney breast as anchor. Furniture: Sofa facing chimney, dining table as divider. Avoid: Removing a chimney breast without structural advice, and letting the breast dominate the room.
Use the chimney breast as a focal point, with open shelving or artwork on either side to balance it. Keep the kitchen units around the breast simple, so the breast anchors the zone without overwhelming it. Check structural requirements before altering a chimney breast, because it may be load-bearing and need engineer advice.
12. Loft and Studio Layout: One-Wall With Pocket Doors
Loft and studio layout consolidates the kitchen onto a single wall, to maximise floor space for the living area. Pocket doors can slide shut to completely hide the kitchen when not in use, giving a clean living look for hosting or photos. It suits lofts, studios, and minimalists who want a kitchen that disappears.
Best for: Lofts, studios, minimalists, small footprints. Room size: Small, studio, loft. Zoning: Pocket doors + rug + lighting. Furniture: Loveseat, small dining table, side table. Avoid: Fixed island, bulky uppers, and a kitchen that dominates the studio.
Use flat-front cabinets that fade into walls, and a consistent palette to make the kitchen blend into the living space. When pocket doors are open, the kitchen is part of the room, and when they are shut, the room reads as a living room alone. That flexibility matters in a studio, because one room must serve as kitchen, living, dining, and sometimes work space.
Zoning System: How to Create Zones Without Walls
Zoning is the system that makes open plan work, because without zones, an open room feels like one big, undefined space. Use island or peninsula as a physical divider, rug to anchor the sofa zone, pendant lighting as a ceiling boundary, consistent flooring to unify, and furniture placement to define zones. Each zoning tool has a different job, and together they create order without walls.
Island and Peninsula Zoning: Size, Clearance, Seating
Island zoning works because an island creates a mid-height physical boundary without blocking light or sightlines. Position it so seating faces the living zone, and leave at least 36 inches clearance on every walkway side. A narrow island about 24 inches deep fits smaller rooms, while a standard island with seating for two to three suits medium rooms.
Peninsula zoning works because a peninsula is attached to one wall, creating division without needing clearance on all sides. It offers seating and prep space while keeping circulation efficient, which is why it suits narrow rooms. Choose peninsula if a floating island would block walkways, and island if you have clearance on all sides and want social seating facing the room.
Rug Zoning: Size, Placement, All Four Legs Rule
Rug zoning works because a rug anchors the sofa zone without a wall, making the living area feel intentional. Use a rug big enough for all four sofa legs for a generous look, or at least front legs for most styles, because a rug that is too small makes the living zone look disconnected. Measure sofa plus coffee or side table first, then choose rug size, not the other way around.
Place a flat-weave washable rug under the kitchen zone if you need a kitchen rug, and a plush rug under the seating zone for comfort. That contrast creates visual separation without walls or furniture dividers, because texture and colour signal zone change. Avoid a rug that is too small for the sofa, because it floats in the room and fails to anchor the zone.
Lighting Zoning: Pendant, Recessed, Layered, Kelvin
Lighting zoning works because pendant lights over the island create a clear ceiling boundary that mentally divides the active culinary space from the passive lounge space. Use 5000K daylight bulbs over the kitchen counter for task light, and 2700K warm bulbs near the sofa for relaxing light, because different Kelvin temperatures signal different zones. Add dimmers per zone, so kitchen, dining, and living can be lit separately.
Hang pendant lights over the island so they frame the island as a distinct zone, without blocking sightlines or head clearance. Use recessed or layered lighting in the living room for a softer, more relaxing feel, and pendant lights over the dining table for a dining boundary. That layered plan makes each area feel distinct yet connected, because lighting, not walls, defines the zones.
Flooring Zoning: Same Flooring, Rug Anchoring
Flooring zoning works because consistent flooring visually unifies the space and makes it look larger, while rugs define zones without a flooring change. Use the same flooring material across both zones — engineered wood, luxury vinyl plank, hardwood, or large-format tiles — to prevent visual fragmentation. Avoid tiles in the kitchen plus carpet in the living room, because that split breaks flow.
Use rugs to define zones, not a flooring change, because a flooring change creates a visual wall where you wanted openness. Choose water-resistant finishes near sinks and appliances, because kitchens need more water resistance than living areas. That combination — same flooring, rug anchoring — gives you unity plus definition, without sacrificing either.
Furniture Zoning: Sofa, Low Shelf, Dining Table
Furniture zoning works because a sofa, low shelf, or dining table can subtly separate kitchen and living areas while keeping sightlines open. Instead of erecting partitions, use a sofa or low shelf to create cosy pockets without losing the sense of space. That approach is flexible and inexpensive, because it uses furniture you already need.
A low shelf as a divider offers storage without blocking light, which is why it suits small rooms better than a full-height partition. A dining table as a divider creates a clear dining zone, while a sofa as a divider creates a clear living zone. Choose furniture zoning by zone need: sofa for living, table for dining, low shelf for storage plus division.
Measurements That Matter: Walkways, Clearances, Island, Sofa, Rug
Measurements decide whether an open plan layout works, because a beautiful island that blocks walkways fails, no matter how stylish it is. Use US inches and feet for a US article, because metric measurements from non-US competitors confuse US readers and contractors. Tape the layout on the floor before buying furniture, because tape reveals walkway problems that a floor plan hides.
Walkway and Island Clearance Table (US Inches)
| Measurement | Minimum | Comfortable | Notes |
| Walkway, general | 36 inches | 42–48 inches | Main circulation, not just side paths |
| Island clearance, all sides | 36 inches | 42–48 inches | More if island has seating or appliances |
| Walkway behind dining chairs | 36 inches | 42 inches | Chairs pulled out, not pushed in |
| Walkway behind bar stools | 36 inches | 42 inches | Stools pulled out, not pushed in |
| Work triangle leg | 48 inches | 60–72 inches | Sink to stove to fridge, unblocked |
| Pendant clearance over island | Per manufacturer | Per manufacturer | Verify for your ceiling height, do not guess |
Island Size Table
| Room size | Island depth | Island length | Seating | Clearance |
| Small, under 400 sq ft | About 24 inches | 36–48 inches | 2 bar stools, or none | 36 inches all sides |
| Medium, 400–800 sq ft | 24–36 inches | 48–72 inches | 2–3 bar stools | 36–42 inches all sides |
| Large, over 800 sq ft | 36–48 inches | 72–96 inches | 4–6 bar stools | 42–48 inches all sides |
| Portable cart (small rooms) | About 24 inches | 36–48 inches | None, or 1 stool | Moveable, locking casters |
Sofa and Rug Size Table
| Room size | Sofa | Coffee table | Rug | Notes |
| Small, under 400 sq ft | Loveseat, 55–63 inches wide | Side table, not coffee table if walkway under 28 inches | Rug big enough for front legs, ideally all four | Skip coffee table if walkway tight |
| Medium, 400–800 sq ft | Full sofa, 72–84 inches wide | Coffee table, 36–48 inches long | Rug big enough for all four legs | Anchor sofa zone with rug |
| Large, over 800 sq ft | Full sofa + loveseat or sectional | Coffee table, 48–60 inches long | Large rug, all four legs of all seating | Anchor full seating zone, not just sofa |
Broken Plan vs Open Plan vs Closed Plan
Open plan removes full walls for light and social flow, while closed plan keeps walls for noise control, smell control, privacy, and hiding a messy kitchen. Broken plan is the hybrid that keeps light but adds partial dividers, so you get visual connection plus acoustic benefits. Choose by actual use, not by trend, because a family that cooks strong-smelling food daily needs different zoning than a couple that entertains rarely.
Comparison Table
| Layout | Light | Noise | Smells | Privacy | Messy kitchen visible | Best for |
| Open plan | High | Low control | Low control | Low | Yes, visible | Social, entertaining, small space feel |
| Broken plan | High | Medium control | Medium control | Medium | Partially hidden | Noise/smell concern, families, hosting |
| Closed plan | Lower | High control | High control | High | No, hidden | Privacy, noise, smell, messy kitchen |
An honest conversation about how the room will actually be used is more important than any layout sketch, according to one competitor. Ask how often you cook strong-smelling food, how often you host, whether kids do homework at the island, and whether you work from home in the living zone. Those answers decide whether open, broken, or closed plan fits, because a layout that looks good in photos but fails on daily use will frustrate you for years.
Flooring, Colour, and Material System: One Room, Not Two
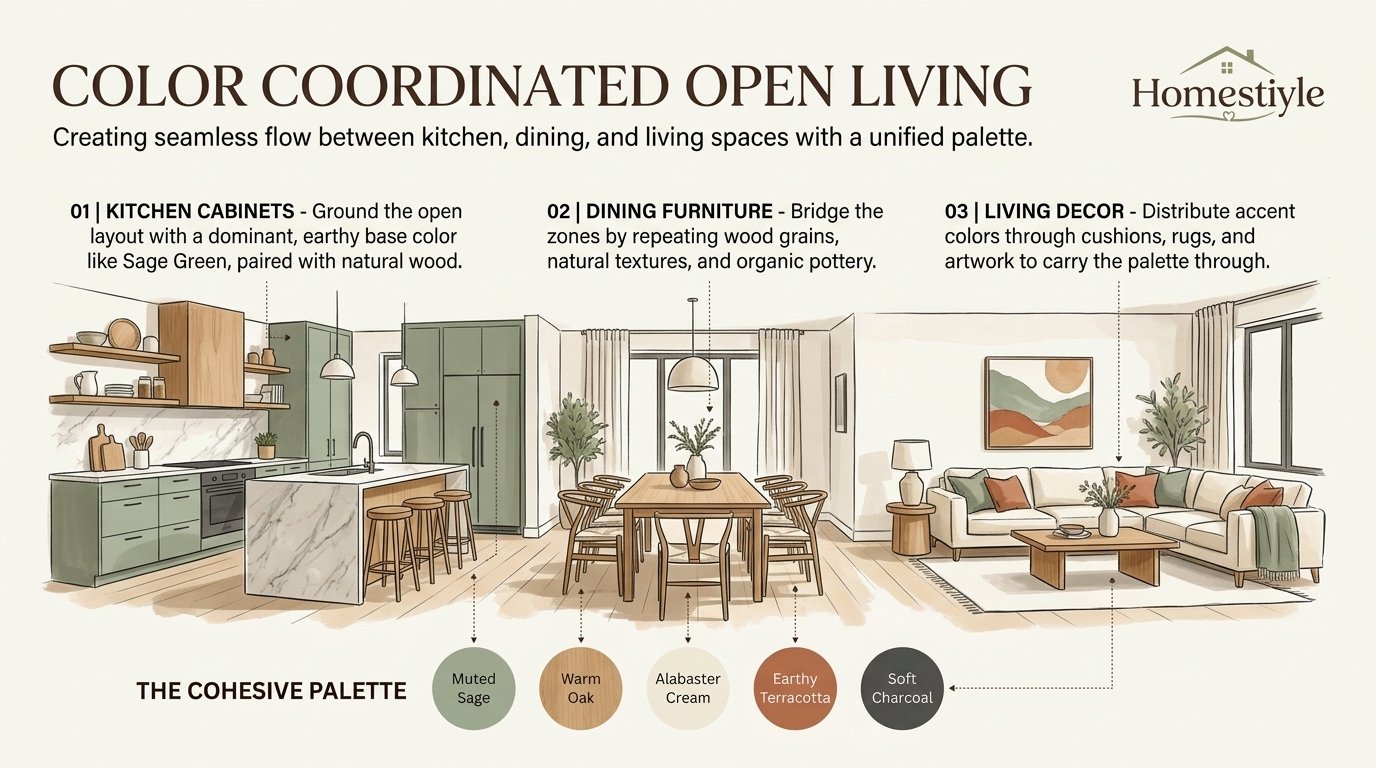
A kitchen living room combo only reads as one room when both zones share a material language, according to one competitor. Continuous flooring, a matching hardware finish, and one dominant neutral across both zones cost nothing extra at planning stage, and save you from an expensive redo when the space feels off at the end. That material logic matters more than matching furniture, because materials unify while furniture defines zones.
Material Logic Table
| Style | Palette | Material | Hardware | Lighting | Avoid |
| Modern | White, gray, black | Flat-front cabinets, polished concrete | Black or chrome | Pendant, recessed | Clutter, busy patterns |
| Farmhouse | White, warm wood, sage | Wood cabinets, butcher block, shiplap | Black iron | Pendant, warm | Range hood without real airflow |
| Scandinavian | White, warm ash, light wood | Warm ash, not gray, light oak | Light wood, brass | Pendant, warm | Gray that looks cold, dark accent walls |
| Industrial | Black, brick, metal, wood | Exposed brick, steel, dark wood | Black metal | Pendant, Edison | Rug too small for sofa legs |
| Contemporary | Neutral, one accent | Flat-front, glass, metal | Matching finish | Layered, dimmers | Mixed metals without a plan |
| Luxury | Neutral, marble, brass | Marble, brass, walnut | Brass, matching | Pendant, layered | Clutter, mismatched hardware |
Use the same finishes throughout, with natural timber fronts reflecting sideboard, shelving, and brick tones, to tie the kitchen into the living space. A clean white island merges with walls in the rest of the space, while a jet black island creates contrast with white walls and black lines. To reinforce the look, use the same hardware finish across kitchen and living furniture, because mixed hardware without a plan looks accidental.
Lighting Plan by Zone: Kitchen, Dining, Living
Lighting defines mood and zones, because the same spotlight does not work for every scene. Use warm, inviting light in the living room and brighter, functional light in the kitchen, so each area feels distinct yet connected. That layered plan is like stage design: different scenes need different lighting, and one flat overhead light flattens the whole room.
Lighting Table
| Zone | Fixture | Kelvin | Placement | Dimmer |
| Kitchen counter | Recessed, under-cabinet | 5000K daylight | Over counter, task areas | Yes, per zone |
| Island | Pendant lights | 2700K–3000K warm to neutral | Over island, ceiling boundary | Yes, per zone |
| Dining table | Pendant lights | 2700K warm | Over table, dining boundary | Yes, per zone |
| Living sofa | Floor lamps, recessed, layered | 2700K warm | Near sofa, relaxing areas | Yes, per zone |
| General | Recessed, layered | 2700K–3000K | Throughout, layered | Yes, per zone |
Hang matching window treatments uniformly across all windows in both kitchen and living space, to frame the room as a single cohesive unit. Sheer linen drapes work well, because they let light travel while softening windows, and they echo soft living room comforts in the kitchen. Introduce warm, organic textures like leather bar stools or woven rattan pendants in the kitchen, to echo the soft comforts of the living room.
Storage System for Small Open Plan Kitchens
Storage is the make-or-break system for small open plan kitchens, because clutter defeats open plan calm faster than any layout mistake. Use ceiling-height cabinetry to add storage without growing the footprint, vertical shelving to use wall height, and drawer dividers plus shelf risers to increase effective capacity. Limit open shelving to appealing and functional pieces with a consistent theme, and rotate seasonally to prevent visual overload.
Storage Table
| Storage type | Best for | Capacity | Avoid |
| Ceiling-height cabinets | Small kitchens, no footprint growth | High, vertical | Heavy uppers that close in a narrow galley |
| Vertical shelving | Small kitchens, wall height | Medium, vertical | Overloading shelves, clutter |
| Floating shelves, 2–3 | Above counter, decor + everyday | Low to medium | Every wall, too many shelves |
| Drawer dividers | Utensils, small items | Medium, organised | No dividers, messy drawers |
| Shelf risers | Cabinets, double stacking | Medium, vertical | Overstacking, hard to reach |
| Hooks inside doors | Utensils, measuring tools | Low, hidden | Hooks that block door closing |
| Open shelving, limited | Appealing pieces, consistent theme | Low, curated | Clutter, mismatched items, every wall |
Mount two to three floating shelves above the kitchen counter, at heights that suit your ceiling, and add hooks inside cabinet doors for utensils. Place a mirror on the living room wall facing the largest window, to reflect light and make the space feel larger. Live with the layout for one month before buying anything decorative, because living with it reveals what storage you actually need, not what looks good in photos.
Noise and Smell System: Ventilation, Hood, Rugs, Glass
Noise and smells travel more easily in open plan, because there are no walls to block them, so plan ventilation and sound absorption from the start. Install a high-extraction range hood that vents to the exterior if feasible, or a strong recirculating hood with effective charcoal filters, and operate it while cooking and for some time after. That ventilation system matters more than any air freshener, because it removes smells at the source.
Noise and Smell Table
| Problem | Solution | Cost driver | Best for |
| Cooking smells | High-extraction hood, vented outside | Hood + ducting, verify US price | Strong-smelling cooking, frequent cooking |
| Cooking smells, no duct | Recirculating hood, charcoal filters | Hood + filters, replace filters regularly | Apartments, no exterior vent |
| Noise, general | Rugs, soft furnishings, curtains | Rug + curtains, verify US price | All open plan rooms |
| Noise, specific | Glass partition, broken plan divider | Glass + installation, verify US price | Noise concern, work from home, kids |
| Grease on fabrics | Durable fabrics, high double rubs rating | Fabric choice, verify rating | Near kitchen, great room configuration |
| Heat from cooking | Ventilation, hood, window airflow | Hood + windows | Summer cooking, large kitchens |
Check material durability for furniture near an open kitchen, because constant airborne grease from cooking degrades cheap fabrics faster in a great room configuration, according to one competitor. Choose durable fabrics with a high double rubs rating, and verify the rating before buying, because cheap fabrics near a kitchen wear out twice as fast. That durability check saves money, because replacing a sofa costs more than choosing a durable fabric at planning stage.
Remodel Path: Knock Through vs Extend vs Broken Plan (US Permits)
There are usually two routes to creating an open plan kitchen living room: knocking through, or extending, or both. Knocking through removes the wall between the existing kitchen and the adjoining room, while extending at the rear adds square footage and flexibility. Some projects combine both, producing the most dramatic transformation, but needing careful coordination of structural work, electrics, and installation sequencing.
Remodel Path Table
| Path | Wall removal | Permit (US, verify locally) | Engineer | Cost driver | Timeline (verify) |
| Knock through | Yes, internal wall | Yes, local permit, especially load-bearing | Yes, if load-bearing | Structural beam, electrics, flooring, lighting | Weeks, verify with contractor |
| Extend at rear | Yes, plus new footprint | Yes, local permit, zoning, setback | Yes, structural | Extension, foundation, roofing, kitchen, flooring | Months, verify with contractor |
| Both knock through + extend | Yes, plus new footprint | Yes, local permits, zoning, setback | Yes, structural | Structural, extension, kitchen, flooring, lighting | Months, verify with contractor |
| Broken plan, no wall removal | No, partial dividers only | Usually no structural permit, verify locally | Usually no, verify | Glass, fireplace, shelving, lighting | Days to weeks, verify |
In most properties, the wall between kitchen and adjoining room is load-bearing, which means a structural beam and local permit approval are needed, according to one competitor (UK, but US load-bearing logic is similar — verify with a US engineer). The overall footprint stays the same with knock through, but the space feels significantly larger, because sightlines open and light travels. An extension allows for larger islands, better circulation, and clearer zoning, but it needs local zoning and setback checks, because US rules vary by locality and are not the same as UK permitted development.
Renter-Friendly Open Plan: No Wall Removal, Furniture and Lighting
Renters cannot remove walls, but they can create an open plan feel with furniture zoning, rug zoning, lighting zoning, and portable islands. Use a sofa or low shelf as a divider, a rug to anchor the sofa zone, pendant-style lighting to create a ceiling boundary, and a consistent palette to unify the room. That system gives you open feel without permanent changes, and it moves with you when you move.
Renter Checklist
- Furniture divider: Use a sofa or low shelf as a divider, with its back to the kitchen, facing the living zone.
- Rug zoning: Use a rug to anchor the sofa zone, big enough for front legs, ideally all four legs.
- Lighting zoning: Use pendant-style lights and layered lighting to create a ceiling boundary over the kitchen zone.
- Portable island: Use a butcher-block cart on locking casters as a moveable island, with storage and prep space.
- Consistent palette: Use a consistent neutral palette across both zones, with pops of colour in cushions and art.
- No permanent changes: Avoid full-height partitions, wall removal, and permanent fixtures, because they defeat renter flexibility.
Avoid full-height partitions, because they defeat the purpose of open plan, and avoid buying furniture that only fits one room. Choose multifunctional furniture that adapts quickly, like folding tables and storage benches with dual functions, because renter rooms need flexibility. That adaptability matters, because a renter layout that works in one apartment may need to work in the next apartment too.
Style System: Modern, Farmhouse, Scandinavian, Industrial, Contemporary
Style in open plan is not about matching furniture, it is about material logic, because a room that shares a material language reads as one room. Pick your style first, then reverse-engineer the material logic before buying a single piece of furniture, because that logic decides palette, material, hardware, and lighting. That approach saves you from an expensive redo when the space feels off at the end.
Modern Open Plan
Modern open plan uses flat-front cabinets, polished concrete or large-format tiles, and a neutral palette with black or chrome hardware. It suits clean, minimal rooms, because flat fronts fade into walls and create a seamless look. Avoid clutter and busy patterns, because modern style needs calm surfaces to work.
Farmhouse Open Plan
Farmhouse open plan uses wood cabinets, butcher block, shiplap, and a warm palette with black iron hardware. It suits family homes, because wood and butcher block feel warm and durable, and a range hood with real airflow handles family cooking. Avoid a range hood without real airflow, because farmhouse cooking needs ventilation, not just a decorative hood.
Scandinavian Open Plan
Scandinavian open plan uses warm ash, not gray, light oak, white walls, and a light, airy palette with brass or light wood hardware. It suits small rooms, because light wood and white walls make the space feel larger and brighter. Avoid gray that looks cold, and dark accent walls that shrink small rooms, because Scandinavian style needs warmth, not cold gray.
Industrial Open Plan
Industrial open plan uses exposed brick, steel, dark wood, and black metal hardware, with pendant and Edison lighting. It suits lofts and character rooms, because brick and steel already exist in the architecture. Avoid a rug too small for the sofa, because industrial style needs a rug big enough for all four sofa legs to anchor the seating zone.
Contemporary and Luxury Open Plan
Contemporary open plan uses flat-front cabinets, glass, metal, and a neutral palette with one accent, plus layered lighting with dimmers. It suits medium to large rooms, because contemporary style needs clean lines and layered light to feel intentional. Luxury open plan uses marble, brass, walnut, and a neutral palette with matching brass hardware, plus pendant and layered lighting, for a high-end great room.
Mistakes to Avoid With Open Plan Layouts
Mistake 1: Island Too Big for the Room
Island too big for the room blocks walkways, dominates the living area, and makes circulation cramped, even if the island looks beautiful in photos. A large island in a small room fails on flow, not on style, because walkways need 36 inches minimum. Fix it by measuring walkways first, choosing a narrow island about 24 inches deep for small rooms, or using a portable cart instead of a fixed island.
Mistake 2: Sofa Too Big for the Room
Sofa too big for the room dominates the living zone, blocks walkways, and makes the room feel cramped, even if the sofa is comfortable. A full sofa in a room under 400 sq ft fails on scale, because it leaves no room for circulation or a dining table. Fix it by choosing a loveseat 55–63 inches wide for small rooms, and skipping the coffee table if walkway width drops below 28 inches.
Mistake 3: Rug Too Small for the Sofa Zone
Rug too small for the sofa zone makes the living area look disconnected, because the rug floats in the room instead of anchoring the seating. A rug that only fits under a coffee table, not under sofa legs, fails to define the zone. Fix it by measuring sofa plus coffee or side table first, then choosing a rug big enough for front legs, ideally all four legs.
Mistake 4: Flooring Mismatch Between Zones
Flooring mismatch between zones breaks flow, because tiles in the kitchen plus carpet in the living room create a visual wall where you wanted openness. That split makes the room look smaller, because the eye stops at the flooring change. Fix it by using the same flooring across both zones, with rugs to define zones, not a flooring change.
Mistake 5: Flat Lighting With No Zoning
Flat lighting with no zoning makes the room feel flat and undefined, because one overhead light does not distinguish kitchen, dining, and living zones. That flat light also makes the room feel smaller, because zones blur together without lighting boundaries. Fix it by using layered lighting by zone, with pendant lights over the island, 5000K daylight in the kitchen, and 2700K warm light near the sofa, plus dimmers per zone.
Mistake 6: Ignoring Noise and Smells
Ignoring noise and smells makes open plan frustrating in daily use, because cooking smells and kitchen noise travel to the living zone without walls to block them. That frustration grows over time, even if the layout looks good in photos. Fix it by installing a high-extraction hood, using rugs for sound absorption, and considering a broken-plan divider like glass or shelving if noise or smells are a daily concern.
Shopping List for Open Plan Kitchen Living Room Layout
Use this list as a starting point, not a fixed cart, and verify US price, size, and availability before buying. Choose products by room size, layout, and zoning need, not by marketing alone, and measure walkways before ordering furniture. A shopping list without measurements will lead to returns and blocked walkways.
Shopping Table
| Item | Budget pick | Mid pick | Premium pick | Notes |
| Kitchen island | Portable cart, locking casters | Narrow island, 24 inches deep | Standard island, seating for 4–6 | Verify size, clearance, US price |
| Peninsula counter | Counter extension, bar seating | Peninsula with storage | Custom peninsula, seating + storage | Verify size, clearance, US price |
| Bar stools | Bar stools, counter height | Bar stools, adjustable | Leather bar stools, counter height | Match counter height, clearance behind |
| Pendant lights | Pendant lights, warm | Pendant lights, dimmable | Rattan pendant lights, dimmable | Over island, ceiling boundary, dimmers |
| Rug, living | Flat-weave rug, front legs | Plush rug, all four legs | Large rug, all seating legs | Measure sofa + table first |
| Sofa | Loveseat, 55–63 inches | Full sofa, 72–84 inches | Sectional, large rooms | Measure walkways first |
| Flooring | Luxury vinyl plank | Engineered wood | Hardwood, large-format tile | Same flooring both zones, water-resistant kitchen |
| Range hood | Recirculating hood, charcoal filters | High-extraction hood, vented | High-extraction hood, real CFM | Verify CFM, ducting, US price |
| Open shelving | Floating shelves, 2–3 | Floating shelves, consistent theme | Custom shelving, consistent theme | Limit to appealing pieces, rotate seasonally |
Expert Tips for Open Plan Kitchen Living Room Layout Ideas
- Measure first, buy last. Measure walkways, island clearance, and sofa size before ordering furniture, because measurements decide layout success.
- Tape the layout on the floor. Use painter’s tape to outline kitchen and living zones, and live with the taped layout before buying furniture.
- Choose layout by room size. One-wall for small, L-shaped for square, peninsula for narrow, island for medium to large with clearance.
- Zone with island, rug, and lighting. Island as divider, rug as anchor, pendant as ceiling boundary, with consistent flooring to unify.
- Keep 36 inches clearance around islands. At least 36 inches on every walkway side, and 36–48 inches for comfortable circulation.
- Use the same flooring both zones. Consistent flooring makes the room look larger, while rugs define zones without a flooring change.
- Use 5000K kitchen, 2700K living. Daylight task light in the kitchen, warm relaxing light near the sofa, with dimmers per zone.
- Share one material language. Continuous flooring, matching hardware, one dominant neutral cost nothing at planning and save an expensive redo.
- Check permits before removing walls. Load-bearing wall removal needs an engineer and local permit, because US codes vary by locality.
- Live with the layout for one month. Live with the layout before buying decor, because daily use reveals storage and zoning needs that photos hide.
FAQs
What is the best layout for an open plan kitchen living room?
Best layout depends on room size and shape, with one-wall for small or loft, L-shaped for square or medium, galley for narrow, island for medium to large, and peninsula for narrow with divider need. Use the layout chooser table, not a single “best” layout, because size and shape decide workflow. Measure walkways first, because a layout that blocks circulation fails, no matter how beautiful it is.
How do I zone an open plan kitchen living room without walls?
Use an island or peninsula as a mid-height divider, a rug to anchor the sofa zone, pendant lights over the island as a ceiling boundary, consistent flooring to unify, and furniture placement to define zones. That combination creates order without blocking light or sightlines, because each tool has a different job. Avoid full-height partitions, because they defeat the purpose of open plan.
How do I separate the kitchen from the living room in an open plan?
An island or peninsula is the most effective zoning tool, because it creates a mid-height physical boundary without blocking light or sightlines. Position it so seating faces the living zone, leave at least 36 inches clearance on every walkway side, and add rug plus lighting zoning for a clear boundary. If floor space will not allow a fixed island, a portable cart on locking casters gives the same boundary you can move.
Can I have a kitchen island in a small open plan space?
Yes, if total space allows, with a narrow island about 24 inches deep and at least 36 inches clearance around it. A portable butcher-block cart on locking casters gives the same boundary you can move when you need floor clear, which suits small rooms better than a fixed island. Measure walkways first, because an island that blocks circulation fails, even if it fits on a floor plan.
How big should a kitchen island be in an open plan?
By room size, with small rooms needing a narrow island about 24 inches deep, medium rooms handling a standard island with seating for two to three, and large rooms handling a large island with seating for four to six. Measure walkways first, because an island that blocks circulation fails, no matter how beautiful it is. Keep at least 36 inches clearance on every walkway side, and more if the island has seating or appliances.
How much clearance do I need around a kitchen island?
At least 36 inches on every walkway side, and 36–48 inches for comfortable circulation. That clearance accounts for chairs and stools pulled out, not just pushed in, because seating needs space to move. If the island has a hob or sink, allow more clearance, because cooking and cleaning need elbow room plus walkway space.
What is the best layout for a small open plan kitchen living room?
L-shaped or galley kitchen along one wall works best for small rooms, with living area opposite the kitchen counter so you face away from the stove while sitting. A small island with two bar stools replaces a dining table and saves floor space, while a loveseat beats a full sofa in rooms under 400 sq ft. Use light colours, consistent flooring, and a rug to anchor the sofa zone, without a fixed island that blocks walkways.
What is broken plan vs open plan?
Open plan removes full walls for light and social flow, while broken plan keeps that light but adds partial dividers to block noise and cooking smells. Broken plan dividers include glass partitions, double-sided fireplaces, open shelving, and sliding or pocket doors, which keep visual connection plus acoustic benefits. Choose broken plan if noise, smells, or privacy are daily concerns, and open plan if social flow and light matter most.
Should kitchen and living room flooring match?
Yes, use the same flooring across both zones to prevent visual fragmentation and to make the space look larger. Engineered wood or luxury vinyl plank are durable, beautiful, and practical, with water-resistant finishes near sinks and appliances. Use rugs to define zones, not a flooring change, because a flooring change creates a visual wall where you wanted openness.
Should kitchen and living room furniture match?
No, furniture should coordinate and harmonise, but not match exactly, because identical woods and fabrics across a great room can look uniform and catalog-like. Aim for a cohesive palette, with one dominant neutral, matching hardware, and accents that echo kitchen colours in living room pillows or art. That coordination makes the room feel intentional, while exact matching makes it feel like a showroom.
What colours make an open plan kitchen living room look bigger?
White or light gray walls paired with light wood flooring make the space feel larger, with a restrained neutral palette and reflective surfaces like glass and mirrors. Avoid dark accent walls in rooms under 375 sq ft, because they shrink the space visually, and use bright or neutral walls with brighter accents in accessories. That light palette, plus consistent flooring and smart lighting, creates a larger, brighter feel.
How do I handle noise in an open plan kitchen living room?
Use rugs for sound absorption, soft furnishings, and glass partitions or broken-plan dividers for noise, because open plan lets noise travel more easily. Rugs alone help, but a glass partition or double-sided fireplace adds real noise control while keeping light. Plan noise from the start, because adding a divider after a remodel costs more than planning it at layout stage.
How do I handle cooking smells in an open plan?
Install a high-extraction range hood that vents to the exterior if feasible, or a strong recirculating hood with effective charcoal filters, and operate it while cooking and for some time after. That ventilation removes smells at the source, while air fresheners only mask them. Choose a hood with real airflow for your cooking style and room size, and verify airflow ratings before buying.
Do I need a permit to remove a wall in the US?
Yes, in most cases, especially for a load-bearing wall, which needs a structural beam and local permit approval, plus a structural engineer assessment. Verify with your local building department, because permits and codes vary by US state and locality, and do not use UK permitted development as a US rule. That local check matters, because a wall that looks non-load-bearing may still carry structural loads.
Is open plan better than closed plan?
Open plan is better for social flow, light, entertaining, and small-space feel, while closed plan is better for noise control, smell control, privacy, and hiding a messy kitchen. Broken plan is the hybrid that keeps light but adds noise and smell control, which suits families and frequent cooks. Choose by actual use, not by trend, because a layout that looks good in photos but fails on daily use will frustrate you for years.
How do I light an open plan kitchen living room?
Use layered lighting by zone, with pendant lights over the island as a ceiling boundary, recessed or layered lighting in the living room, 5000K daylight over the kitchen counter, and 2700K warm light near the sofa. Add dimmers per zone, so kitchen, dining, and living can be lit separately, because one flat overhead light flattens the whole room. Hang matching window treatments uniformly across all windows to frame the room as a single cohesive unit.
What size sofa fits a small open plan living room?
A loveseat 55–63 inches wide beats a full sofa in rooms under 400 sq ft, because a full sofa blocks walkways and dominates the room. Skip the coffee table if walkway width drops below 28 inches, and use a side table or wall-mounted shelf instead. Measure walkways first, because a sofa that fits on a floor plan may still block circulation in real life.
How do I add storage to a small open plan kitchen?
Use ceiling-height cabinetry, vertical shelving, magnetic knife strips, drawer dividers, shelf risers, hooks inside cabinet doors, and two to three floating shelves above the counter. Limit open shelving to appealing and functional pieces with a consistent theme, and rotate seasonally to prevent visual overload. That storage system adds capacity without growing the footprint, which is essential in small open plan kitchens.
Can renters create an open plan feel without removing walls?
Yes, with furniture zoning, rug zoning, lighting zoning, a consistent palette, and a portable island or butcher-block cart on locking casters, without permanent changes. Use a sofa or low shelf as a divider, a rug to anchor the sofa zone, and pendant-style lighting to create a ceiling boundary. Avoid full-height partitions, because they defeat the purpose of open plan, and choose multifunctional furniture that moves with you.
What is the best kitchen layout for a narrow open plan room?
Peninsula layout for narrow rooms, because it creates division without restricting circulation, or galley kitchen opening into living space, because it keeps everything within easy reach. Use light colours, avoid bulky upper cabinets, and keep the living room simple so the transition feels smooth. A floating island in a narrow room blocks walkways, while a peninsula attached to one wall creates division plus seating without blocking circulation.
Conclusion
Open plan kitchen living room layout ideas work when layout, zoning, and measurements work together, not when a single photo inspires a purchase. Choose your kitchen layout by room size and shape, zone with an island or peninsula, a rug, pendant lighting, and consistent flooring, and keep at least 36 inches clearance around islands and walkways. That system gives you light, social flow, and order, without the cramped flow, noise, and clutter that make open plan frustrating.
Start by measuring your room, taping kitchen and living zones on the floor, and living with that taped layout before buying furniture. Pick your style by material logic, with continuous flooring, matching hardware, and one dominant neutral, so both zones read as one room. Check local permits and structural requirements before removing any wall, because US codes vary by locality and load-bearing walls need engineer advice.
That measured, zoned approach is what turns open plan kitchen living room layout ideas from inspiration into a room you actually enjoy living in. Measure first, choose layout by size, zone without walls, and live with the layout for a month before buying decor, because daily use reveals what photos hide.
