
Attic bedroom ideas work best when slope comes first and colour comes second, because a beautiful paint shade cannot fix a bed that blocks a walkway. A sloped ceiling decides where you can stand, sit, dress, and store clothes, while paint only changes how that slope looks. Smart attic rooms start with measurements, headroom, light, and storage, then add style on top of a plan that already works.
Attic bedroom ideas also split into two very different jobs: decorating an existing attic room, and converting a raw attic into a bedroom. Decorating means choosing a bed, storage, lighting, and colour for a room that already meets basic safety and comfort needs. Converting means checking structure, stairs, insulation, heating, egress, and permits before any furniture arrives, since those decisions cost far more than bedding.
Attic bedroom ideas fail most often when owners buy tall furniture before measuring ceiling height at several points. A dresser that fits on the tallest wall may hit the slope on a side wall, while a tall headboard can make a low room feel cramped and highlight the angle. Low, long furniture usually suits attics better, because horizontal lines follow the roofline instead of fighting it.
Attic bedroom ideas also need a legal honesty check, because a room with a bed is not automatically a legal bedroom. Model code summaries used here give 7 feet of ceiling over at least 50 percent of floor area, 70 square feet minimum with no dimension under 7 feet, and an egress opening of 5.7 square feet. Local adopted code governs, so every code number below carries a verify locally instruction.
What Makes an Attic Bedroom Work, in One Clear Answer
Slope First, Colour Second
Slope first planning means mapping ceiling height zones before choosing paint, bedding, or furniture style. Start by marking where the ceiling reaches 7 feet, where it drops below 5 feet, and where you can stand comfortably. Those zones decide bed placement, storage placement, desk placement, and walkway placement, while colour only finishes the result.
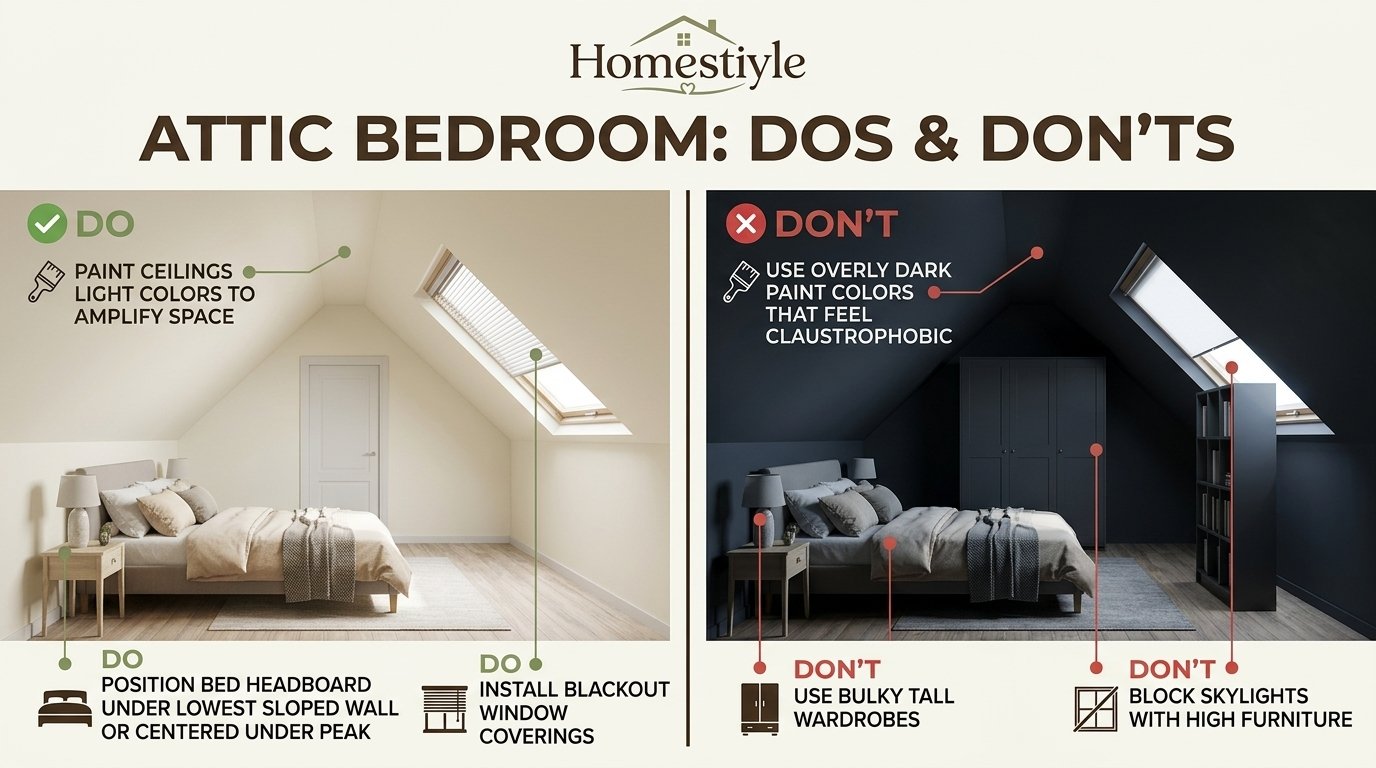
Colour second planning still matters, because light paint and matte finishes help a low room feel larger and calmer. Pale whites, creams, soft greiges, muted blues, and gentle greens reflect light and blur the line between wall and ceiling. Dark paint can also work, yet it needs a strong light plan, since dark slopes without enough light feel smaller rather than cosier.
Slope first planning also prevents wasted furniture purchases, because a bed, wardrobe, or desk chosen by style alone may not fit the slope at all. Measure ceiling height at the bed head, bed foot, dressing area, desk chair, and walkway before ordering anything large. A tape measure and a simple ceiling map save more money than any sale price.
Usable Floor Area, Not Taped Floor Area
Usable floor area means the floor area you can actually stand and use, not the total tape measurement from wall to wall. Floor area under a ceiling lower than 5 feet generally does not count toward minimum room size in model code summaries, even when it holds storage. A room that tapes at 300 square feet may only credit 180 to 200 square feet as usable, which changes layout, furniture, and legal status.
Usable area calculation starts with peak height, 7 foot zone, and 5 foot exclusion, measured carefully across the room. Mark a line where the slope reaches 7 feet, measure the floor between those lines, then note the low zones separately as storage or seating only. That simple map shows whether a room works as a primary suite, a guest room, or only a reading nook.
Usable area also explains why two attics with the same footprint can feel completely different. A steep roof gives more 7 foot zone and more standing room, while a shallow roof gives long low zones that suit drawers but not dressing. Roof pitch, ridge height, and knee wall height matter more than total square footage for daily comfort.
Legal Bedroom Versus Bonus Room, Why the Label Matters
Legal bedroom status affects permits, appraisal, listing, insurance, and resale, not just the word used on a bedroom door. A room that fails ceiling, egress, size, heating, or alarm rules may still hold a bed, yet an appraiser may call it a bonus room and a buyer agent may flag it during inspection. That label difference can change value, financing, and buyer confidence sharply.
Bonus room status is not a failure by itself, since many attics work well as guest lofts, reading rooms, studios, or playrooms without legal bedroom status. Owners should choose the label honestly, based on code, rather than marketing a bonus room as a bedroom to gain a bedroom count. Honest labelling protects sellers, buyers, insurers, and future owners equally.
Legal bedroom status also requires heating, light, ventilation, electrical safety, and alarms, not only ceiling and egress. A room must maintain heat at a habitable level without relying on a plug in space heater alone, and it needs smoke and carbon monoxide alarms in the right places. Those systems cost money, yet they protect sleepers far more than any decorative finish.
| Decision | Measure first | Why it matters |
|---|---|---|
| Bed placement | Sitting, standing, dressing headroom | Prevents head bumps and wasted floor |
| Storage placement | Eave height and drawer depth | Turns low zones into useful storage |
| Light plan | Dormer, skylight, window position | Controls brightness, heat, and privacy |
| Legal status | Ceiling zone, egress, size, heat, alarms | Decides bedroom versus bonus room |
| Budget | Scope, structure, dormer, ensuite, stairs | Prevents mid project budget collapse |
Attic Bedroom at a Glance
Four Moves That Solve Most Attic Rooms
Four moves solve most attic rooms: place the bed by headroom, push storage into low zones, add light at the slope, and keep the centre clear. Bed placement by headroom gives comfortable sitting and dressing, while storage in low zones keeps the centre open for walking. Light at the slope, through dormers or skylights, lifts the whole room, while a clear centre prevents a small room from feeling crowded.
Centre clearance matters because walkways, door swings, and dressing space need full height more than furniture does. A bed can sit under a slope, yet a walkway under a slope forces constant ducking and frustration. Keep the main path under the tallest ceiling, even when that means moving a dresser or desk to a side wall.
Light at the slope matters because attic corners stay dark without a dormer, skylight, or layered lighting plan. A single overhead light often leaves sloped corners dim, while layered lighting with recessed lights, sconces, and a small lamp fills each zone. Dimmers help too, since bright task light and soft evening light serve different moments in the same room.
What to Measure Before You Buy Furniture
Measure ceiling height at bed head, bed sides, dressing area, desk chair, walkway, and door swing before buying any large furniture. Measure knee wall height, eave depth, window sill height, and stair headroom as well, since those numbers decide drawer depth, wardrobe type, and access. Write measurements on a simple room sketch, with slope direction marked clearly.
Measure furniture too, especially bed height, headboard height, nightstand height, dresser height, and desk height, against ceiling height at each planned spot. A nightstand of 18 to 20 inches suits many low attic rooms, while a tall dresser suits only the tallest wall. A low platform bed often suits attics best, since it lowers sitting height and opens sightlines under the slope.
Measure door and stair clearance as well, because large furniture must travel up stairs and through doors to reach an attic room. A wardrobe that fits the room may not fit the stair turn, while a mattress may need a different route or a smaller size. Check stair width, turn clearance, and headroom before ordering bulky pieces.
Bed Placement Under a Sloped Ceiling
Bed Head Against the Gable Wall, Best for Standing and Dressing
Bed head against the gable wall suits rooms where the gable wall offers the tallest, flattest surface for a headboard and bedside tables. Gable walls give full height for standing, dressing, and making the bed, while the slope falls away to the sides rather than over the sleeper. That placement also leaves side walls free for storage, art, or a desk under a dormer.
Gable wall placement works best when the bed width fits the gable wall without blocking windows, doors, or walkways. A queen bed needs side clearance for getting in and out, plus nightstand space, so a narrow gable wall may suit a twin or full bed better. Measure gable width, window position, and door swing before committing to this classic layout.
Gable wall placement also suits couples and primary suites, since both sleepers get similar headroom and similar access to bedside storage. A centred bed on a gable wall feels balanced and intentional, while a bed pushed into a corner can feel cramped for the wall side sleeper. Symmetry helps in small rooms, yet comfort should beat symmetry when space is tight.
Bed Under the Slope, Best for Low Profile Sleeping Only
Bed under the slope suits sleepers who want a cosy, tucked in sleeping nook with a low platform bed and minimal headboard height. Slope placement uses space that would otherwise hold only storage, since lying down needs less headroom than standing. A low bed under a slope can feel like a cabin berth, especially with built in shelves and soft lighting nearby.
Slope placement fails when sleepers must sit up, dress, or make the bed under the lowest ceiling, since those actions need more headroom than lying flat. Test sitting height in bed, with pillows, before choosing slope placement, and leave full height space beside the bed for dressing. A bed under a slope needs a clear standing zone nearby, or daily routines become annoying quickly.
Slope placement also needs lighting that suits lying down, such as wall sconces, clamp lights, or LED strips along the slope, rather than a pendant that hangs into head space. Reading lights should sit beside the bed, not above the sleeper, to avoid glare and head bumps. A small shelf behind the headboard can hold books and a phone without eating floor space.
Bed Between Two Dormers, Best for Light and Symmetry
Bed between two dormers suits rooms with two dormer windows on the same wall, where light falls across the bed from both sides. Dormer light makes the bed feel bright and open, while dormer headroom gives standing space at the bed sides. That layout also creates natural symmetry, with a dormer, a bed, and a dormer forming a balanced focal wall.
Bed between dormers works best when dormer spacing matches bed width, so the bed does not block a dormer seat or a walkway. A bed that blocks a dormer window wastes light and access, while a bed centred between dormers keeps both windows usable. Measure dormer width, spacing, and sill height before choosing this layout, especially for a queen or king bed.
Bed between dormers also suits guest rooms and primary suites, since guests wake to natural light and owners gain a clear, photogenic focal wall. Blackout shades on dormers help sleep, since morning light through two windows can wake sleepers early. Roman shades or relaxed linen curtains soften dormer angles without swallowing light completely.
Bed Perpendicular to Windows, Best for Floor Space
Bed perpendicular to windows suits rooms where floor space matters more than window symmetry, since the bed leaves the window wall open for other uses. Light falls across the bed rather than directly onto pillows, which suits sleepers who dislike morning sun on their faces. That layout also leaves the window wall free for a desk, reading chair, or storage bench.
Bed perpendicular to windows works best when walkway clearance remains clear around the bed foot and sides, without blocking a door or stair entry. A bed that juts into the centre can split a small room into two cramped paths, while a bed tucked against a side wall keeps one clear path. Measure bed length plus walkway width before choosing a perpendicular layout, especially in narrow attics.
Bed perpendicular to windows also suits small attics with one large dormer, since the dormer becomes a lounge or desk zone rather than a bed backdrop. A dormer reading nook beside a perpendicular bed creates two distinct zones, sleeping and lounging, in one small room. That zoning makes a small attic feel larger, because each zone has a clear purpose.
Headroom Test: Sitting Up, Standing, Dressing, Making the Bed
Headroom test one, sitting up, checks whether a sleeper can sit upright in bed without hitting the slope, with pillows and a reading position included. A bed that passes lying flat but fails sitting up will frustrate readers, phone users, and morning risers daily. Test sitting height with the actual mattress and pillow thickness, not with a bare frame measurement.
Headroom test two, standing, checks whether a sleeper can stand beside the bed without ducking, for dressing, making the bed, and reaching storage. Standing headroom matters most at the bed sides, dressing area, and walkway, not at the bed head alone. A room that forces ducking beside the bed feels cramped even when the bed itself feels cosy.
Headroom test three, dressing and making the bed, checks whether a sleeper can bend, reach, and move bedding without hitting the slope or a low beam. Making a bed under a slope often requires standing at the foot or side, not at the head, so plan a full height spot for that task. A simple headroom test before furniture arrives prevents daily annoyance for years.
| Bed placement | Best for | Watch out for |
|---|---|---|
| Head against gable wall | Standing, dressing, couples, symmetry | Gable width, window and door blocking |
| Under the slope | Low platform bed, cosy nook, small rooms | Sitting, dressing, making bed headroom |
| Between two dormers | Light, symmetry, guest and primary rooms | Dormer spacing, blackout needs, bed width |
| Perpendicular to windows | Floor space, dormer lounge zone, narrow rooms | Walkway blocking, bed length plus path |
| Corner bed, twin or daybed | Kids, guests, tiny attics, reading nook | Wall side access, making bed difficulty |
Layouts by Room Size
Small Attic Bedroom, Under 150 Square Feet Usable
Small attic bedrooms need one clear purpose, low furniture, and built in storage, since every extra piece crowds the room. A twin, full, or queen platform bed with storage drawers, plus knee wall drawers, often replaces a separate dresser entirely. A floating nightstand or small wall shelf can replace a bulky nightstand, while a mirror on the tallest wall adds depth.
Small rooms benefit from open layout, light palette, and continuous flooring, which make the room feel larger without adding square footage. Pale matte plank flooring running wall to wall, plus the same light colour on walls and ceiling, blurs slope lines and opens sightlines. A single statement piece, such as a textured throw or a small gallery wall, adds personality without clutter.
Small rooms also need strict circulation discipline, with one clear path from stair entry to bed, window, and storage. Avoid filling every eave with furniture, since a little breathing space makes a compact room feel generous and easier to move through. A small room that breathes feels larger than a small room packed with storage.
Medium Attic Bedroom, 150 to 300 Square Feet Usable
Medium attic bedrooms support a bed, a desk or reading chair, and a wardrobe zone, without forcing every function into one corner. A queen bed on the gable wall, a dormer desk or reading nook, and knee wall storage along one slope create three clear zones. That zoning helps couples, guests, and workers share one room without constant compromise.
Medium rooms benefit from area rugs and lighting zones, which define sleeping, working, and lounging areas without walls. A rug under the bed anchors the sleeping zone, while a sconce and small table define a reading zone, and a desk lamp defines a work zone. Lighting zones also help at night, since a sleeper can read without lighting the whole room.
Medium rooms can also support a small ensuite or a dressing area, provided plumbing location, headroom, and ventilation allow it. An ensuite in a medium attic needs careful placement, with shower and toilet in full height zones and storage in low zones. A dressing area under a slope, with drawers and hanging rails by height, often works better than a separate closet room.
Large Attic Bedroom and Primary Suite, Over 300 Square Feet Usable
Large attic bedrooms support a primary suite with sleeping, sitting, dressing, and ensuite zones, plus a walk in closet under the eaves. A king bed on the gable wall, a sitting chair near a dormer, a dressing area along a slope, and an ensuite near existing plumbing create a complete suite. That scale suits couples who want a private top floor retreat away from main living areas.
Large suites benefit from open plan zoning without extra walls, since walls chop up sloped ceilings and block light flow. Area rugs, lighting, and furniture placement define zones better than partitions, while sliding doors save swing clearance for ensuite and closet entries. Open zoning also lets skylight and dormer light travel across the whole suite.
Large suites also need temperature and sound planning, since a large attic runs hotter in summer and colder in winter than a small room. Mini split zoning, insulation, air sealing, and acoustic insulation between floors help a large suite stay comfortable and quiet. A large suite that overheats or echoes will feel less luxurious than its size suggests.
Narrow Attic Bedroom, Long and Tight
Narrow attic bedrooms need a linear layout, with bed, storage, and desk arranged along the long axis rather than across it. A bed at one gable end, storage along one slope, and a desk or reading nook at the other gable end keeps one clear path down the centre. That linear plan prevents a narrow room from feeling like a corridor with furniture blocking the way.
Narrow rooms benefit from horizontal lines, long low storage, and a striped rug running along the length of the room. A long low wardrobe or drawer run along a knee wall reads as one orderly wall, while a striped rug draws the eye along the room rather than up to the slope. Mirrors on a long wall can add depth, yet they should sit opposite a window for best light effect.
Narrow rooms should avoid tall furniture in the middle, since tall pieces break the long sightline and make the room feel segmented. Keep tall storage on a gable end wall, low storage along slopes, and the centre clear for walking. A narrow room with a clear centre path feels longer and calmer than a narrow room with furniture islands.
Wide Attic Bedroom, Gable to Gable
Wide attic bedrooms support two zones side by side, such as sleeping on one gable and lounging or working on the other gable. A wide room can hold a king bed, two nightstands, a desk, a reading chair, and a wardrobe zone without crowding, provided slope zones are mapped first. Wide rooms suit couples, families, and guest suites with flexible sleeping arrangements.
Wide rooms benefit from symmetry and balance, with a centred bed, matching nightstands, and paired lighting on the main gable wall. Symmetry helps a wide room feel intentional rather than empty, while a second zone on the opposite gable adds function without clutter. A wide room with only a bed in the middle can feel unfinished, so a second zone matters.
Wide rooms should still avoid filling the centre with furniture, since the centre offers the best headroom and circulation in a wide attic. Keep the centre as a walkway and gathering space, with furniture pushed to gable ends and low zones. A wide room that keeps its centre clear feels grand, while a wide room packed in the middle feels busy.
Layouts by Who Sleeps There
Primary Suite for a Couple, Storage for Two, Ensuite, Sitting Area
Primary suites for couples need storage for two, dressing space for two, and an ensuite that does not steal sleeping space. A king or queen bed on the gable wall, two nightstands, a shared wardrobe zone under a slope, and an ensuite near plumbing create a workable suite. Couples should split storage by person, with separate drawers and hanging zones, to avoid morning conflict.
Primary suites benefit from a sitting area near a dormer, where a chair, small table, and reading light create a private lounge within the suite. A sitting area helps couples use the suite for reading and relaxing, not only sleeping, which matters for a top floor retreat. A sitting chair should sit in full height space, not under a low slope where standing feels cramped.
Primary suites also need sound and temperature control, since a top floor suite sits above other bedrooms and living areas. Acoustic insulation, thick underlayment, rugs, and a mini split with separate control help a suite stay quiet and comfortable. Couples should test sound and temperature at different times of day before finalising finishes.
Guest Bedroom, Twin Nook, Flexible Bed, Easy Storage
Guest bedrooms need flexible sleeping, easy storage, and simple controls, since guests should not need instructions to sleep comfortably. Two built in twins along opposite eaves create a flexible guest loft for siblings, friends, or holiday overflow, with individual reading sconces and drawers for spare blankets. A shared trunk or slim chest between beds can serve as a nightstand and keep traffic flowing down the middle.
Guest rooms benefit from light, durable palettes and washable textiles, since guests bring different habits and needs. Beadboard, striped cotton, woven rugs, and pattern only on pillows and throws allow seasonal changes without repainting. Hooks along a knee wall can replace bulky wardrobes, while a narrow mirror helps with morning routines.
Guest rooms should include clear light and shade controls, since guests may wake early to skylight or dormer light. Blackout shades on skylights and dormers, plus a simple bedside lamp and sconce, let guests control brightness without searching for switches. A small guide card with Wi-Fi, shade, and heating controls helps guests feel welcome rather than confused.
Kids Bedroom, Bunk, Twin, Play, Safety, Headroom for Children
Kids bedrooms suit attics well, because children need less headroom than adults and enjoy cosy, nook-like spaces. Built in bunk beds under a pitched ceiling, twin beds flush to a low wall, and a bookshelf at the foot of beds maximise a tight, narrow attic. Kids furniture fits low zones naturally, while adults can use full height zones for supervision and play.
Kids rooms need safety first, with guardrails on bunks, secure shelving, cord management, and no climbable furniture near windows or skylights. Stairs need handrails, lighting, and a safe landing, while low ceilings need padding or awareness for taller children and adults. A kids attic should feel fun, yet it must also pass the same egress, alarm, and heating checks as any bedroom.
Kids rooms benefit from play and storage zones, with toy carts under desks, wall mounted book displays, and pull out bins under eaves. Rolling carts can tuck under desks or closets when not in use, while wall mounted book displays keep stories within reach and add colour. A reading nook with pillows or bean bags in the lowest slope can turn a tricky corner into a favourite spot.
Teen Bedroom, Desk in Dormer, Study, Storage, Personality
Teen bedrooms need sleep, study, and storage zones, with personality that teens help choose. A bed under the lowest pitch, a compact study nook in a dormer or gable end where head height improves, and peg rails along a knee wall for bags and headphones create a workable teen loft. A wall to wall desk with a pinboard keeps assignments visible, while LED strips under shelves add glow without harsh overhead light.
Teen rooms benefit from durable, wipeable finishes and colour blocking, since teens use rooms hard and change tastes quickly. Colour blocking one sloped plane adds personality without crowding the room, while durable surfaces survive study, gaming, and social time. Smart zoning keeps mess contained and gives a sense of ownership, which helps teen buy in.
Teen rooms should include charging, lighting, and storage for tech, with outlets near the desk, bed, and reading nook, plus cable management that does not trail across walkways. A sleek ladder or alternating tread stair can save floor space, yet code compliant stairs matter more than a ladder look for a legal bedroom. Parents should check stair code before choosing a space saving stair type.
Nursery, Crib Away From Windows, Soft Light, Safe Storage
Nurseries in attics need soft light, safe storage, and a crib away from windows, to protect sleep and safety. A crib placed a little away from windows lets soft natural light filter in without direct sun or draught on the baby, while a changing area and storage sit in full height zones. Soft, washable textiles and low, secure shelving suit a nursery better than tall, tip prone furniture.
Nurseries benefit from blackout shades and layered lighting, since babies need dark sleep and parents need soft night light for feeding. Skylight blackout shades, dormer blackout shades, and a dimmable sconce or small lamp create flexible light control. Parents should avoid heavy drapes that block dormer light completely during the day, since soft daylight helps routine.
Nurseries should include temperature and air quality checks, since attics run hot and cold more than lower floors. Insulation, air sealing, ventilation, and a reliable heating and cooling system matter more than nursery decor for infant comfort. Parents should seek clinician guidance for infant sleep safety and room temperature, since general design advice is not medical advice.
Home Office Bedroom Combo, Murphy Bed, Dormer Desk, Zoning
Home office bedroom combos need a bed that disappears by day and a desk that works by night, without either function crowding the other. A Murphy bed or wall bed that folds away unlocks floor space for work, yoga, or lounging, while a dormer desk uses full height and daylight for focused work. That hybrid layout suits small attics, guest workers, and creative studios.
Hybrid rooms benefit from zoning by light and rug, with a work zone near a dormer and a sleep zone under a slope or gable wall. A low step platform can zone sleeping from workspace, hiding cable management in risers and enhancing perceived ceiling height around the bed. Sliding doors can separate a closet or ensuite without swing clearance loss.
Hybrid rooms should include strong connectivity and ergonomics, with a supportive chair, proper desk height, and a desk near a window for daylight without screen glare. Wi-Fi extenders or wired connections may be needed for a top floor office, since signals weaken through floors and roofs. Ample shelving and cabinets keep paperwork out of sight and maintain a clean, professional environment when the bed is folded away.
Storage That Follows the Roofline
Knee Wall Drawers, 18 to 24 Inches Depth, Full Extension, Soft Close
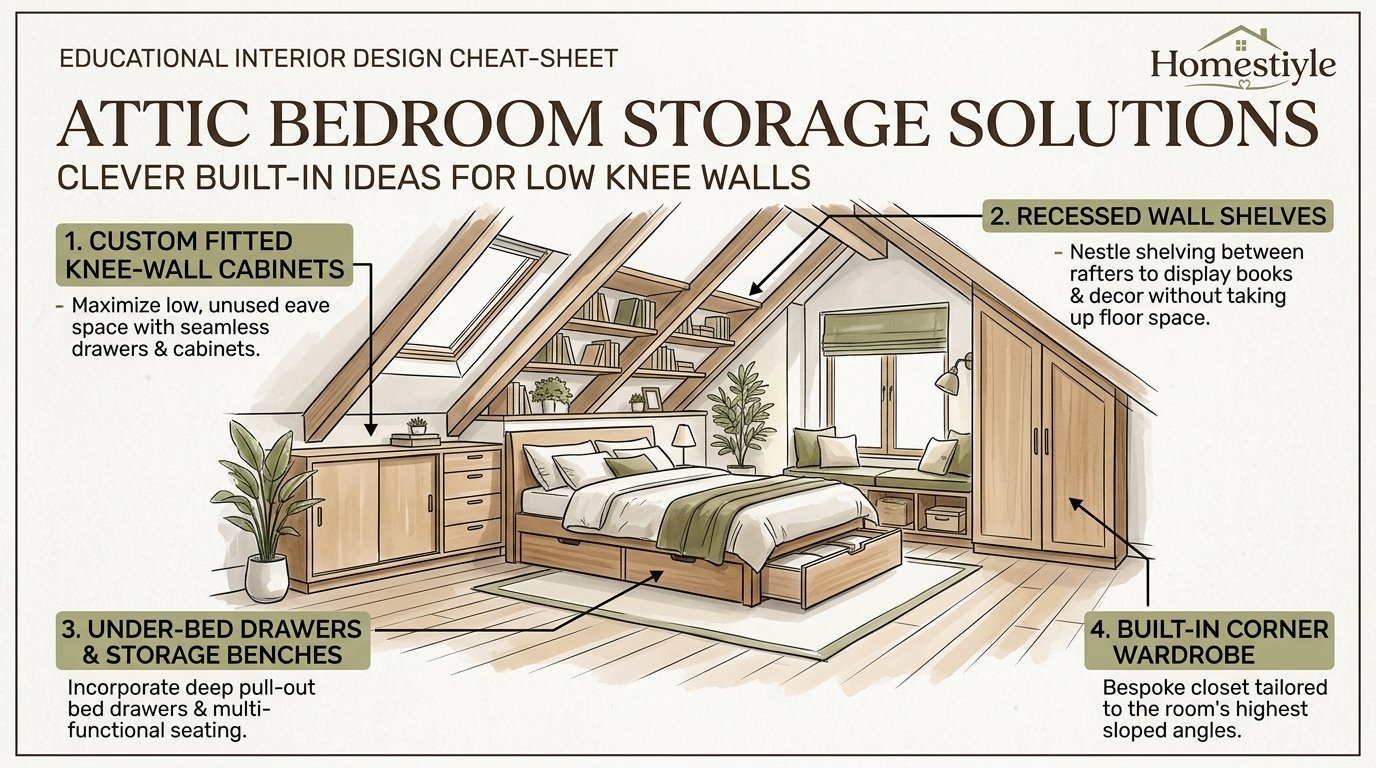
Knee wall drawers turn low, otherwise wasted space into the most useful storage in an attic bedroom. A knee wall of about 36 inches high is too low for hanging clothes, yet perfect for drawers, bins, and seasonal storage, according to practical design examples. Full extension drawer glides let sleepers reach the back of a deep drawer, while flat front panels read as built in rather than fussy.
Drawer depth matters, because drawers usually need 18 to 24 inches of depth to hold folded clothes, bedding, and accessories comfortably. If a knee wall is very shallow, lift top bins may work better than drawers, since a drawer face can hit the angled wall before opening fully. Measure eave depth at several points, since roof pitch and knee wall position change depth across a wall.
Soft close hardware helps in attics, because sloped ceilings create awkward reach zones and slamming drawers under a low roof gets old fast for daily users. Soft close drawers also protect fingers and drawer contents when reaching from a low, angled position. Label drawers inside, not on fronts, since visible labels on angled storage can make a room feel busy.
Eave Wardrobe, Hanging Versus Drawers by Height
Eave wardrobes need a height rule: hanging rails need full height for shirts, jackets, and dresses, while drawers suit low zones for folded clothes and accessories. A wardrobe that tries to hang clothes under a low slope will crush hems and waste space, while a wardrobe that uses drawers in low zones and hanging in tall zones works efficiently. Map wardrobe height across the wall before ordering doors or rails.
Eave wardrobes benefit from sliding doors, mirrored doors, or handleless push latch fronts, which save swing clearance and bounce light into darker eaves. Sliding doors suit narrow attics, since hinged doors need swing space that may hit a bed or walkway. Mirrored doors can expand sightlines, yet low iron glass prevents green tint and distortion in bright skylight rooms.
Eave wardrobes should include seasonal and daily zones, with daily clothes in easy reach and seasonal bedding in platform drawers or deep eave bins. A continuous plinth and consistent door heights trick the eye into reading one long, orderly wall, which makes a loft room feel wider. That visual calm matters as much as storage volume in a small attic.
Platform Bed Storage, Deep Drawers, Seasonal Bedding
Platform bed storage turns the bed base into a wardrobe, with deep drawers for seasonal bedding, off season clothes, and spare linens. A custom platform bed with deep drawers and a continuous under eave wardrobe turns an awkward knee wall into hardworking square footage. That strategy suits small attics especially, since every inch serves a purpose and visual calm equals perceived space.
Platform bed storage benefits from soft close hardware and toe kick lighting, which help safe late night steps and quiet drawer use. Toe kick lighting under a platform bed can guide midnight paths without a bright overhead light, while soft close hardware prevents slamming in a quiet top floor room. Keep the palette quiet, with warm oak, putty, and chalky white, so joinery recedes and textiles take the spotlight.
Platform bed storage should be split by person for couples, with separate drawers or sides for each sleeper where possible. Shared platform drawers often become messy, while split drawers keep daily clothes organised and accessible. Seasonal bedding can sit in the deepest drawers, since it is accessed only a few times a year.
Dormer Storage, Window Seat Drawers, Bookcases Flanking Dormer
Dormer storage turns a window bump out into a destination, with a cushioned window seat, deep drawers beneath, and slim bookcases flanking the opening. A dormer window seat doubles as a daybed for reading, naps, and views, while drawers beneath hold linens and off season clothes. That combination solves zoning too, since the dormer becomes a lounge zone and frees the main span for bed and circulation.
Dormer storage benefits from Roman shades or relaxed linen curtains, which soften angles and provide privacy without swallowing light. Heavy drapes can block the whole point of a dormer, which is daylight and view, so fabric should stay simple and light. A small side table for tea and a plug in sconce make the niche usable day and night.
Dormer storage should include a slim back pillow and a small swing arm lamp, since a dormer seat needs comfort and task light to work as a reading nook. A cushioned bench of about 18 to 20 inches seat height suits most adults, while a slim back pillow supports reading without pushing the sitter forward. Do not cram furniture around a dormer nook, since a nook works because it is quiet, not because it holds a second living room.
Built In Versus Freestanding, When Custom Wins and When It Wastes Money
Built in storage wins when roof pitch, eave depth, and knee wall height make standard furniture fit poorly or waste space. A carpenter building to exact roof pitch often uses space better than returning pieces that do not fit, and built ins can cost less than repeated returns and compromises. Built ins also read as architecture, not furniture, which helps a small attic feel intentional.
Freestanding storage wins when budget is tight, renters need flexibility, or attic use may change soon. Off the rack shelves and cabinets on low wall areas can avoid space wastage without custom cost, especially for guest rooms and kids rooms. Freestanding pieces should stay low and slim, with long, low profiles that follow horizontal lines rather than tall profiles that fight the slope.
Built in versus freestanding decision should consider resale and future use, since custom built ins suit a long term primary suite, while freestanding pieces suit a short term guest room. A built in wardrobe that fits one roof pitch may not suit a future buyer, yet it usually adds more daily value than a freestanding dresser that blocks a walkway. Choose built ins for daily use zones and freestanding pieces for flexible zones.
| Eave height | Best storage use | Avoid |
|---|---|---|
| Under 18 inches | Lift top bins, shallow drawers, seasonal bins | Deep drawers that hit the slope |
| 18 to 36 inches | Knee wall drawers, shoe storage, bedding bins | Hanging rails, tall baskets |
| 36 to 48 inches | Low drawers, low hanging for kids clothes, bookcases | Full length hanging, tall dressers |
| Over 48 inches | Short hanging, shelves, small wardrobe | Tall armoire that blocks light |
Light: Dormers, Skylights, and Layered Lighting
Dormer Versus Skylight, Headroom, Light, Heat, Cost, Leak Risk
Dormer versus skylight is the most important light decision in an attic bedroom, since dormers add headroom and usable floor area while skylights add light without floor area. A dormer projects out from the sloped roof to create a vertical wall and flat ceiling section, which can count toward legal room size. A skylight sits in the roof slope and floods the room with top light, yet it does not add standing room or floor area.
Dormer light comes from a vertical window at face height, which suits reading, working, and viewing, while skylight light comes from above, which suits general brightness and mood. Dormer light feels like normal room light, while skylight light feels dramatic and architectural, especially over a bed or gallery wall. Rooms with both dormer and skylight light feel bright at every hour, since dormer light fills the face and skylight light fills the slope.
Dormer cost, permit complexity, and leak risk usually exceed skylight cost, since dormers change roof structure, framing, and flashing more extensively. Skylight cost is lower per unit in competitor reported ranges, yet skylight flashing and waterproofing still demand careful installation, since a roof penetration is a common leak source. Choose dormer for headroom need and skylight for light need, not by style alone.
Shed Dormer Versus Gable Dormer, Width, Headroom, Cost
Shed dormer design replaces an entire sloped section of one roof face with a near vertical wall and a shallow pitched roof, creating the most headroom. Shed dormers suit primary suites and large attics, where a wide, flat ceiling section transforms usable area dramatically. Shed dormer cost in competitor reported ranges runs about 15,000 to 35,000 dollars depending on width and roofline complexity.
Gable dormer design creates a smaller, house shaped protrusion from the roof slope, better for adding light and a small amount of headroom in a specific zone. Gable dormers suit a desk nook, a reading nook, or a bed head zone, where a small headroom gain matters more than a full width change. Gable dormer cost in competitor reported ranges runs about 5,000 to 20,000 dollars per dormer, with scope and market driving the range.
Shed versus gable decision should consider roof appearance, neighbourhood character, and structural impact, not only headroom gain. A wide shed dormer can change a roofline dramatically, while a small gable dormer preserves roof character with a modest gain. A structural engineer and local building department should review dormer plans, since dormers change roof loads and framing.
Skylight Placement, South Facing Heat, Venting, Blackout Shades, Flashing
Skylight placement matters as much as skylight size, since south facing skylights bring the most light and heat, which helps in winter but can overwhelm a room in summer. Pair south facing skylights with quality shades or low emissivity glazing to control heat, while north facing skylights give softer, more even light with less heat gain. Skylight placement should align with rafters where possible, to simplify installation and shade fitting.
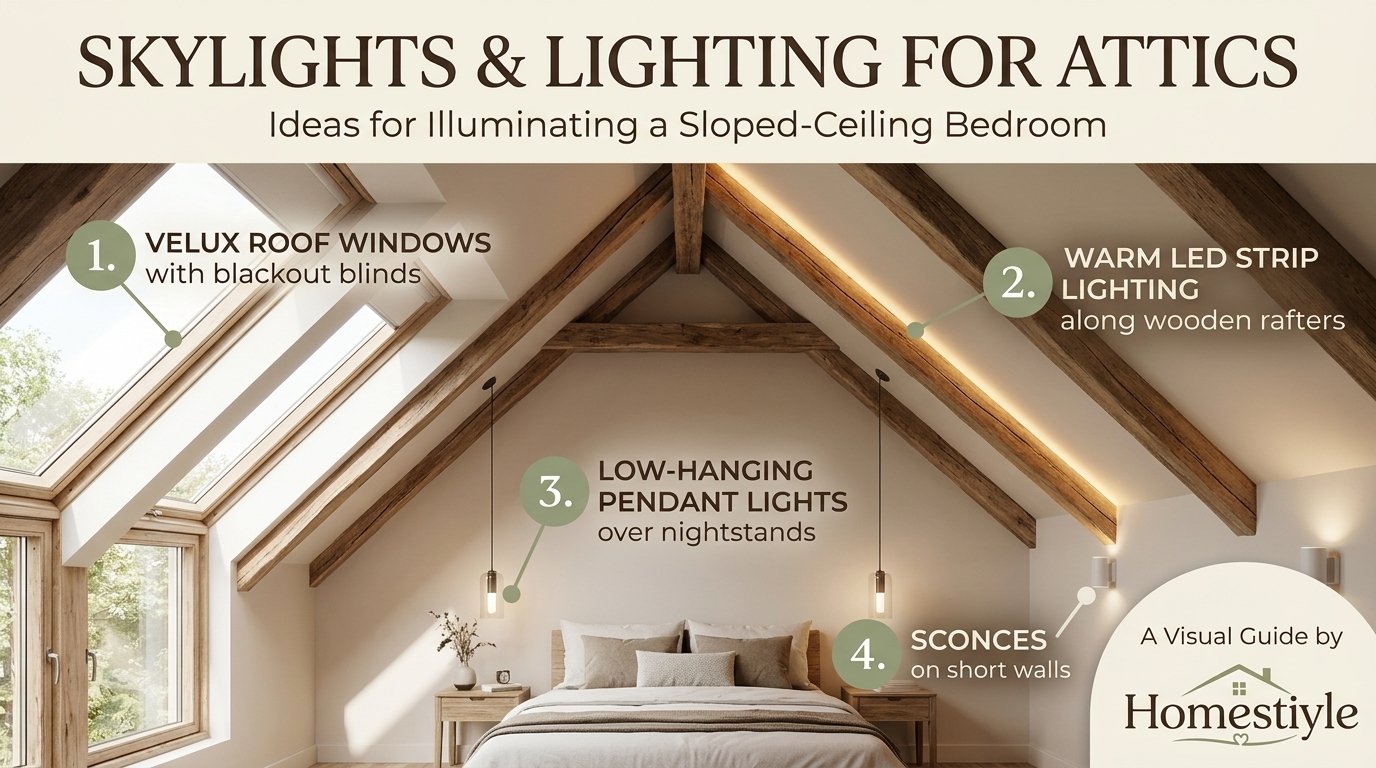
Venting skylights that open let warm air escape near the ridge, which helps a loft that runs hot in summer. Venting models suit attics with heat buildup, while fixed models suit spots where ventilation is not needed, such as over a bed or gallery wall. Remote controlled blackout blinds help sleep, since skylight light over a bed can wake sleepers early without shade control.
Flashing and waterproofing demand careful contractor detail, since skylight installation cuts a roof penetration that must stay watertight through rain, snow, and temperature swings. Confirm flashing type, underlayment, and warranty with a contractor before installation, and inspect skylights after the first heavy rain. A beautiful skylight that leaks will damage finishes, insulation, and trust far more than a smaller, well flashed window.
Layered Lighting, Recessed Gimbal, Sconce, Pendant, LED Strip, Dimmer
Layered lighting combines recessed lights, wall sconces, pendant lights, and LED strips to fill sloped corners without harsh shadows. Recessed gimbal cans at the ridge can aim light along slopes, while wall washers along knee walls soften low zones. Dimmable sconces near pillows give reading light without lighting the whole room, while LED strips along a ridge beam add glow without glare.
Layered lighting benefits from dimmers on each layer, so a room can move from bright task light to low evening light without adding wiring complexity. A bright morning layer suits dressing and cleaning, while a soft evening layer suits reading and sleep preparation. Dimmers also save energy and extend bulb life, while giving guests and couples control over shared light.
Layered lighting should avoid a single central pendant in a low attic, since pendants hang into head space and create harsh shadows on slopes. A pendant at the tallest point can work as a statement piece, such as a paper lantern or a small chandelier, yet it should sit where headroom allows and where it does not block a walkway. Wall sconces and recessed lights usually serve low attics better than pendants.
Window Treatments, Cellular Shade, Roman Shade, Linen Curtain, Blackout
Window treatments for attics need to control light, heat, privacy, and sleep without blocking dormer or skylight benefits. Cellular shades offer light control and insulation, which helps dormer windows with heat gain and heat loss, while Roman shades soften angles with fabric texture. Relaxed linen curtains add softness and privacy, yet heavy drapes can swallow light and make a dormer feel closed.
Blackout shades matter most for skylights over beds and dormers in guest rooms, since morning light can wake sleepers early. Remote controlled blackout blinds for skylights give total darkness when needed, while still allowing daylight during the day. A bedroom that cannot go dark will frustrate guests, teens, and shift workers, even when it looks beautiful in daylight photos.
Window treatment choice should match window type, since skylights, dormers, gable windows, and roof windows each need different shade systems. A shade that fits a dormer may not fit a skylight, and a curtain that suits a gable window may block a dormer seat. Measure each window type separately and choose treatments by function first, then by fabric and colour.
| Light option | Headroom gain | Light type | Cost signal, competitor reported | Best use |
|---|---|---|---|---|
| Shed dormer | Large, wide flat ceiling | Vertical face light, view | 15,000 to 35,000 dollars | Primary suite, large gain |
| Gable dormer | Small, local zone | Vertical face light, view | 5,000 to 20,000 dollars per dormer | Desk nook, reading nook, bed head |
| Fixed skylight | None | Top light, dramatic | 1,500 to 4,000 dollars per unit, Block range | General brightness, gallery wall |
| Venting skylight | None | Top light plus air escape | Higher than fixed, check product | Hot attics, ridge heat release |
Colour and Style That Work With a Slope
Light Palette, White, Cream, Pale Greige, Soft Green, Muted Blue
Light palettes help attics feel larger, brighter, and calmer, especially in small, dark, or north facing rooms. Bright white walls, gentle colour palettes, and lots of natural light create an open and airy feel that makes a room feel larger than its taped size. Soft whites, creams, pale greiges, gentle greens, and muted blues reflect light around the space and blur edges between wall and ceiling.
Light palettes benefit from matte finishes on walls, which absorb light gently and hide imperfections on sloped surfaces. A soft sheen or eggshell on woodwork stays easy to wipe clean in a space that can get dusty, while high gloss on large surfaces can distract with reflections in a low room. Finish matters as much as shade, since slope angles catch light differently than flat walls.
Light palettes should include warm wood and textile contrast, so a white attic does not feel clinical or cold. Light oak flooring, warm brass accents, natural linen bedding, and a wool rug add warmth and texture without darkening the room. A light palette with warm accents feels inviting, while a light palette with only white surfaces can feel sterile.
Colour Drenching, Same Colour Walls, Ceiling, Trim to Blur Lines
Colour drenching means painting walls, sloped ceiling, and trim the same colour, so no hard line draws attention to the slope. That technique blurs architectural lines and visually expands the space, especially in small attics with awkward angles. Colour drenching works with light colours for brightness and with dark colours for cocoon effects, yet the principle stays the same: erase lines, not highlight them.
Colour drenching benefits from matte paint and consistent sheen, since sheen changes can recreate lines even when colour stays the same. Use the same matte finish on walls and ceiling, with a slightly more durable finish only on trim that needs cleaning. That consistency helps the eye read one continuous surface rather than separate wall, slope, and trim planes.
Colour drenching should be tested with large paint samples on slope and wall, since slope angles change how colour looks under skylight and dormer light. A colour that looks soft on a flat wall may look darker on a slope, or lighter under a skylight, depending on light direction. Test samples at different times of day before committing to a full room colour.
Moody Cocoon, Charcoal, Navy, Moss, Matte Finish, Warm Wood
Moody cocoon palettes use saturated, matte hues such as charcoal, midnight blue, and moss to blur odd angles and invite sleep. Deep paint on walls, ceilings, and trim erases lines, while texture from linen bedding, velvet headboard, woven shades, and aged brass adds depth. Warm wood nightstands and amber tone bulbs in dimmable sconces add restful glow to a dark room.
Moody palettes suit guest rooms and primary suites where rest is the goal, especially when skylight blackout shades control morning light. A moody attic can feel like a chic cocoon, with bright morning contrast and moody evening calm, when light control works well. Without blackout shades, a moody attic may still wake sleepers early to skylight light, which undermines the cocoon effect.
Moody palettes need lighter floors or wool carpet to anchor the room and prevent a dark room from feeling heavy. A lighter floor, a wool rug, or warm wood flooring balances dark walls, while a dark floor plus dark walls can feel cave like. Keep one element light, floor or bedding, to maintain balance in a moody attic.
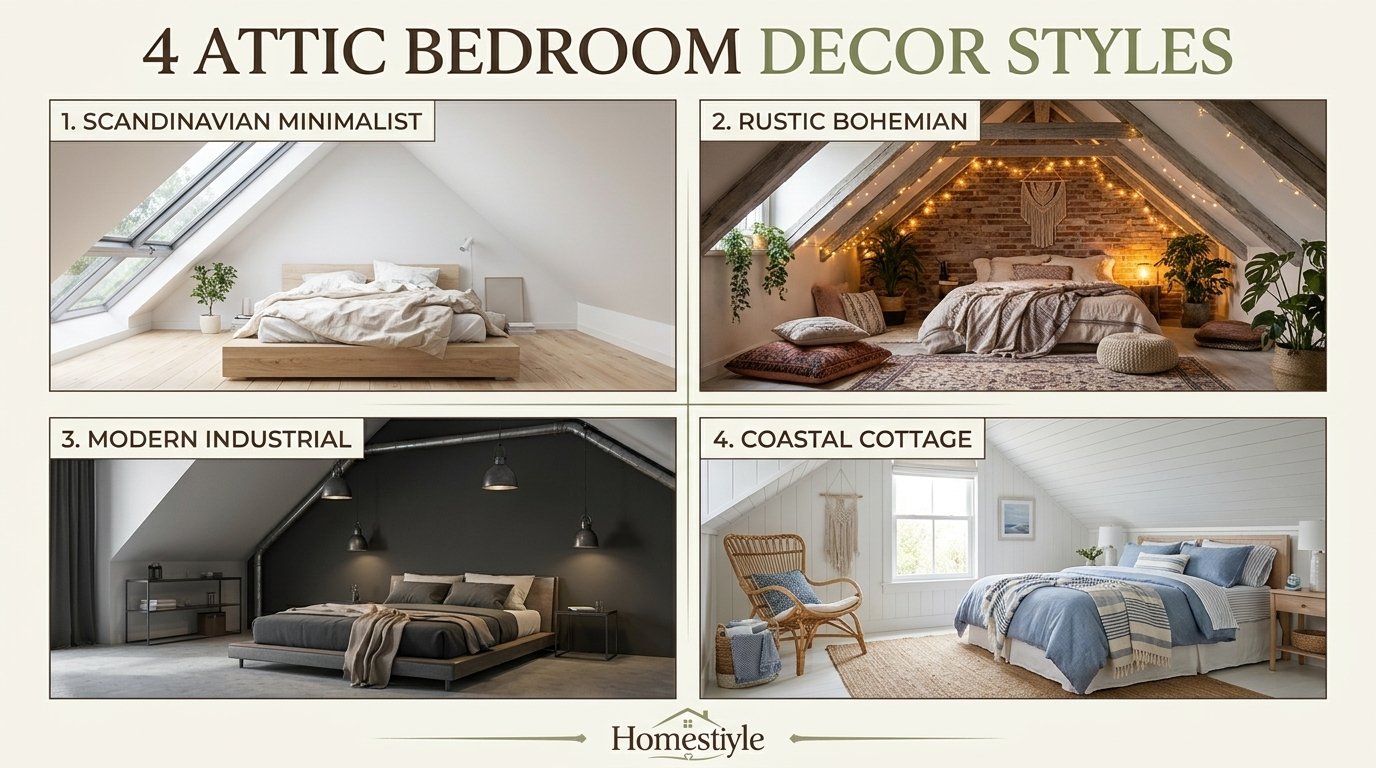
Style Systems: Scandinavian, Modern Farmhouse, Industrial, Japandi, Coastal, Boho, Rustic
Scandinavian attic bedrooms rely on restrained palettes, tactile materials, and negative space to make sloped ceilings feel intentional. Limewash or soft white paint diffuses light and blurs ceiling planes, while whitewashed tongue and groove cladding adds subtle texture without visual weight. Warm wood, low leggy furniture, and a few thoughtful accessories complete a bright, restful, livable attic.
Modern farmhouse attic bedrooms use shiplap, barn doors, and black accents to add texture and familiarity to a sloped room. Vertical or horizontal shiplap across gable walls emphasises height, while smooth slopes provide contrast, and a sliding barn door saves clearance for an ensuite or closet. Black iron sconces, thin frame mirrors, and matte metal beds sharpen cosy whites and woods.
Industrial attic bedrooms use exposed brick, steel trusses, and leather platform beds to celebrate structure rather than hide it. Exposed brick adds industrial feel and visual interest, while ceiling beams and clothing rods echo that texture. Smooth furniture and soft bedding add warmth, so an industrial attic feels welcoming rather than cold or unfinished.
Beams, Brick, Shiplap, Limewash, Gallery Wall, Plants
Exposed beams showcase colour, texture, and structure in a sloped ceiling, while adding the illusion of a traditional flat roof in some designs. Wood tones and dark neutrals in furniture and bedding pull a beamed room together, while whitewashing beams can soften a rustic room without hiding structure. Beams should be cleaned, sealed, and checked for damage before styling, since old beams can hide dust, pests, or moisture.
Exposed brick adds industrial warmth and accent wall interest, especially when paired with smooth furniture and soft bedding. Brick texture contrasts with linen, wool, and wood, creating a tactile room that feels layered rather than flat. Brick walls need sealing and cleaning in attics, since dust and moisture can accumulate on rough surfaces over time.
Gallery walls suit attics with uniquely shaped windows and skylight light, since sunlight falling across frames creates natural gallery lighting. Frames positioned to mimic how sunlight widens and softens as it moves along a wall can turn a slope into a feature rather than a problem. Gallery walls should stay low and light, since heavy frames on slopes can feel crowded and unsafe if not fixed well.
Furniture That Fits a Slope
Low Profile Bed, Platform Bed, Daybed, Twin Bed, Bunk Bed
Low profile beds suit attics because low height opens sightlines and reduces head bump risk under slopes. A low platform bed with clean lines, built in storage drawers, and a low headboard creates a calm, grounded sleeping zone. A daybed along a knee wall preserves central headroom, while twin beds under opposite eaves create flexible guest sleeping.
Platform beds with storage suit small attics and couples, since deep drawers replace a dresser and keep the centre clear. A platform bed close to the floor suits attics where the ceiling slopes low, since low height keeps sightlines open and gives the room a calm feel. A platform bed should still allow easy sitting, dressing, and making, with full height space nearby for those tasks.
Bunk beds suit kids attics with steep pitches, since children need less headroom and enjoy built in, nook like sleeping. Built in bunks flush to a low wall, with a bookshelf at the foot, maximise a tight, narrow attic for siblings. Bunk safety, guardrails, ladder access, and ceiling clearance for the top bunk must be checked carefully before use.
Nightstand Height, 18 to 20 Inches Low Nightstand, Floating Nightstand
Nightstand height in attics often falls to 18 to 20 inches for low nightstands, which keeps surfaces within easy reach under a slope. Low nightstands work perfectly in low ceiling environments, keeping necessary surfaces close to the bed while their compact footprint does not obstruct pathways. A low nightstand should still hold a lamp, book, phone, and water without crowding the bedside.
Floating nightstands mount as small wall shelves beside the bed, keeping floors clear and cords tidy while emphasising sightlines under rafters. Floating shelves suit narrow attics, since they need no floor space and can sit at exact height for each sleeper. Floating nightstands should be fixed securely into studs or solid backing, since a shelf that fails under a lamp or book creates a safety risk.
Nightstand choice should consider lamp height and reading light, since a tall lamp on a low nightstand can still hit a slope. Wall sconces beside the bed often work better than table lamps in low attics, since sconces free nightstand space and keep light at reading height. A plug in sconce with a dimmer gives flexible light without ceiling height demands.
Dresser Versus Wardrobe, Tall Furniture Only on Tallest Wall
Dresser versus wardrobe decision in attics depends on wall height at the furniture location, not on storage preference alone. Tall dressers and armoires fight the slope, while long, low storage follows horizontal lines and fits under eaves. Tall furniture belongs only on the tallest wall, usually a gable wall, where full height allows safe use and comfortable access.
Wardrobes under slopes need custom or low profile designs, since standard wardrobes assume flat, full height walls. Built in wardrobes with doors that follow roof angles, sliding doors, or mirrored doors can fit slopes better than freestanding armoires. A wardrobe that blocks a walkway, window, or door swing should move, even when it offers more storage on paper.
Dresser choice should consider drawer access under a slope, since a drawer that hits an angled wall before opening fully wastes storage and frustrates daily use. Full extension glides help, yet drawer depth and slope angle must be measured together before ordering. A dresser that opens fully on a gable wall beats a larger dresser that opens only partly under a slope.
Desk in Dormer, Chair Clearance, Screen Glare
Desk in dormer placement uses full height and daylight at a dormer for focused work, study, and reading. A dormer desk benefits from a window view, natural light, and a defined work zone separate from the sleeping zone. A desk chair needs clearance to pull out and stand up without hitting a slope, so dormer depth and chair space must be measured together.
Desk screen glare needs positioning that avoids direct sun on the screen, since dormer light can wash out a laptop or monitor. A desk facing sideways to a dormer window, with a shade or curtain for glare control, usually works better than a desk facing directly into a window. A monitor arm or laptop stand can adjust screen angle for comfort in a tight dormer.
Desk storage should use wall shelves, peg rails, and drawer units that fit dormer angles without crowding the work surface. Slim bookcases flanking a dormer frame the view and create storage, while a small drawer unit under a desk holds supplies without eating floor space. A desk that holds only a laptop and a lamp often works better in a dormer than a large desk with hutch storage.
Seating, Reading Chair, Window Seat, Bench at Foot of Bed
Seating in attics should sit in full height zones, since sitting, standing, and reading need more headroom than lying down. A reading chair near a dormer, with a small table and sconce, creates a lounge zone that feels intentional rather than cramped. A window seat in a dormer doubles as a daybed, reading nook, and storage bench, making it one of the most valuable attic seats.
Bench at the foot of a bed suits large and medium attics, where it provides dressing seating and storage without blocking a walkway. A bench should sit low and slim, with storage inside for spare bedding or shoes, and it should leave clear space to walk around the bed. A bench that blocks bed access or a walkway should move, even when it looks stylish in photos.
Seating fabric should suit attic light and dust, with linen, cotton duck, and washable covers preferred over heavy drapes or delicate velvets in high sun dormers. Simple fabrics keep dormer seats bright and easy to clean, while heavy fabrics can block light and trap dust. A textured throw and a small pillow add comfort without crowding a dormer seat.
Comfort: Insulation, Air Sealing, Heating, and Cooling
Why Attics Run Hot in Summer and Cold in Winter
Attics run hot in summer because roof surfaces absorb solar heat and warm air rises to the top floor, while insulation gaps let that heat into the room. Attics run cold in winter because roof surfaces lose heat quickly, cold air leaks through eaves and gaps, and heating systems often underserve the top floor. That swing makes attics the hardest rooms to keep comfortable without a proper insulation and HVAC plan.
Temperature swing also affects sleep quality, furniture, and finishes, since hot attics disrupt sleep and cold attics encourage condensation on surfaces. A room that swings from hot to cold daily will feel uncomfortable even with beautiful decor, while a room with stable temperature feels restful year round. Comfort engineering should come before finishes, not after, in any attic conversion.
Temperature control starts with insulation, air sealing, ventilation, and properly sized heating and cooling, in that order, according to conversion guides. Insulation slows heat flow, air sealing stops leaks, ventilation controls moisture and heat buildup, and HVAC delivers controlled heating and cooling. Skipping any one element leaves a weak link that finishes cannot fix.
Insulation at Roof Deck Versus Attic Floor, Air Sealing, Vapor Control, Ventilation
Insulation at roof deck means insulating the sloped roof itself, so the attic room sits inside the insulated envelope. Roof deck insulation suits finished attics, since it keeps the room warm in winter and cool in summer, while protecting pipes and ducts inside the envelope. Spray foam at the roof deck is a common method in competitor reported ranges, with costs varying by depth and square footage.
Insulation at attic floor means insulating the floor between the attic and the floor below, which suits unfinished storage attics, not finished bedrooms. A finished attic bedroom needs roof deck insulation, since attic floor insulation would leave the bedroom outside the insulated envelope and exposed to roof temperatures. That distinction matters for any owner who already has attic floor insulation from a storage era.
Air sealing, vapor control, and ventilation work with insulation to prevent condensation, mold, and heat loss in a finished attic. Air sealing stops warm, moist indoor air from leaking into roof cavities, vapor control manages moisture movement, and ventilation removes excess moisture and heat. A roof check for leaks, staining, and compressed insulation should happen before finishes, since hidden moisture will damage new work quickly.
Mini Split Versus Extended Duct Versus Electric Heat, Cost, Control, Noise
Mini split HVAC suits attics because a ductless unit can serve a top floor room independently, without extending ductwork through floors and roofs. Mini split cost in competitor reported ranges runs about 3,000 to 8,000 dollars installed, including electrical work, with scope and market driving the range. Mini splits offer separate temperature control, quiet operation, and heating plus cooling in one unit, which suits a private top floor suite.
Extended duct HVAC suits attics where existing forced air trunk lines run accessibly and can be extended without major structural work. Extended duct cost is lower than a new mini split when trunk lines are close, yet it may not give independent control for a top floor room. A room served by extended duct may run hot or cold compared with lower floors, since duct length and airflow affect balance.
Electric heat alone, such as plug in space heaters or window air conditioning alone, does not satisfy habitable room heating requirements in model code summaries, which require a permanent heating system. A room must be capable of maintaining 68 degrees Fahrenheit at 3 feet above the floor, which demands a permanent, properly sized system. Owners should budget for a permanent system, not a temporary heater, in any legal bedroom conversion.
Skylight Heat Control, Low Emissivity Glazing, Shades, Venting Skylight
Skylight heat control starts with low emissivity glazing, shades, and venting options, which together manage solar gain and heat buildup. Low emissivity glazing reduces heat transfer through glass, while shades block direct sun when needed, and venting skylights release warm air near the ridge. A skylight without heat control can turn a bright attic into an overheated room in summer, especially on south facing slopes.
Skylight shades should be remote controlled where possible, since skylights sit high on slopes and manual shades are hard to reach daily. Remote controlled blackout blinds give total darkness for sleep, while solar shades reduce heat without blocking all light. Shade choice should match skylight brand and size, since generic shades may not fit roof window dimensions or flashing details.
Skylight heat control also benefits from external shading, roof colour, and ventilation, though those options depend on roof type and budget. A light coloured roof reflects more solar heat than a dark roof, while ridge ventilation helps hot air escape from the roof assembly. Owners should discuss skylight orientation, glazing, and ventilation with a contractor before cutting a roof opening.
Sound, Rain Noise, Footstep Noise, Acoustic Insulation, Rug, Underlayment
Sound in attics comes from rain on roofs, footsteps from below, and footsteps within the attic, all of which travel easily through thin floors and roofs. Acoustic insulation between joists, resilient channels with drywall, thick underlayment beneath flooring, and carpets or large area rugs dampen noise further. Soundproofing matters most when a loft sits above a bedroom or living area, where footstep noise disrupts sleep below.
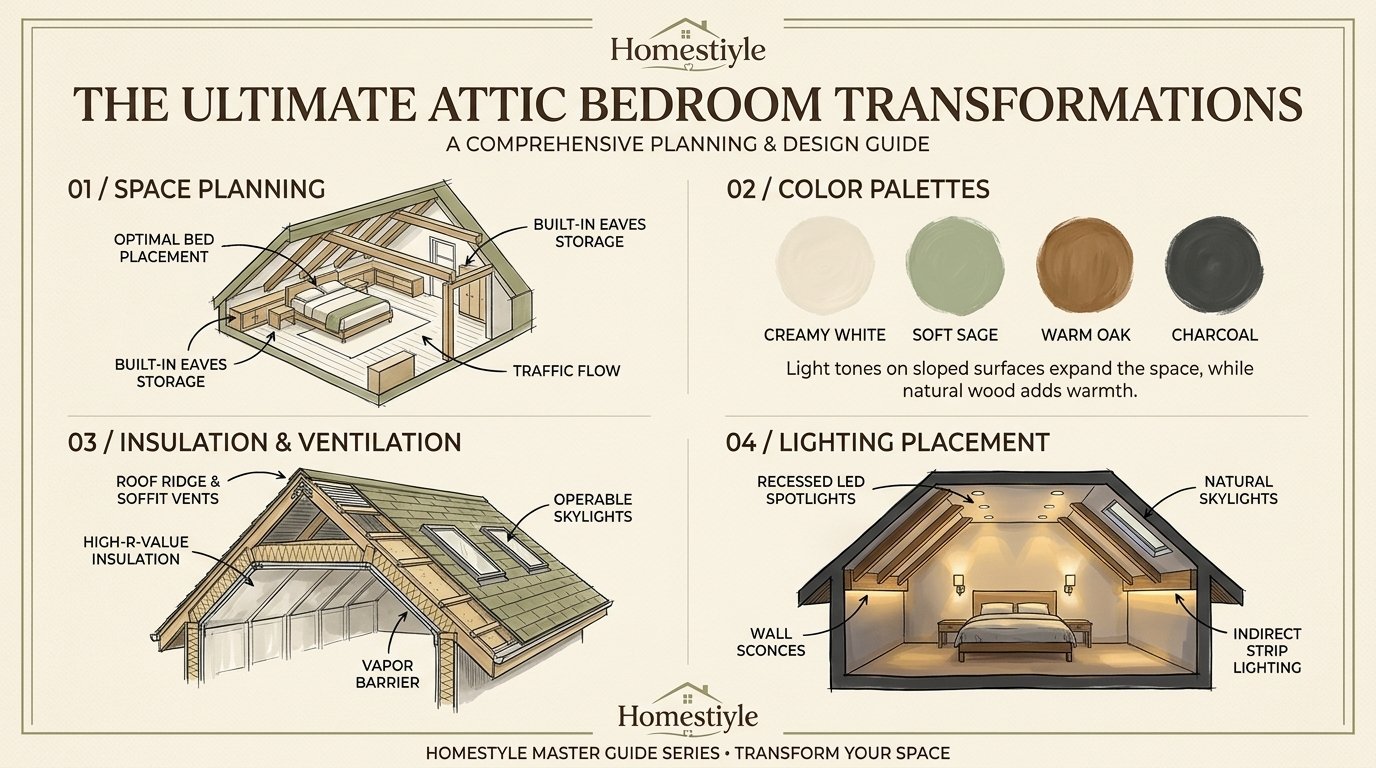
Rain noise on roofs can feel loud and intrusive in a finished attic, especially with metal roofing or thin roof assemblies. Dense pack cellulose between rafters, acoustic insulation, and resilient channels can reduce rain noise significantly, while a thick wool rug absorbs sound within the room. Owners should test rain noise expectations with a contractor, since no insulation eliminates all roof noise completely.
Footstep noise within an attic can be reduced with thick underlayment, carpet, and rug placement, plus soft close hardware and furniture pads. A hard floor attic with no rug will echo and transmit footsteps, while a carpeted attic with rugs feels quieter and more private. Sound planning should happen before flooring, since underlayment and insulation are hard to add after finishes.
Condensation and Leaks, Flashing, Roof Check Before Finishes
Condensation in attics happens when warm, moist indoor air meets cold roof surfaces, creating moisture that can damage insulation, wood, and finishes. Air sealing, vapor control, ventilation, and proper insulation detailing prevent most condensation, while a roof leak check before finishes prevents hidden water damage. Owners should look for dark staining, compressed insulation, and moisture marks before closing walls.
Roof leaks in attics often start at skylights, dormers, valleys, and flashing details, where roof planes meet and water can enter. Skylight flashing, dormer flashing, and valley flashing must be installed correctly and inspected after heavy rain, since a small leak can damage a large finished area. A contractor who cannot explain flashing details should not cut a roof opening.
Leak prevention also includes gutter, downspout, and roof surface maintenance, since water that pools or backs up can enter attic assemblies. Owners should clear gutters, check downspouts, and inspect roof surfaces before a conversion, and again after any dormer or skylight work. A finished attic with a leaking roof will cost far more to repair than a raw attic with a checked roof.
Stairs, Access, and Safety
Pull Down Ladder Does Not Meet Code for a Bedroom, Real Stair Required
Pull down ladders do not meet code for a habitable bedroom, since living space needs a real, code compliant stairway for safe access and egress. A pull down ladder may suit storage access, yet it cannot serve as the primary access for a bedroom, guest room, or primary suite. Conversion plans must include a real stair, with headroom, width, handrails, and lighting that meet local code.
Real stair planning starts with stair location, headroom, and floor area lost below, since a new stair needs an opening cut through the floor and space on the level below. A stair that fits the attic may steal a closet or a corner of a room below, which changes the whole house layout. Owners should plan stair location early, before finalising attic layout, since stair position affects attic circulation too.
Real stair safety also includes lighting, handrails, and furniture moving clearance, since attic stairs are used daily and sometimes at night. Well lit stairs with secure handrails reduce fall risk, while wide turns help move mattresses and furniture to the top floor. A stair that is safe for daily use matters more than a stair that looks dramatic in photos.
Straight Stair Versus Spiral Versus Alternating Tread, Space Lost Below
Straight stairs suit attics where floor area below allows a long, straight run, with comfortable tread depth and headroom throughout. Straight stairs are easiest to use, carry furniture, and meet code, yet they need the most floor area below. A straight stair that steals a large room below may not be worth the attic gain, so owners should weigh both floors together.
Spiral stairs suit tight attics where floor area is precious, since a spiral footprint is smaller than a straight run. Spiral stairs can look dramatic and save space, yet they are harder to use, harder to carry furniture up, and may face stricter code limits for a primary bedroom access. Local code should be checked before choosing a spiral stair for a bedroom, since not all spiral designs qualify as primary access.
Alternating tread stairs suit very tight attics where a steep, compact stair is the only option, with treads that alternate left and right to save depth. Alternating tread stairs save floor area, yet they feel steep and require careful foot placement, which suits occasional guest use better than daily primary suite use. Owners should test alternating tread comfort and code status before committing to that stair type.
| Stair type | Floor area needed | Ease of use | Best for |
|---|---|---|---|
| Straight stair | Largest, long run | Easiest, furniture friendly | Primary suite, daily use |
| Spiral stair | Small, compact footprint | Harder, furniture difficult | Tight guest loft, occasional use |
| Alternating tread stair | Smallest, steep | Steep, careful foot placement | Very tight attic, occasional use |
| Switchback stair | Medium, two runs plus landing | Good, furniture possible with turns | Medium attic, balanced use |
Handrail, Lighting, Headroom at Stair, Furniture Moving Clearance
Handrails on attic stairs should be secure, continuous, and at a comfortable height, with lighting that illuminates every tread without glare. A handrail that wobbles or ends mid stair creates a fall risk, especially at night or when carrying items. Lighting should sit at stair top, stair bottom, and landing, with switches accessible from both levels where possible.
Headroom at stairs matters because a stair with low headroom forces ducking at the most dangerous point, where a fall risk is highest. Stair headroom should be checked at every tread, not only at the top landing, since slope ceilings can cut headroom mid stair. A stair that requires ducking should be redesigned, not accepted, for daily bedroom access.
Furniture moving clearance matters because mattresses, beds, wardrobes, and desks must travel up attic stairs at least once, and often again for replacement. Measure stair width, turn clearance, and headroom against the largest furniture piece before ordering, and consider flat pack or modular furniture for tight stairs. A beautiful bed that cannot reach the attic is not a bedroom solution.
Smoke and Carbon Monoxide Alarms, Placement, Interconnected Alarms
Smoke alarms are required in every sleeping room and on every level, according to model code summaries and safety guidance, with placement that ensures early warning during sleep. Carbon monoxide alarms are required where fuel burning appliances, attached garages, or other carbon monoxide sources create risk, with placement that follows manufacturer and local code guidance. Alarms should be interconnected where required, so an alarm on one level triggers alarms on other levels.
Alarm placement in attics needs attention to slope, peak, and dead air spaces, since smoke and carbon monoxide move differently in sloped rooms. Alarms should sit on ceilings or high walls as directed by manufacturer instructions, away from kitchens, bathrooms, and ventilation that could cause false alarms. Owners should test alarms monthly, replace batteries as directed, and replace alarms at manufacturer recommended intervals.
Alarm planning should happen before walls close, since wiring, placement, and interconnection are easier during rough in than after finishes. A conversion that skips alarm planning may pass a visual inspection yet fail a safety inspection, delaying occupancy. Safety systems should be treated as part of the room, not as an afterthought.
Egress Window, 5.7 Square Feet, 24 Inches, 20 Inches, 44 Inches Sill, Verify Locally
Egress window rules in model code summaries require a minimum net clear opening of 5.7 square feet, with at least 24 inches of opening height, at least 20 inches of opening width, and a sill no higher than 44 inches above the floor. That opening must allow emergency escape and rescue access, which means a small decorative attic window usually does not qualify. Cutting a proper egress opening in a sloped roof requires framing, flashing, and a properly sized rough opening, sometimes with custom window units for roof pitch.
Egress cost in competitor reported ranges runs about 1,200 to 4,500 dollars per window cut into a sloped roof surface, with more cost when structural framing between rafters needs modification. Block ranges give egress at 2,500 to 6,000 dollars, which shows scope and market differences rather than a single price. Owners should get a local quote with scope, including framing, flashing, window unit, and finish, before budgeting.
Egress placement matters because an egress window must be reachable and operable from the sleeping room without tools, keys, or special knowledge. A window behind furniture, above a high sill, or blocked by a dormer seat fails the purpose of egress, even when its size meets the numbers. Plan egress location early, with clear floor space in front of the window and a simple operating mechanism.
Ensuite Bathroom in an Attic Bedroom
Plumbing Location Rule, Above or Near Existing Water and Waste Lines
Plumbing location rule for attic ensuites states that placing a new bathroom above or near existing water and waste lines keeps the project simpler and more cost effective. A bathroom far from existing plumbing needs long pipe runs, pump systems, or structural changes that increase cost and leak risk. Owners should map existing plumbing stacks before choosing an ensuite location, not after choosing a bathroom style.
Plumbing location also affects headroom and layout, since pipes, vents, and drains need space that may compete with shower and toilet headroom. A bathroom above a lower bathroom or kitchen often shares a wet wall, which simplifies venting and drainage. A bathroom far from a wet wall may still work, yet it needs a plumber and structural review before finishes are chosen.
Plumbing cost in competitor reported ranges for an ensuite bathroom runs about 15,000 to 40,000 dollars, with scope, fixtures, and market driving the range. That range covers basic to high end finishes, yet it does not include dormer or structural work that may be needed for headroom. Owners should get a local quote with plumbing, waterproofing, ventilation, and finish scope clearly separated.
Shower Headroom, Toilet Headroom, Vanity Placement Under Slope
Shower headroom in attics needs full standing height at the shower head and entry, since showering under a slope forces ducking and water spray problems. A shower under a low slope may look charming in photos, yet daily showering under a slope feels cramped and wet. Place showers in full height zones, such as dormer areas or gable ends, and use low zones for storage or vanity seating.
Toilet headroom in attics needs full sitting and standing height at the toilet, with clearance to stand, sit, and use the toilet comfortably. A toilet under a slope may fit a seated person, yet standing and dressing after use need more height. Place toilets in full height zones where possible, and use low zones for storage, laundry, or vanity drawers instead.
Vanity placement under a slope can work well, since sitting at a vanity needs less headroom than standing in a shower. A triangular vanity mirror can bounce light deeper into a bedroom, while a floating vanity saves floor space in a small ensuite. Vanity height, mirror height, and lighting should be tested with the actual slope, since a mirror that hits a slope wastes wall space.
Ventilation, Waterproofing, Pocket Door, Sliding Door
Ensuite ventilation in attics needs a properly vented fan that removes moisture from showers and baths, with ducting that exits outside, not into the attic cavity. Humidity sensing, zoned ventilation fans near the ridge can clear steam automatically, preserving fresh sleep conditions through seasonal swings. A bathroom without proper ventilation will develop condensation, mold, and finish damage quickly in an attic.
Waterproofing in attics needs shower waterproofing, floor waterproofing, and wall detailing that suit sloped ceilings and dormer junctions. Waterproof membranes, sealed joints, and proper tile detailing prevent leaks into lower floors and roof assemblies. Owners should hire a contractor with bathroom waterproofing experience, since attic bathrooms combine roof, slope, and plumbing risks in one small room.
Pocket doors and sliding doors suit attics because they save swing clearance in tight ensuite and closet entries. A pocket door tucked behind a wall minimises swing conflicts, while a sliding barn door adds style and saves clearance without a pocket wall. Door choice should consider privacy, sound, and maintenance, since pocket doors can be harder to repair than hinged doors.
Costs, Permits, and Resale Honesty
Cost Tiers, Simple, Moderate, Major, With Scope, Not Just Price
Cost tiers in competitor reported ranges give simple conversions at 8,000 to 30,000 dollars, moderate structural work at 30,000 to 60,000 dollars, and major structural renovation at 60,000 to 95,000 dollars plus. Simple conversions assume adequate ceiling height, load bearing floors, and accessible HVAC runs, with work mainly insulation, drywall, flooring, lighting, and egress. Moderate work adds joist sistering, a new staircase, new HVAC or mini split, and one smaller dormer for code height.
Major structural renovation adds full shed dormer addition, ridge beam modification, complete mechanical system installation, and high finish interior work, common in cape cod homes where the entire roofline must change. That tier explains why two attics with similar size can cost vastly different amounts, since roofline change drives cost more than paint or flooring. Owners should identify their tier before getting quotes, using ceiling height, joist size, HVAC access, and stair location as tier signals.
Cost tiers from another competitor reported set give 40,000 dollars for a straightforward build to well over 100,000 dollars for a high end project with custom finishes, a dormer, or an added bathroom. That total conflicts with the first tier set, yet the conflict reflects scope differences, market differences, and finish levels, not a single true price. Step 2 readers should treat both sets as planning ranges, not quotes, and get local quotes with identical scope for comparison.
Cost Components Reconciled, DesignLike Versus Block, Why Totals Differ
Cost components reconciled show staircase, egress, joist, insulation, HVAC, drywall, flooring, and permit ranges that overlap yet differ by source. Staircase ranges give 3,000 to 12,000 dollars in one set and 5,000 to 20,000 dollars in another, while egress ranges give 1,200 to 4,500 dollars in one set and 2,500 to 6,000 dollars in another. Those differences reflect stair type, egress location, market, and whether a quote includes finish work or only rough work.
Cost reconciliation should explain that component totals do not simply add to a project total, since contractors bundle work, share labour, and include contingency differently. A project total also includes design, drawings, permits, inspections, and contingency, which component lists often omit. Owners should ask each contractor for a single total with scope, exclusions, and contingency clearly stated, rather than adding component ranges themselves.
Cost planning should include a contingency fund of 10 to 15 percent for surprises such as hidden water damage, old wiring, or structural issues found after opening walls. That contingency protects a project from stalling mid way, which is a common attic conversion failure. A project without contingency often stops at drywall stage, leaving a half finished room for months.
| Cost component | Competitor reported range A | Competitor reported range B | Why ranges differ |
|---|---|---|---|
| Staircase | 3,000 to 12,000 dollars | 5,000 to 20,000 dollars | Stair type, straight versus spiral, finish |
| Egress window | 1,200 to 4,500 dollars | 2,500 to 6,000 dollars | Roof slope, framing, window unit |
| Joist sistering, full floor | 3,000 to 8,000 dollars | Floor reinforcement 2,000 to 10,000 dollars | Joist size, span, floor area |
| Insulation, spray foam roof deck | 1,800 to 5,500 dollars | Insulation and drywall 3,000 to 8,000 dollars | Depth, area, drywall included or not |
| Mini split HVAC | 3,500 to 8,000 dollars | 3,000 to 7,000 dollars | Unit size, electrical, market |
| Dormer addition | Shed 15,000 to 35,000 dollars, gable 5,000 to 20,000 dollars | Dormer 10,000 to 30,000 dollars | Dormer type, width, roof complexity |
| Ensuite bathroom | Not in tier list, separate | 15,000 to 40,000 dollars | Fixtures, plumbing location, finishes |
| Permits and inspections | 500 to 3,000 dollars | Included in total, not separate | Municipality, scope, drawings |
Permit Steps, Pre Application, Drawings, Inspections, Final
Permit steps start with a pre application meeting with the local building department, which is free in many municipalities and takes 30 to 60 minutes. That meeting tells owners exactly what their jurisdiction requires, including adopted code edition, local amendments, and drawing requirements. A pre application meeting prevents wasted design work on a plan that local code will reject.
Permit steps continue with architectural or structural drawings, which most jurisdictions require stamped drawings from a licensed professional for structural work. Drawing costs in competitor reported ranges run about 800 to 3,000 dollars, depending on scope and professional. Drawings should show ceiling height zones, egress, stairs, insulation, HVAC, electrical, and plumbing, so inspectors can review the whole conversion, not just finishes.
Permit steps finish with framing inspection, rough mechanical inspection, insulation inspection where required, and final inspection, each at a different construction stage. Framing inspection happens after structural work but before insulation and drywall cover it, while rough mechanical inspection covers electrical, HVAC, and plumbing before walls close. Final inspection confirms egress, smoke detectors, HVAC function, and overall code compliance before occupancy.
Legal Bedroom Versus Bonus Room, Appraisal, Listing, Insurance, Tax
Legal bedroom versus bonus room affects appraisal value, listing honesty, insurance coverage, and property tax assessment, not just marketing language. An appraiser may credit a legal bedroom with full bedroom value, while a bonus room may receive lower value as flexible space. A listing that calls a bonus room a bedroom risks buyer inspection flags, price renegotiation, or deal collapse when the discrepancy appears.
Insurance coverage for a finished attic also depends on permitted status, heating, alarms, and egress, since insurers assess risk based on code compliance and safety systems. An unpermitted attic bedroom with no egress or alarms may face coverage gaps, higher premiums, or claim disputes after a fire or water event. Owners should inform their insurer about a conversion and confirm coverage before occupancy, not after a claim.
Tax assessment for a finished attic may change with permitted living area, since assessors count legal, permitted space differently than unpermitted space. A legal bedroom conversion may increase assessed value and tax, while a bonus room may affect assessment differently by jurisdiction. Owners should check local assessment rules with their assessor, since tax impact varies by market and by permitted status.
Contractor Quote Checklist, Seven Data Points Before First Quote
Contractor quote checklist starts with seven data points: peak ceiling height, joist size and spacing, current access point, HVAC situation, electrical panel capacity, visible moisture or mold, and approximate square footage above 7 feet. Showing up with those seven data points puts owners in a different conversation than simply saying they want to convert an attic. Contractors can price scope accurately when they know structure, access, and systems before visiting.
Contractor quote checklist should also include scope, exclusions, timeline, milestones, change order procedures, and detailed material specifications in writing. A quote that lists only a total price without scope invites misunderstandings about finishes, dormers, ensuite, and HVAC. Owners should compare quotes with identical scope, not only identical totals, since a low total with missing scope costs more later.
Contractor selection should check attic conversion experience, structural knowledge, insulation and ventilation expertise, insurance, and a portfolio of completed attics. Red flags include no attic experience, skipped structural evaluation, ignored ventilation needs, inability to explain code, unusually low bids, and no proper insurance. A contractor who cannot explain ceiling, egress, and insulation rules should not lead a conversion project.
1. Measure peak ceiling height. Note the highest point and where the slope drops below 7 feet.
2. Check joist size and spacing. Look for stamps on wood and note whether joists suit living loads.
3. Note current access point. Record pull down stair, hatch, or no access, plus stair location options.
4. Record HVAC situation. Note forced air trunk access, radiant heat, or ductless options, plus panel capacity.
5. Note moisture, staining, and insulation condition. Look for dark staining, compression, and roof leak signs.
6. Measure square footage above 7 feet. Calculate usable area separately from taped area, with 5 foot exclusion noted.
7. Photograph roof, eaves, and existing windows. Share photos with contractors and the building department for faster, clearer quotes.
Attic Bedroom Ideas by Style, 21 Ideas in One System
Bright White Attic, Skylight Gallery Wall, Dormer Daybed
Bright white attics use white walls, soft linens, and large skylights to create an open, airy feel that makes a small attic feel larger. A skylight gallery wall uses sunlight pouring through a skylight to create gallery style lighting on photographs or art, turning a slope into a display feature. A dormer daybed in a bright white room adds a lounge zone without darkening the space, since light fabrics and white walls reflect daylight.
Bright white attics benefit from warm wood and textile contrast, such as light oak floors, warm brass accents, and natural linen bedding, to avoid a clinical feel. A bright white room with only white surfaces can feel sterile, while warm wood and soft textiles add invitation. A chandelier or paper lantern at the tallest point can add a statement without crowding a low slope.
Bright white attics suit guest rooms, primary suites, and small attics where light is scarce and space feels tight. White paint on walls, ceiling, and trim blurs slope lines, while skylights and dormers add daylight that white surfaces reflect. Bright white works best with blackout shades, since morning light through skylights can wake sleepers early without shade control.
Moody Cocoon, Dark Brown, Charcoal, Navy Accent
Moody cocoon attics use dark brown, charcoal, and navy accent walls to create a cocoon like retreat under a sloped ceiling. A deep grey wall behind the bed anchors the room and contrasts with soft white bedding and light wooden floorboards, while a narrow arched window draws in natural light. Dark tones create stability and security feelings, especially when paired with warm floor lamps and soft textiles.
Moody attics benefit from sculptural floor lamps, abstract art, and greenery, which add personality without overwhelming a compact space. A sculptural lamp with a warm toned bulb provides inviting light, while abstract art adds colour without clutter. Greenery adds life and softness, yet plants need light, so plant placement should suit skylight and dormer light levels.
Moody attics suit primary suites and guest rooms where rest is the goal, especially with matte finishes and warm wood accents. Dark paint should stay on an accent wall or a colour drenched room with a strong light plan, not on every surface in a dark attic without light. A moody attic with good lighting feels cosy, while a moody attic without light feels cave like.
Scandinavian Calm, Whitewashed Slopes, Warm Wood
Scandinavian attics use whitewashed slopes, warm wood accents, and restrained palettes to make sloped ceilings feel intentional and calm. Limewash or soft white paint diffuses light and blurs ceiling planes, while whitewashed tongue and groove cladding adds subtle texture without visual weight. Warm wood headboards, benches, and exposed rafters sealed in natural finish balance lightness with warmth.
Scandinavian attics benefit from low, leggy furniture and edited accessories, such as a paper lantern pendant, stoneware catchall, and layered neutral linens. Low furniture maintains sightlines under eaves, while edited accessories prevent a small room from feeling crowded. A thick wool rug absorbs sound and adds warmth, while a sheepskin draped over a chair adds texture and comfort.
Scandinavian attics suit small attics, guest rooms, and primary suites where timeless, bright, spacious feelings matter more than bold colour. That style embraces architecture instead of fighting it, delivering a bright, spacious feel without major construction. Scandinavian calm works best with skylight and dormer light, since light is the main decoration in that system.
Modern Farmhouse, Shiplap, Barn Door, Black Accents
Modern farmhouse attics use shiplap, barn doors, and black accents to add texture, familiarity, and contrast to a sloped room. Shiplap across gable walls emphasises height and adds texture, while smooth slopes provide contrast, and a sliding barn door saves clearance for an ensuite or closet. Black iron sconces, thin frame mirrors, and matte metal beds sharpen cosy whites and woods.
Modern farmhouse attics benefit from vintage inspired rugs, linen curtains, and antique finds, which add soul without crowding a small room. A long runner along a knee wall visually elongates the room, while shaker front drawers in eaves add storage with a familiar farmhouse look. Linen curtains soften dormer angles, while oversized pillows add comfort to a bed or window seat.
Modern farmhouse attics suit guest suites and family attics, where crowd pleasing, fresh yet timeless feelings matter. That blend of crisp lines and familiar textures makes a sloped ceiling bedroom feel both fresh and timeless, without requiring bold colour or expensive custom work. Farmhouse style works best with white, wood, and black palettes, not with dark, moody colour schemes.
Industrial, Exposed Brick, Steel, Leather Platform Bed
Industrial attics use exposed brick, steel trusses, and leather platform beds to celebrate structure and raw materials. Exposed brick adds industrial feel and accent wall interest, while ceiling beams and clothing rods echo that texture. Smooth furniture and soft bedding add warmth, so an industrial attic feels welcoming rather than cold, even with brick and steel surfaces.
Industrial attics benefit from metal lighting, leather textures, and simple bedding, which reinforce industrial character without clutter. A steel pendant or iron sconce adds industrial light, while leather bedding or a leather headboard adds tactile warmth. Simple, clean lined furniture prevents an industrial attic from feeling like a warehouse, since soft textiles balance hard surfaces.
Industrial attics suit loft apartments, artist studios, and modern primary suites, where raw structure is a feature rather than a flaw. That style works best in large attics with high ceilings and large skylights, since brick and steel need light and space to feel intentional. Small, dark attics can still use industrial accents, such as a brick accent wall, without full industrial finishes.
Japandi, Low Tatami Bed, Ash Wood, Skylight
Japandi attics blend Japanese minimalism and Scandinavian warmth, with low tatami platform beds, ash wood floors, and skylight light. A platform bed sitting close to the floor suits attics where the ceiling slopes low, since low height keeps sightlines open and gives the room a calm, grounded feel. Ash wood floors, linen bedding, and simple, clean lined furniture complete a serene, uncluttered attic.
Japandi attics benefit from negative space, natural materials, and soft light, with few accessories and no visual clutter. A single vase, a simple lamp, and layered neutral linens add personality without crowding a small room. Skylight light over a low bed creates a calm, meditative focal point, while ash wood adds warmth without darkening the room.
Japandi attics suit primary suites, reading retreats, and small attics where calm and simplicity matter more than storage volume or bold style. That style requires discipline, since every extra piece breaks the calm, yet it rewards owners with a restful top floor retreat. Japandi works best with built in storage hidden behind flat panels, so clutter stays out of sight.
Coastal, White Shiplap, Driftwood, Navy Stripe
Coastal attics use white shiplap walls, driftwood accents, and navy striped bedding to create a breezy, seaside feeling under a slope. White shiplap reflects light and adds texture, while driftwood tones add warmth and natural character. Navy stripes on bedding add colour contrast without darkening the room, while woven rugs and rattan accents add coastal texture.
Coastal attics benefit from light fabrics, natural fibres, and simple decor, such as linen curtains, cotton bedding, and woven baskets for storage. Light fabrics keep dormer and skylight light flowing, while natural fibres add texture without weight. Coastal decor should stay simple, since heavy nautical props can make a small attic feel like a theme room rather than a bedroom.
Coastal attics suit guest rooms, beach houses, and bright attics where light and airiness matter most. That style works best with large dormers or skylights, since coastal brightness needs daylight to feel authentic. A coastal attic without enough light can feel pale and cold, so light planning matters as much as colour choice.
Boho, Canopy, Layered Rugs, Rattan, Plants
Boho attics use canopy beds, layered vintage rugs, rattan accents, and trailing plants to create a relaxed, collected feeling under a slope. Layered rugs add warmth and pattern to floors, while rattan chairs, baskets, and light fixtures add natural texture. Trailing plants add life and softness, especially near skylights and dormers where bright light helps plants thrive.
Boho attics benefit from pattern on pillows, throws, and rugs, rather than pattern on every wall, since small attics can feel crowded with too much pattern. A canopy bed should stay low in an attic, since a tall canopy can hit a slope and make a room feel cramped. Low, layered textiles give boho warmth without tall furniture that fights the roofline.
Boho attics suit guest rooms, teen rooms, and creative studios, where relaxed, personal style matters more than formal symmetry. That style works best with skylight light for plants and layered textiles for warmth, yet it needs storage discipline, since boho collections can quickly become clutter in a small attic. Built in storage behind flat panels helps boho rooms stay relaxed rather than messy.
Rustic, Exposed Beams, Wood Ceiling, Wrought Iron
Rustic attics use exposed timber beams, wood clad ceilings, and wrought iron bed frames to celebrate natural materials and cabin warmth. Wood ceilings add warmth and texture, while exposed beams showcase structure and colour. Warm golden hour light through skylights and dormers enhances rustic wood tones, making a rustic attic feel inviting at sunset.
Rustic attics benefit from chunky knit throws, wood burning stove style focal points where safe and code compliant, and warm lighting, which add cosiness without clutter. Chunky throws add tactile warmth to beds and chairs, while warm bulbs in sconces and lamps create evening glow. Rustic decor should stay simple, since too many rustic props can make a small attic feel like a cabin gift shop.
Rustic attics suit mountain homes, cabins, and primary suites where natural materials and warmth matter most. That style works best with large beams, wood floors, and skylight light, since rustic texture needs light to show grain and colour. Small, dark attics can still use rustic accents, such as a wood headboard or beam detail, without full wood cladding.
Kids and Teen, Bunk Under Pitch, Dormer Desk, Peg Rails
Kids and teen attics use bunk beds under pitch, dormer desks, and peg rails to turn awkward angles into fun, functional zones. Bunk beds under a steep pitch use low zones for sleeping, while dormer desks use full height and daylight for study. Peg rails along knee walls corral bags, headphones, and hoodies without bulky wardrobes, which suits teen ownership and daily use.
Kids and teen attics benefit from murals, decals, and colour blocking, which add personality without structural change. Murals or temporary decals on walls or ceilings personalise a kids room, while colour blocking one sloped plane adds teen personality without crowding the room. Those finishes can change as children grow, without repainting a whole attic or rebuilding storage.
Kids and teen attics need safety and storage discipline, with guardrails, secure shelving, cord management, and clear walkways. A kids attic that is fun yet unsafe fails as a bedroom, while a teen attic that is stylish yet messy frustrates daily use. Safety, storage, and personality should be planned together, not as separate afterthoughts.
Mistakes to Avoid
1. Buying tall furniture before measuring. Tall dressers, armoires, and headboards that fight the slope waste money and crowd a room. Measure ceiling height at each furniture spot before ordering, and choose low, long furniture for slope zones.
2. Painting dark without a light plan. Dark paint in a dark attic without skylight, dormer, or layered lighting feels cave like rather than cosy. Add light first, then choose dark colour, with blackout shades for sleep control.
3. Blocking a dormer with a bed. A bed that blocks a dormer window wastes light, view, and access, while making the dormer useless. Centre a bed between dormers or place it perpendicular, so dormers stay usable as light and lounge zones.
4. Filling every eave with furniture. Filling every low zone with furniture islands leaves no breathing space or circulation, making a small room feel cramped. Leave the centre clear and use low zones for storage, not for extra furniture.
5. Skipping egress to save money. Skipping a proper egress window to save money creates a safety risk and a legal bedroom failure. Budget egress early, with framing, flashing, and window unit scope included, before finishes are chosen.
6. Skipping insulation and air sealing. Skipping insulation, air sealing, and vapor control leaves a room hot in summer, cold in winter, and prone to condensation. Comfort engineering should come before finishes, since insulation is hard to add after walls close.
7. Skipping permits to save time. Skipping permits and inspections risks resale flags, insurance gaps, and retroactive permit costs that exceed original permit fees. Pull permits for structural, electrical, HVAC, and plumbing work, and keep inspection records for future buyers.
8. Using a pull down ladder as bedroom access. A pull down ladder does not meet code for a bedroom, yet owners sometimes plan a bedroom around ladder access to save stair cost. Plan a real stair early, with headroom, handrails, lighting, and floor area lost below included in the budget.
9. Ignoring skylight heat and flashing. A skylight without heat control and proper flashing can overheat a room in summer and leak in heavy rain. Choose low emissivity glazing, shades, venting where needed, and a contractor who can explain flashing details clearly.
10. Copying a photo without a layout plan. A photo that looks beautiful may hide headroom, storage, and circulation problems that only a layout plan reveals. Use photos for style inspiration, then test bed placement, storage, light, and walkways with measurements before buying.
Expert Tips
1. Map ceiling height zones first. Mark 7 foot zones, 5 foot exclusion zones, and full height zones on a room sketch before choosing any furniture. That map decides bed, storage, desk, and walkway placement more accurately than any photo or style board.
2. Test bed placement with tape on the floor. Tape a bed outline on the floor at each candidate spot, then test sitting, standing, dressing, and walking around the taped bed. That low cost test reveals headroom and circulation problems before a mattress arrives.
3. Use light paint on slopes and trim. Paint slopes, walls, and trim the same light colour to blur lines and expand a small attic visually. Test large samples on slope and wall at different times of day, since slope angles change colour under skylight and dormer light.
4. Build storage into the slope, not against it. Build knee wall drawers, eave wardrobes, and platform bed drawers that follow roof angles, rather than placing tall furniture against a slope. Built in storage reads as architecture, saves floor space, and keeps the centre clear.
5. Pair dormer light with skylight light. Use dormer light for face height tasks and skylight light for general brightness, so a room feels bright at every hour. A room with only dormer light can feel dark at the slope, while a room with only skylight light can feel harsh at night.
6. Layer lighting with dimmers. Combine recessed gimbal lights, wall sconces, and LED strips, each on a dimmer, to move from bright task light to soft evening light. Layered lighting fills sloped corners that a single overhead light leaves dim, while dimmers give guests and couples control.
7. Choose low, long furniture for slope zones. Choose low platform beds, low nightstands, and long low storage for slope zones, and reserve tall furniture for gable walls only. Horizontal lines follow roof geometry, while vertical lines fight it and highlight low ceilings.
8. Pack a move in checklist for attic rooms. Pack bedding, lighting, storage, and shade controls as a complete attic move in set, rather than buying pieces separately without a plan. A checklist prevents forgotten goggles, shades, or storage bins that make an attic feel unfinished for months.
9. Get three quotes with identical scope. Get three local contractor quotes with the same scope, including structure, dormer, ensuite, HVAC, electrical, finishes, permits, and contingency. Identical scope comparison reveals true price differences, while different scope comparison hides missing work that costs more later.
10. Keep a conversion record for resale. Keep permits, inspections, drawings, product warranties, and contractor records in one file for future buyers, appraisers, and insurers. A complete conversion record turns a finished attic from a marketing claim into a verifiable, valuable bedroom.
Quick Decision Quiz
Question 1: What is the first decision in attic bedroom ideas?
Slope and headroom come first, because ceiling height zones decide bed, storage, desk, and walkway placement before colour or style. Measure peak height, 7 foot zone, and 5 foot exclusion, then choose furniture that fits those zones.
Question 2: Where should the bed go in an attic bedroom?
Bed placement depends on headroom, yet gable wall placement suits most couples for standing and dressing, while slope placement suits low platform beds for sleeping only. Test sitting, standing, dressing, and making the bed at each candidate spot before committing.
Question 3: Dormer or skylight, which should I choose?
Dormer suits headroom need, since it adds usable floor area and a vertical window, while skylight suits light need, since it adds top light without floor area. Choose dormer for a desk nook or bed head zone, and skylight for general brightness or a gallery wall.
Question 4: Can my attic be a legal bedroom?
Legal bedroom status needs ceiling, size, egress, heating, light, ventilation, and alarms, verified against local adopted code. Model code summaries give 7 feet over 50 percent, 70 square feet, and egress 5.7 square feet, yet local amendments govern, so check with a local building department first.
Question 5: How much does an attic bedroom conversion cost?
Conversion cost depends on scope, with competitor reported planning ranges from simple to major structural work, plus dormer and ensuite costs where needed. Get three local quotes with identical scope, including structure, HVAC, electrical, finishes, permits, and contingency, before budgeting a single total.
Question 6: How do I keep an attic bedroom cool in summer?
Cooling starts with insulation, air sealing, ventilation, and skylight heat control, plus a properly sized mini split or extended duct system. South facing skylights need shades or low emissivity glazing, while venting skylights release warm air near the ridge.
Question 7: What storage works best under a slope?
Storage under a slope works best as knee wall drawers, eave wardrobes by height, and platform bed drawers, with drawer depth 18 to 24 inches where eave depth allows. Hanging rails need full height, while drawers suit low zones, so map wardrobe height across the wall before ordering doors.
Question 8: What furniture should I avoid in an attic bedroom?
Avoid tall dressers, tall armoires, and tall headboards under slopes, since they fight roof geometry and make low rooms feel cramped. Choose low, long furniture for slope zones, and reserve tall furniture for the tallest gable wall only.
FAQs
What is an attic bedroom?
An attic bedroom is a bedroom located in a roof space, with sloped ceilings, dormers or skylights for light, and eave storage for low areas. Attic bedrooms suit primary suites, guest rooms, kids rooms, teen rooms, and home office combos, depending on size, headroom, and layout. A finished attic bedroom needs insulation, heating, lighting, stairs, and safety systems, not only a bed and paint.
How do you decorate an attic bedroom?
Decorate an attic bedroom by mapping slope zones first, then choosing low furniture, built in storage, layered lighting, and a light or moody palette that suits light levels. Place the bed by headroom, push storage into low zones, add dormer or skylight light, and keep the centre clear for walking. Add style through beams, brick, shiplap, limewash, gallery walls, and plants, without crowding a small room.
Where should the bed go in an attic bedroom?
Bed placement depends on headroom and room shape, yet gable wall placement suits most sleepers for standing, dressing, and making the bed. Slope placement suits low platform beds for sleeping only, while bed between dormers suits light and symmetry, and bed perpendicular to windows suits floor space. Test sitting, standing, dressing, and walking at each candidate spot before committing to a layout.
How do you make a small attic bedroom feel bigger?
Small attics feel bigger with light paint on walls and ceiling, continuous flooring, low furniture, built in storage, and a clear centre path. Colour drenching with the same light colour on walls, ceiling, and trim blurs slope lines, while mirrors opposite windows bounce daylight deeper into the room. Avoid filling every eave with furniture, since breathing space makes a compact room feel generous and easier to move through.
What paint color makes an attic bedroom feel bigger?
Light paint colours such as white, cream, pale greige, soft green, and muted blue reflect light and blur edges between wall and ceiling in small attics. Matte finishes on walls absorb light gently and hide slope imperfections, while a soft sheen on woodwork stays easy to clean. Test large samples on slope and wall at different times of day, since slope angles change colour under skylight and dormer light.
Can an attic be a legal bedroom?
An attic can be a legal bedroom when it meets ceiling, size, egress, heating, light, ventilation, electrical, and alarm rules under local adopted code. Model code summaries give 7 feet over 50 percent of floor area, 70 square feet minimum, and egress 5.7 square feet, yet local amendments govern. Check with a local building department before marketing, listing, or insuring an attic as a bedroom, since unpermitted status affects appraisal and resale.
How high must an attic ceiling be for a bedroom?
Model code summaries require 7 feet of ceiling height over at least 50 percent of floor area for a habitable room, with floor area under 5 feet generally excluded from minimum size. That rule is often called the 7 and 7 rule, yet it is a model code summary, not a universal permit. Local adopted code and local amendments govern, so verify ceiling calculation with a local building department before finalising a layout.
How do you measure usable attic floor area?
Measure usable attic floor area by marking peak height, marking a 7 foot line on each slope, measuring floor between those lines, and excluding floor under 5 feet from minimum size calculations. Record knee wall height, eave depth, and window positions on a sketch, since those numbers decide bed, storage, and desk placement. A room that tapes at 300 square feet may only credit 180 to 200 square feet as usable, which changes layout and legal status.
Does an attic bedroom need an egress window?
An attic bedroom needs an emergency escape and rescue opening, usually a window sized to code, unless a code compliant door or other approved opening serves that purpose. Model code summaries give 5.7 square feet clear opening, 24 inches height, 20 inches width, and sill max 44 inches above the floor, verified locally. A small decorative attic window usually does not qualify, and egress location must stay reachable and operable without tools or keys.
Does an attic bedroom need a closet to be legal?
Closet requirements for a legal bedroom vary by jurisdiction and by appraiser, with many jurisdictions not requiring a closet for code bedroom status. Some appraisers and listing practices expect a closet, while model code summaries focus on ceiling, size, egress, heating, light, ventilation, and alarms. Check local code and local appraisal practice before assuming a closet is required, and plan storage that works whether or not a closet exists.
Do I need a permit to convert an attic into a bedroom?
Most attic conversions need permits for structural, electrical, HVAC, plumbing, and egress work, with drawings and inspections required by local building departments. Permit steps usually include pre application, drawings, framing inspection, rough mechanical inspection, insulation inspection where required, and final inspection. Skipping permits risks resale flags, insurance gaps, and retroactive permit costs, so pull permits before closing walls.
How much does it cost to convert an attic into a bedroom?
Conversion cost depends on scope, with competitor reported planning ranges from simple to major structural work, plus dormer, staircase, HVAC, and ensuite costs where needed. Simple conversions assume adequate ceiling, load bearing floors, and accessible HVAC, while major work adds shed dormers, ridge beam changes, and full mechanical systems. Get three local quotes with identical scope, including permits and contingency, before budgeting a single total, since no national price fits every attic.
Dormer versus skylight, which is better for an attic bedroom?
Dormer suits headroom need, since it adds usable floor area and a vertical window for reading, working, and viewing. Skylight suits light need, since it adds top light and drama without floor area, yet it does not add standing room. Choose dormer for a desk nook, bed head zone, or primary suite gain, and skylight for general brightness, gallery walls, or a bed canopy effect, with heat control and flashing planned carefully.
How do you keep an attic bedroom cool in summer?
Cooling starts with insulation, air sealing, ventilation, skylight heat control, and properly sized heating and cooling, in that order. South facing skylights need shades or low emissivity glazing, while venting skylights release warm air near the ridge. A mini split with independent control often suits top floor rooms better than extended ductwork, since it can cool a hot attic without overcooling lower floors.
How do you insulate an attic bedroom?
Insulate a finished attic bedroom at the roof deck, so the bedroom sits inside the insulated envelope, rather than at the attic floor alone. Roof deck insulation, air sealing, vapor control, and ventilation work together to prevent heat loss, heat gain, condensation, and mold. Check roof condition, staining, and existing insulation before closing walls, since hidden moisture and leaks will damage new finishes quickly.
Can I use a pull down ladder for an attic bedroom?
A pull down ladder does not meet code for a habitable bedroom, since living space needs a real, code compliant stairway for safe daily access and egress. Pull down ladders suit storage access only, while bedrooms need stairs with headroom, width, handrails, lighting, and furniture moving clearance. Plan stair location early, since a new stair needs floor area below and affects attic circulation as well.
Can I put a bathroom in an attic bedroom?
An attic ensuite works when plumbing location, headroom, ventilation, and waterproofing allow a shower, toilet, and vanity in full height zones. Place new bathrooms above or near existing water and waste lines to keep plumbing simpler and cheaper, and place showers and toilets in full height areas, not under low slopes. Budget ensuite costs as competitor reported planning ranges, with plumbing, waterproofing, ventilation, and finishes scoped separately by a local contractor.
How do you add storage to an attic bedroom?
Add storage by following the roofline, with knee wall drawers in low zones, eave wardrobes by height, platform bed drawers for seasonal bedding, and dormer window seat drawers for linens. Drawer depth of 18 to 24 inches suits many knee walls, while hanging rails need full height for shirts and dresses. Built in storage suits daily use zones, while freestanding low shelves suit flexible guest and kids rooms.
What furniture works in a low ceiling bedroom?
Low ceiling bedrooms suit low platform beds, low nightstands of 18 to 20 inches, floating nightstands, long low storage, and slim desks that follow horizontal lines. Tall dressers, tall armoires, and tall headboards fight the slope and make low rooms feel cramped, so reserve tall furniture for the tallest gable wall only. Test furniture height against ceiling height at each planned spot, including lamp height and drawer opening clearance.
How do you light a sloped ceiling bedroom?
Light a sloped ceiling bedroom with layered lighting, including recessed gimbal lights at the ridge, wall washers along knee walls, dimmable sconces near pillows, and LED strips along beams. Dormers and skylights provide daylight, while dimmers on each layer allow bright task light and soft evening light in the same room. Avoid a single central pendant in a low attic, since pendants hang into head space and create harsh shadows on slopes.
What flooring is best for an attic bedroom?
Flooring choice depends on comfort, sound, and moisture, with hardwood, luxury vinyl plank, and wool carpet all used in attic bedrooms. Hardwood adds warmth and durability, luxury vinyl plank adds water resistance and easy cleaning, and wool carpet adds softness, warmth, and sound dampening. Thick underlayment beneath hard floors reduces footstep noise, while large area rugs add warmth and sound control in any attic flooring system.
How do you make an attic bedroom cozy for guests?
Guest attics feel cozy with flexible twin beds, individual reading sconces, spare blanket storage, blackout shades, and simple light and heating controls. Two built in twins along opposite eaves suit siblings, friends, and holiday overflow, while hooks along a knee wall replace bulky wardrobes. Light, durable palettes and washable textiles allow seasonal changes, while a small welcome note with shade, heating, and Wi-Fi details helps guests feel at ease.
Will an attic bedroom add resale value?
An attic bedroom can add resale value when it is permitted, code compliant, well insulated, and honestly listed as a legal bedroom, with permits and inspection records available. An unpermitted attic marketed as a bedroom risks inspection flags, appraisal downgrades, and price renegotiation, which can erase perceived value gains. Value depends on market, attic size, headroom, ensuite, and local demand for extra bedrooms, so get local appraisal and agent advice before budgeting for resale return.
Conclusion
Attic bedroom ideas succeed when slope, headroom, light, storage, and legal status are planned before colour, bedding, or furniture style. A bed placed by headroom, storage built into low zones, light added through dormers or skylights, and a centre kept clear for walking create a room that feels intentional rather than cramped. Those four moves work for small guest lofts, kids rooms, teen studios, and large primary suites alike, with size and user needs shaping the details.
Attic bedroom ideas also succeed when costs and code are treated as design inputs, not as afterthoughts that appear after walls close. Measure usable floor area, check ceiling and egress rules locally, plan insulation and HVAC early, and get three quotes with identical scope before committing to a dormer, ensuite, or staircase. That discipline prevents mid project stalls, resale flags, and uncomfortable rooms that look beautiful in photos yet fail daily use.
Start by measuring your attic, marking 7 foot zones and egress options, and choosing bed placement by sitting, standing, and dressing headroom. Then choose storage by eave height, light by dormer or skylight need, and colour by light level, with a contractor and local building department check before structural work begins. Attic bedroom ideas, planned that way, turn a forgotten roof space into a private, bright, and genuinely usable bedroom that owners enjoy every day.
