
Studio apartment layout ideas work best when the bed is placed first, zones are defined by furniture and rugs, and a clear walking path connects every part of the room. A studio is not a small one-bedroom with missing walls. It is one open room where sleeping, living, cooking, eating, working, and storing must coexist without feeling like one undifferentiated space.
The biggest mistake is treating square footage as the whole answer. A well-shaped 400 square foot studio can feel larger than a poorly shaped 500 square foot studio with a bed in the entry sightline. Shape, window position, door swing, and storage walls decide daily comfort far more than total area alone.
Start with your daily routine, not a furniture catalog. Note where you enter, where you cook in the morning, where you work, where you relax at night, and where guests sit. A layout that supports those five movements will feel calm, while a layout that fights them will feel cramped even with expensive furniture.
Tape furniture footprints on the floor before you buy anything large. Tape shows walkways, bed clearance, sofa depth, and rug size in real life. That ten-minute test prevents the most common studio error, which is a sofa or bed that looks right online and blocks movement at home.
A strong studio layout puts the bed against the longest unbroken wall farthest from the entry, defines the living zone with a rug and sofa back, and keeps primary walkways 30 to 36 inches wide.
An alcove adds a recessed sleeping nook, while a junior one-bedroom adds a partial divider that usually does not make it a legal bedroom. Choose zoning tools that protect light, movement, and storage at the same time.
What Is a Studio Apartment, Really?
A studio apartment is one main room for sleeping, living, cooking, eating, and working, plus a separate bathroom. The bathroom is the only room with a full wall and door in a standard studio. Every other function shares open floor space, which is why zoning matters more than decorating.
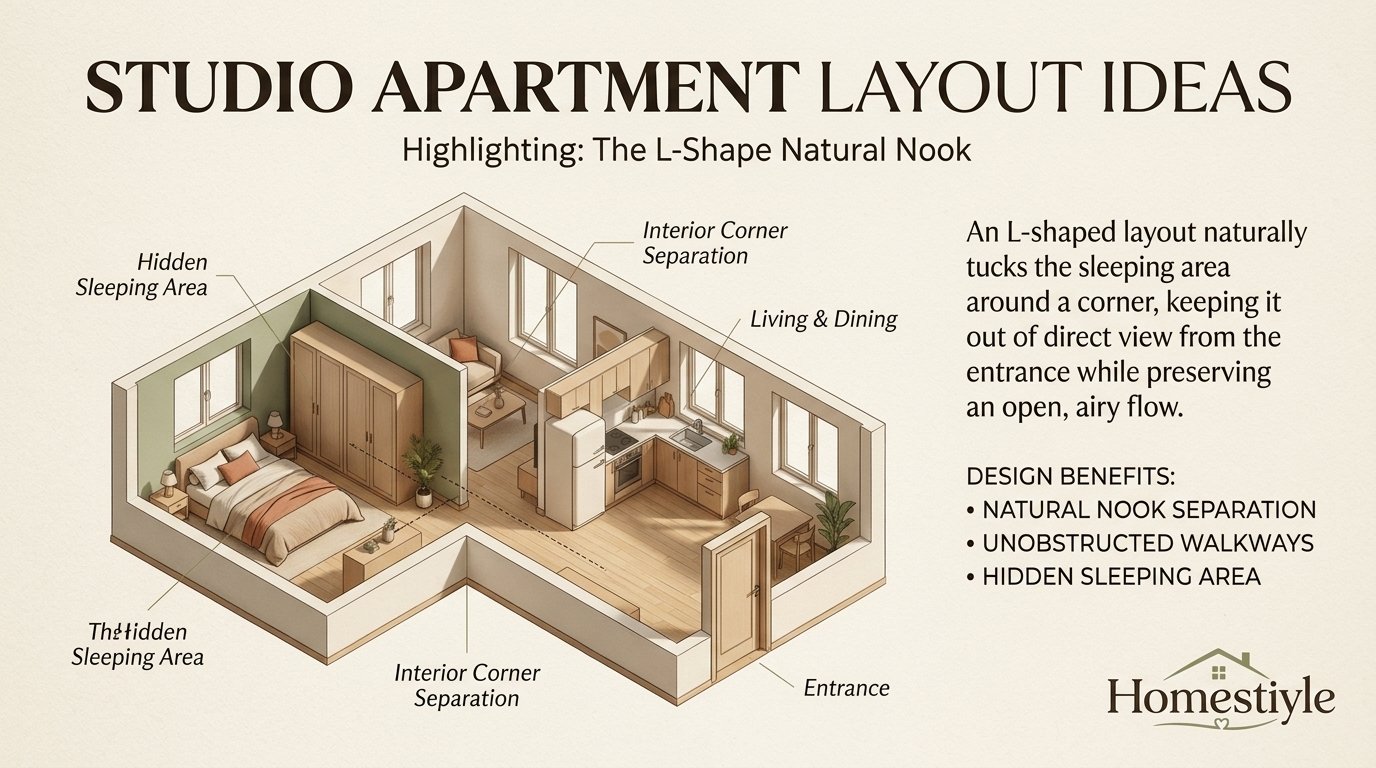
An alcove studio adds a recessed nook off the main room, often shaped like an L, for the bed. That nook feels more private than an open studio, but it remains open to the main space without a full wall or door. A curtain can close the alcove at night and open it during the day.
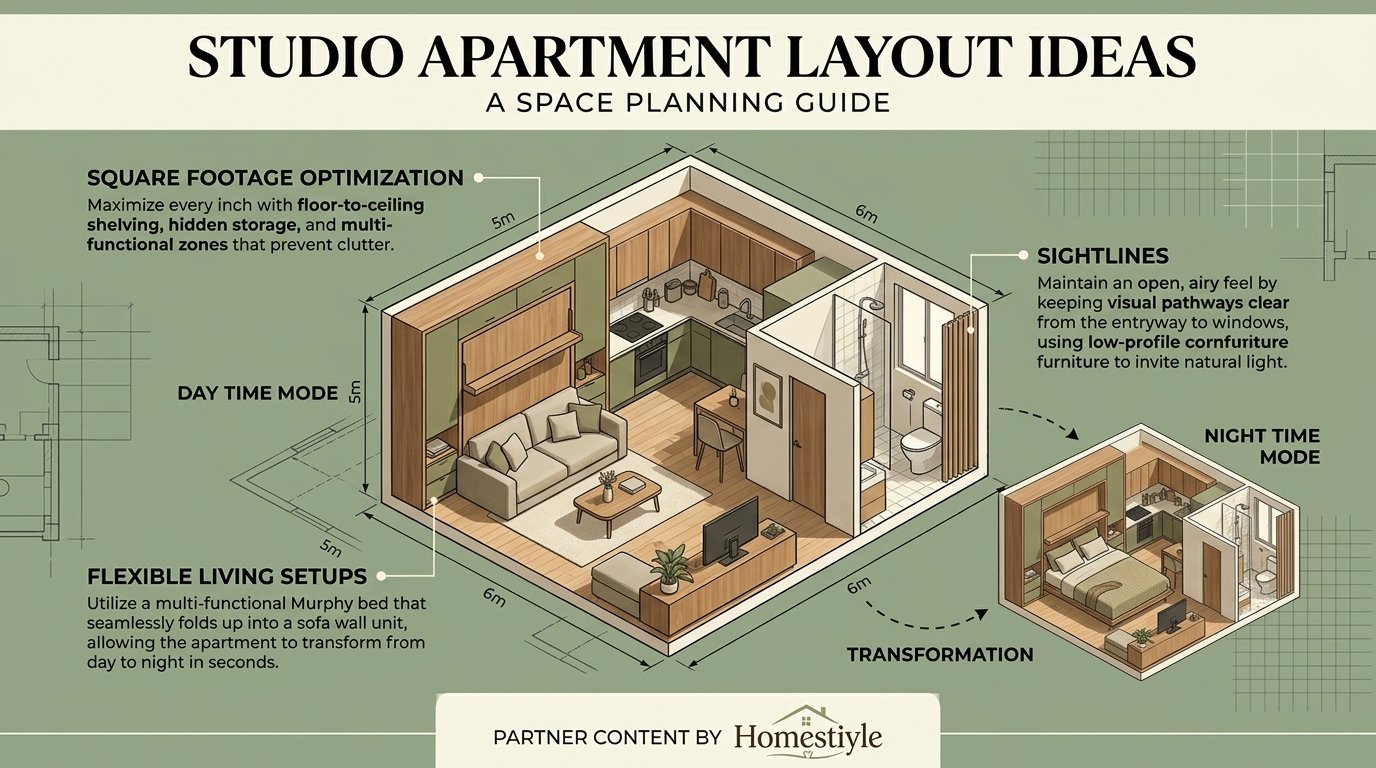
A junior one-bedroom is a larger studio with a more defined sleeping area, sometimes separated by a partial wall or sliding partition. That separation improves privacy and sightlines, but it frequently fails legal bedroom criteria such as an egress window, minimum size, or a full door. Marketing terms vary by city and building, so check the actual floor plan, not the label alone.
A loft studio uses high ceilings, often 11 feet or more, to create a raised sleeping platform or a second level. Loft living suits people comfortable with stairs and lower headroom above the platform. A loft is a ceiling and volume type, not a size class, and it should not be confused with a standard studio.
What a junior one-bedroom is not
A junior one-bedroom is not a true one-bedroom, even when the sleeping area looks like a separate room in photos. A true bedroom usually has full walls, a door, an egress window, and enough size to meet local code. A partial wall, a bookshelf, or a curtain does not create those legal features by itself.
Check local building and housing rules before assuming a sleeping nook counts as a bedroom for occupancy, resale, or rental listings. Local adoption governs, and rules differ by city and building type. General code summaries are useful for planning, but they do not replace a check with the local building department.
Size and shape matter more than total square feet
A rectangular studio often zones more easily than a square studio of the same size, because functions can line up along a clear spine. Entry, kitchen, living, dining, and sleep zones can follow one logical path from door to window. A square room can feel static, with furniture pushed to walls and a dead center.
An L-shaped studio creates natural zones through architecture alone, with kitchen and dining in one leg and living and sleeping in the other. That shape hides the bed from the entry more easily and gives corner light from two walls. One leg can still feel dark if windows sit unevenly, so test light at different times.
Start With the Bed, Then Build Zones Around It
The bed is the largest and least flexible piece in a studio, so it decides the layout more than any other item. Place it first, then build living, dining, work, and storage zones around it. Working backward from a sofa or TV usually forces the bed into a leftover corner near the door.
Place the bed against the longest unbroken wall farthest from the entry door when possible. That position keeps the bed out of the immediate entry sightline and makes the room read larger on arrival. A bed that greets you at the front door makes the whole studio feel smaller, no matter how well it is styled.
Leave at least 30 inches of clearance on at least one side of the bed for walking and making the bed comfortably. A queen bed plus that clearance needs roughly 5 feet by 6 feet 6 inches of footprint in planning terms. Two-sided access feels more hotel-like, but one clear side plus foot access often works in a tight studio.
Angle the bed slightly or use a headboard and bedding that read as intentional, not temporary, when the bed stays visible. A real frame, a proper headboard, and cohesive bedding prevent a dorm-room look. Avoid hiding a good bed behind a curtain all day, since that wastes light and makes the room feel smaller.
Test bed placement at night and in the morning, not just at move-in. Check light from windows, noise from the entry, distance to the bathroom, and the path to the kitchen for coffee. A bed that works for sleeping but blocks the morning path will create daily friction.
Bed side clearance and making the bed
Making a bed without side clearance becomes a daily wrestling match with bedding and pillows. Leave room to tuck sheets, fluff pillows, and change bedding without climbing over the bed. A narrow gap that fits your body sideways is not enough for regular bed-making.
Use a platform bed with drawers when side clearance is tight, since it replaces a dresser and frees wall space elsewhere. Under-bed storage works best for seasonal items, spare bedding, and luggage, not for daily clothes you need every morning. Daily items belong in a closet or wardrobe at standing height.
Bed sightline from the front door
Stand in the doorway and look into the room before finalizing bed placement. The first view should show a living zone, window, or art, not an unmade bed. A sofa back, bookshelf, curtain, or alcove wall can soften the sightline without blocking light completely.
When the bed must sit near the entry, dress it like a daybed during the day with bolsters and a cover that reads as seating. That trick works best in narrow rooms where the bed runs lengthwise along a wall. At night, remove bolsters and restore full bedding without moving furniture.
Zoning Without Walls
Zoning in a studio means giving each function a clear place and boundary without building walls. Furniture, rugs, lighting, color, and flooring changes all signal a zone change. The best zoning feels obvious to guests, yet it does not block light, air, or movement.
Use one zoning tool per boundary, not three at once. A rug plus a sofa back plus a curtain on the same boundary can feel heavy and dark. Choose the lightest tool that still defines the zone, and save stronger dividers for sleep privacy or work calls.
Keep sightlines long where possible, so daylight travels from window to entry. A low divider, an open bookshelf, or a sheer curtain preserves light better than a tall solid unit. Light travel makes a studio feel larger, even when the floor plan stays the same.
Rug zoning
Use a separate rug for the living zone and a smaller rug or runner for the sleeping zone. A living rug should sit under the front legs of the sofa and chairs at minimum, and under all four legs when space allows. An 8 by 10 foot rug anchors a living zone well, while a rug under 5 by 7 feet often looks like a bath mat.
Leave a small gap of bare floor between zone rugs, so each zone reads clearly without overlapping. Overlapping rugs create a tripping edge and blur the boundary they should define. Choose low-pile rugs for walkways and washable rugs where spills or pets are likely.
A runner in the kitchen or entry can mark a third zone without furniture. Runners work well in narrow transitions, but they must lie flat and stay clear of door swings. Use rug pads to prevent slipping, especially on hard floors.
Sofa back as a divider
Float the sofa with its back to the bed to create a soft boundary between sleep and living zones. That single move separates functions without a wall, a curtain, or a tall unit. Add a slim console table behind the sofa for a lamp, books, and phone charging.
Pull the sofa 12 to 18 inches from the wall when space allows, so the back reads as a divider, not as a wall-hugging seat. That gap also gives room for a console table and cable routing. In studios under 400 square feet, a sofa back divider may still work if walkways stay clear.
Angle the sofa slightly away from the bed when a straight back feels too abrupt. A slight angle creates a visual break and a more natural conversation layout. Test the angle with the TV, window light, and walking path before committing.
Bookshelf divider
Use an open bookshelf as a divider when you need storage plus separation. Open shelves let light and sightlines pass through, while closed baskets on lower shelves hide clutter. Keep middle shelves open or lightly filled, so the divider does not become a solid wall.
Place the bookshelf perpendicular to a wall, not floating in the middle of the room, for stability and a clear boundary. Anchor tall units to wall studs where possible, especially in homes with children or pets. A falling bookshelf is a safety risk, not just a decor problem.
Fill a divider bookshelf with books, plants, and a few objects, not every possession you own. A crowded divider blocks light and reads as clutter from both sides. Edit ruthlessly, and move overflow to closed storage elsewhere.
Curtain divider
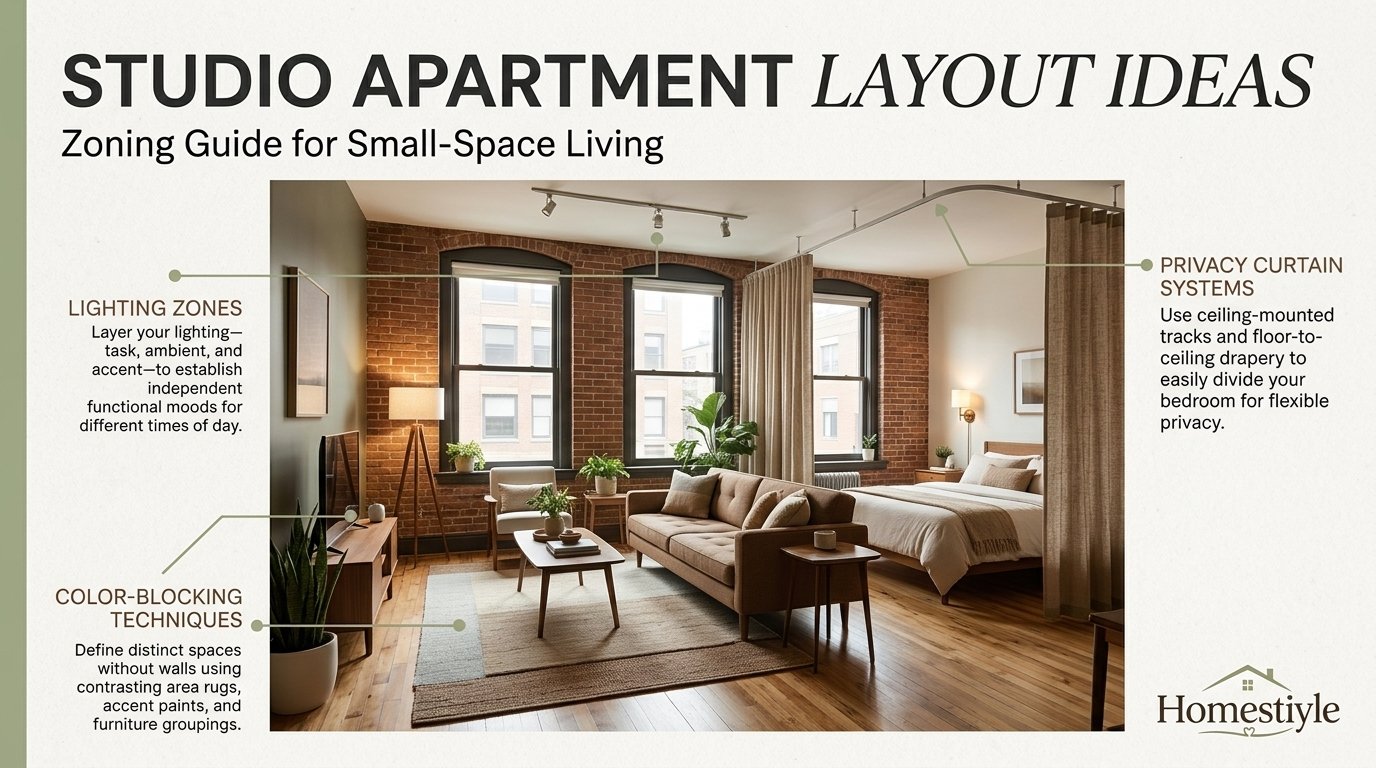
Hang a ceiling-mounted curtain track at the sleep zone entrance for flexible privacy. Curtains close at night, open during the day, and cost less than a sliding partition. Choose a fabric that blocks sightlines without blocking all light, such as a medium-weight linen-look curtain.
Curtains move in drafts and offer no sound privacy, so pair them with a white noise machine or headphones for calls. A curtain works best for sleep privacy and visual separation, not for work calls or loud conversations. Test the track with the curtain closed and open, since a sagging track ruins the effect.
Use a curtain color that matches the room palette, not a bold contrast that draws attention to the divider. A cohesive color makes the curtain read as architecture, not as a temporary fix. Tie the curtain back during the day to restore full light and openness.
Sliding partition
A sliding partition gives stronger separation than a curtain, with a track on the ceiling or floor and panels that stack or slide. Sliding panels can close a sleep zone at night and open fully during the day. Check lease rules before installing any track that drills into ceilings or floors.
Sliding partitions cost more than curtains and need clear track space on at least one side. Measure the stack width when panels are open, since that stack can block a walkway or window. Choose panels with a finished look on both sides, since both zones see the divider.
Platform zoning
Raise the sleeping area on a low platform to create a zone change without any vertical barrier. A platform of a few inches signals sleep space, adds under-platform storage, and keeps sightlines open. Platforms work best when ceiling height allows comfortable sitting and standing on the platform.
Keep platform edges clearly visible with a step, lighting strip, or contrasting edge, to prevent trips at night. A platform that blends into the floor becomes a hazard in the dark. Use the platform for storage drawers, not for daily items that require bending every morning.
Lighting, color, and flooring per zone
Give each zone its own light source, such as a floor lamp for living, a bedside lamp for sleep, and a pendant over dining. Separate lighting reinforces zone identity even when furniture stays open. Dimmer controls help, since one bright ceiling light flattens a studio into a single box.
Use a cohesive color palette across zones, with one accent color repeated in at least two places. Cohesive color makes a studio feel intentional, while a different bold color per zone chops the room into fragments. Warm neutrals, soft greens, and muted blues work well in small open rooms.
Change flooring with a rug or runner, not with a hard flooring break, in most rentals. A flooring change can define zones, but it also creates a visual seam that can feel abrupt in a small room. Rugs give the same signal without renovation or lease risk.
Studio Layouts by Size
Size changes what can stay permanent versus what must fold, roll, or convert. A 300 square foot studio needs daily transformation or strict discipline about possessions. A 600 square foot studio can support permanent zones, a proper dining table, and a dedicated work corner.
Use the table below as a planning guide, not as a promise for every building. Window position, kitchen size, bathroom size, and closet size change usable area fast. Always measure the main room separately from total square footage, since entry, bathroom, and kitchen eat floor area.
300 sq ft micro studio
A 300 square foot studio needs multifunctional furniture and a clear circulation spine along the longest axis. Put the bed at the end farthest from the door, keep tall pieces flat against walls, and float the sofa so its back divides space. Tape footprints before buying, since every inch matters.
Choose a wall bed, daybed, or convertible sofa for daily living in a micro studio, especially when daytime living quality matters. A permanent queen bed can occupy a large share of floor area and leave no room for a proper living zone. Daily conversion only works if the mechanism is easy and fast.
Keep possessions strictly edited in a micro studio, with one-in, one-out rules for clothes, books, and kitchen tools. Storage must go vertical, under the bed, and over doors, since floor storage quickly blocks walkways. A micro studio rewards discipline more than furniture.
400 sq ft studio
A 400 square foot studio supports a permanent bed, apartment sofa, and small dining table with careful zoning. Place the bed farthest from entry, the living zone in the middle, and the kitchen near entry or along one wall. A rug under the living zone and a runner by the bed define zones without a divider.
Use a 72 to 78 inch apartment sofa rather than a full sectional, since sectionals lock layout and eat walkways in this size. A sofa plus one armchair gives more flexibility for guests and rearrangement. Keep coffee table size modest, with lift-top storage when possible.
500 sq ft studio
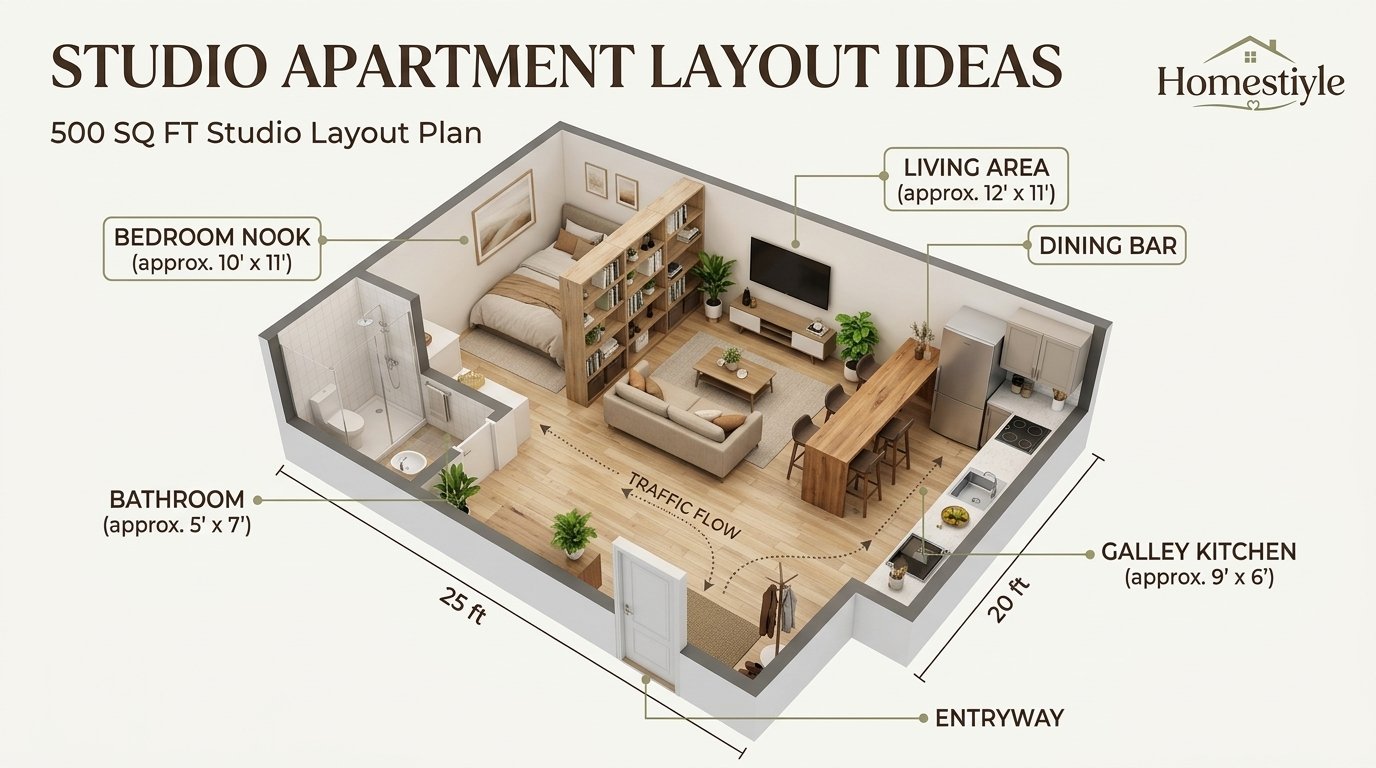
A 500 square foot studio allows defined zones that feel like rooms, with a proper dining table and a work corner. A bookshelf divider starts to earn its footprint at this size, because it adds storage while separating sleep and living zones. A full dining table, not just a bar, becomes realistic.
Couples can work in 500 square feet with separate storage and clear routines, but work-from-home calls still need rules. One work corner with a door-like curtain helps, yet it does not replace a separate room. Test call overlap before signing a lease for two remote workers.
600 sq ft studio and junior one-bedroom
A 600 square foot studio can support a floor-to-ceiling bookshelf or wardrobe divider that completely separates bed from sight. The sleeping area can hold a bed, nightstands, and a small dresser, while the living area holds a sofa, media unit, and dining table. Entertaining feels more natural at this size.
Remember that a 600 square foot junior one-bedroom still has one bathroom and one open-plan core in most cases. A divider improves privacy, but it does not create a legal bedroom, a second bathroom, or soundproofing. Check the floor plan and lease, not just the marketing label.
Studio Layouts by Shape
Shape decides where the bed can hide, where light travels, and where zones naturally split. A good shape can rescue a modest size, while a poor shape can waste a generous size. Sketch the shape before choosing furniture, and mark windows, doors, and fixed kitchen walls first.
Rectangle studio
A rectangle studio zones best with a sequence from entry to window: entry, kitchen, dining, living, then sleep at the far end near the window. That order keeps cooking smells near entry ventilation, living in the middle, and sleep in the quietest, brightest spot. A long axis also creates a clear circulation spine.
Keep the middle of a rectangle clear for movement, with furniture along walls and zones marked by rugs. A coffee table in the middle should leave at least 24 inches of secondary path around it. A center that fills with furniture quickly feels like an obstacle course.
Square studio
A square studio needs corner anchoring to avoid a dead center and cluttered walls. Place the bed in one corner, the living zone in the opposite corner, and the kitchen along one wall. A central dining or work table can anchor the middle without blocking all paths.
Use a round dining table in a square studio when possible, since round shapes improve circulation around corners. A rectangular table can work against a wall, but it often creates a tight pinch point in a square room. Test table chairs pulled out, not just pushed in.
L-shaped studio
An L-shaped studio gives two natural zones through architecture alone, often with kitchen and dining in one leg and living and sleeping in the other. The corner where legs meet often holds entry or bathroom, creating a clear transition point. That transition helps guests feel less exposed to the bed.
Watch for uneven light in an L-shaped studio, since one leg may have windows while the other stays dark. Put the living zone in the brighter leg when possible, and add layered lighting to the darker leg. A mirror opposite a window can bounce light into the darker leg.
Alcove studio
An alcove studio places the bed in a recessed nook that feels like a partial bedroom without a door. Enhance separation with a curtain track at the alcove entrance, a rug change, and a bedside lamp that differs from living lighting. Tie the curtain back during the day to restore openness.
Check alcove depth before choosing bed size, since a shallow alcove may limit a queen bed or leave no side clearance. A full bed with good access often beats a queen bed squeezed into a nook with no walking space. Measure alcove width, depth, and ceiling height separately.
Loft studio with high ceilings
A loft studio uses a raised sleeping platform to add a second level without walls. Place the platform over the least-used area, such as above a closet, bathroom, or kitchen storage, when structure allows. Keep a guardrail, a safe stair or ladder, and clear headroom above the mattress.
Loft living needs heat and noise planning, since warm air rises to the sleeping level and sound travels easily in open volume. A fan, layered bedding for temperature changes, and soft surfaces below help. Loft beds suit solo living best, while couples should test ladder access at night before committing.
Sleep Solutions: Murphy Bed, Sofa Bed, Daybed, or Permanent Bed?
Sleep solution choice decides daytime living quality more than any other furniture decision. A bed used only at night should not dominate daytime floor area in a small studio. A bed used daily for sleep quality should not be a thin sofa mattress that hurts your back.
Ask one question first: will this bed be used for sleep every night, or only for guests? Daily sleep needs a real mattress, easy setup, and good support. Occasional guest sleep can use a sofa bed, air mattress, or daybed without daily comfort compromise.
Check wall structure, lease rules, and install cost before choosing a wall bed. Wall beds need secure wall anchoring, clear floor space when folded down, and a mechanism that one person can operate safely. A wall bed that stays down gains nothing, since it becomes a permanent bed with extra cost.
Wall bed for daily transformation
A wall bed folds vertically into a cabinet when not in use, converting sleep floor area back to living area during the day. Modern systems often include shelving, a desk, or a sofa that rotates or folds with the bed. That integration makes the cabinet read as storage or a work unit when closed.
Wall bed prices vary widely by size, mechanism, shelving, and installation, so treat any single price as a starting point, not a quote. Competitor ranges in this research conflict, from lower installation-only figures to higher full-system figures, so check current US listings and install quotes before budgeting. Daily use justifies higher cost only when the bed actually folds up every morning.
Test wall bed operation with one person, tired, at night, not just in a showroom with help. A mechanism that needs two people, heavy lifting, or moving furniture every night will soon stay down. Easy operation is the real feature, not the cabinet finish.
Sofa bed for occasional guests
A sofa bed works well when guests stay occasionally and daytime seating matters more than daily sleep quality. A quality sofa bed with a real mattress insert beats a thin pull-out mattress, but it still rarely matches a dedicated bed for nightly sleep. Choose sofa bed comfort based on guest frequency, not just sofa style.
Daily sofa bed conversion becomes disruptive fast, with cushions, bedding, and frame movement every morning and night. For a resident who works from home and needs a functional living space daily, a wall bed or permanent bed usually beats a daily sofa bed routine. Be honest about how often conversion will really happen.
Daybed for renter flexibility
A daybed doubles as a sofa during the day and a full bed at night, with bolsters that read as back cushions. Daybeds suit renters because they need no wall installation, no mechanism, and no lease permission. They also suit narrow rooms where a bed runs lengthwise along a wall.
Daybed limits appear when guests visit regularly, since full bedding setup each evening takes time and storage. A daybed with storage drawers helps, but bedding still needs a home during the day. Choose a daybed when flexibility matters more than a fully hidden bed.
Permanent bed with storage
A permanent bed gives the best nightly sleep with a real mattress, a proper frame, and no daily conversion. Pair it with under-bed drawers, a headboard with storage, and a cohesive bedding palette so it reads as intentional furniture. Permanent beds suit studios of 400 square feet and above, especially with a divider or alcove.
Use zoning to prevent a permanent bed from dominating the room visually. A bookshelf divider, curtain, rug change, and separate lighting all help the bed feel like a zone, not the whole apartment. Keep bedding tidy daily, since an unmade bed becomes the room focal point.
Loft bed for high ceilings
A loft bed elevates sleeping off the floor, freeing the area below for a desk, sofa, or storage. Loft beds cost less than wall bed systems in many competitor ranges, but they need safe stairs, guardrails, and enough ceiling height for sitting up. Low ceilings make loft sleeping uncomfortable and unsafe for many adults.
Check ceiling height above the mattress, not just total ceiling height, before choosing a loft. Sitting up in bed needs comfortable clearance, and standing on the platform needs a safe edge. A loft that forces crouching every night will soon feel like a punishment, not a clever solution.
Living Zone Layout
The living zone should feel like a room within the room, not like leftover space around a bed. Anchor it with a rug, a sofa, a coffee table, and a light source that differs from sleep lighting. A clear living zone makes guests comfortable and helps residents switch off work at night.
Choose an apartment sofa of 72 to 78 inches for most studios, with a depth of about 30 to 34 inches. That size seats two or three people without locking the layout. A sectional can work above 500 square feet, but it reduces flexibility and often blocks a walkway in smaller studios.
Place the TV or focal point opposite the sofa, not beside the bed, when possible. A TV that faces both sofa and bed creates a shared focal point, but it also blurs sleep and living zones. A swivel mount or a movable screen can serve both zones without a second TV.
Add one armchair or pouf for guest seating when space allows, rather than a second sofa. A lightweight chair can move to the dining zone, window zone, or entry zone as needed. Heavy, oversized guest seating that never moves wastes the flexibility a studio needs.
Use a lift-top coffee table when the living zone must also serve as a work or dining surface occasionally. A lift-top table rises to laptop height, holds a meal, and hides remotes and chargers inside. Keep the table size modest, so walkways around it stay at least 24 inches wide.
Kitchen and Dining Zone Layout
A studio kitchen is usually a kitchenette or compact kitchen along one wall, in an L shape, or in a galley run. The kitchen must support cooking, prep, storage, and cleaning without spilling into living and sleep zones. Counter space, landing space, and ventilation matter more than appliance size.
Keep at least 30 inches of clear working space in front of counters in planning summaries, and more where possible for two people cooking. Landing space beside the stove and sink prevents hot pans and wet dishes from landing on the floor or living rug. A small island or peninsula can add landing space, but only when walkways stay clear.
Choose slimline appliances when the kitchen is tight, such as a counter-depth refrigerator, a slim dishwasher, or a two-burner cooktop where building rules allow. Appliance size should match cooking frequency, not showroom appeal. A full-size range in a studio that rarely cooks wastes counter and storage space.
One-wall, L-shaped, galley, and peninsula kitchens
A one-wall kitchen lines sink, cooktop, and refrigerator along a single wall, which suits narrow studios and keeps plumbing simple. An L-shaped kitchen adds counter space around a corner and creates a natural work triangle. A galley kitchen uses two parallel runs for efficient cooking, but it can feel like a corridor.
A peninsula kitchen adds a counter extension that doubles as a dining bar and a visual divider between kitchen and living zones. Peninsula seating works well for one or two people, but it needs walkway clearance on both sides. Do not add a peninsula that blocks the main circulation spine.
Counter clearance and landing space
Counter clearance means empty counter beside key appliances, not just total counter length. Leave landing space beside the refrigerator for groceries, beside the sink for dishes, and beside the cooktop for pans. Without landing space, cooking spills into dining and living surfaces fast.
Use vertical kitchen storage to protect counter space, including wall cabinets, open shelves for daily items, and magnetic strips for knives. Keep daily tools within reach and seasonal tools higher or in closed storage. A clear counter feels larger than a longer counter covered in appliances.
Dining table size and shape
Choose a 36 to 42 inch round table for most studios, since round tables improve circulation and seat two to four people flexibly. A rectangular table against a wall can seat two daily and expand for guests with a leaf or extra chairs. Fold-down tables free 15 to 20 square feet when not in use in very small studios.
Place dining near the kitchen and window when possible, so meals feel bright and serving stays short. A dining table that doubles as a work desk needs a clear reset routine, or work papers will permanently claim the dining zone. Keep dining chairs stackable or foldable when space is tight.
Cooking smells and ventilation
Cooking smells travel fast in a one-room home, so ventilation and cooking habits matter as much as layout. Use a range hood vented outside when building systems allow, or a recirculating hood with fresh filters when venting outside is not possible. Open a window near the kitchen during strong cooking when weather allows.
Cook with lids on pots, use the hood before cooking starts, and clean grease promptly to reduce lingering smells. A curtain divider will not block smells, and a bookshelf divider will absorb them if fabric and books sit near the kitchen. Keep sleep bedding away from the kitchen path when possible.
Work From Home Zone in a Studio
A studio work zone needs focus, camera background, and call privacy without a door to close. Place the desk where light, outlet access, and background all work together, not just where a corner remains empty. A desk facing a tidy wall or shelf often beats a desk facing a messy room.
Use a shallow desk or wall-mounted desk when floor space is tight, with a monitor arm to protect screen distance. A desk depth of about 24 inches works for a single monitor, while dual monitors need more depth or an L-shaped return. Keep the desk surface clear at the end of work, so the work zone does not claim the living zone overnight.
Create a work reset routine that closes the workday visually, such as closing a laptop, covering a monitor, or pulling a curtain across a work nook. That ritual matters in a studio, where work and rest share the same sightlines. Without a reset, work stress follows you to the sofa and bed.
Desk placement without a door
Place the desk side on to a window for daylight without screen glare or camera backlighting. A desk with its back to the room gives a calm camera background, while a desk facing the room can feel exposed on calls. Test the camera frame with a real call, not just by sitting at the desk.
Avoid placing a desk where the bed dominates the camera frame, since that looks unprofessional and distracts meeting participants. A bookshelf, plant, or art behind the chair creates a neutral background. A curtain behind the chair can hide a bed or work clutter during calls.
Video call background and light
Light your face from the front at eye level, using a desk lamp, ring light, or monitor light bar with a diffuser. Light from behind creates a silhouette, while light from directly above creates harsh shadows. Keep background lighting soft, so you do not appear against a dark void.
Keep the background tidy and simple, with one shelf, plant, or art piece rather than a full room view. A busy background distracts participants and reveals personal items unintentionally. Check the frame for mirrors, open closets, and bathroom doors before important calls.
Call schedule and headset rules for couples
Couples working from home in a studio need a shared call calendar checked each morning. Stagger long meetings when possible, and move one loud or sensitive call to a hallway, balcony, or outside space when needed. A shared calendar habit prevents most studio work friction.
Use a clear headphone signal for do-not-disturb time, and respect it consistently. Noise-cancelling headphones plus a white noise machine help mask typing and talking, but they do not replace schedule planning. Agree on a backup quiet spot before a busy call day, not during it.
Storage Plan for a Studio
Storage in a studio should follow a ladder: closet first, under-bed second, wall third, rolling fourth, and off-site last. Floor storage should be the last choice, since it blocks walkways and makes the room feel smaller. Every storage decision should answer one question: does this item earn floor space?
Use closed storage for messy, seasonal, or personal items, and open storage only for books, plants, and daily items you want to see. Closed cabinets make a studio look calmer and larger, while open shelves need constant editing to avoid visual clutter. Label closed storage inside, so housemates can return items correctly.
Audit possessions before buying storage furniture, since new storage often invites new clutter. Sort items into daily, weekly, seasonal, and rarely used groups. Daily items stay at arm height, weekly items in a closet, seasonal items under the bed or high up, and rarely used items leave the apartment or go off-site.
Closet first, under-bed second, wall third
Maximize the existing closet with double hanging rods, shelf dividers, and door organizers before adding furniture. A well-organized closet can replace a dresser and free a full wall for living or work. Keep closet doors closed on video calls and for guests, since an open closet reads as clutter.
Use under-bed storage for seasonal clothes, spare bedding, and luggage, with low-profile bins that slide easily. Daily clothes belong in a closet or wardrobe, not under a bed that requires bending every morning. Keep under-bed bins labeled and shallow, so items do not get lost.
Add wall storage with tall, narrow shelves that use ceiling height without blocking walkways. Floating shelves above a desk, door, or bed add capacity without floor space, but they need strong anchors for heavy items. Keep heavy books low and light decor high for safety.
Kitchen storage
Use pull-out pantries, drawer organizers, and vertical racks to make a small kitchen work harder. A pull-out pantry in a narrow gap can hold spices, cans, and dry goods without a full cabinet. Drawer dividers prevent utensils and tools from becoming a tangled drawer.
Hang pots, pans, and utensils on wall rails or magnetic strips when cabinet space runs out, but keep only daily tools visible. Too many hanging items near a cooktop collect grease and look cluttered. Store seasonal appliances, such as a large mixer or holiday cookware, in closed storage elsewhere.
Bathroom storage
Use a vanity with drawers, wall-mounted shelving, and a medicine cabinet in a small studio bathroom. Drawers organize toiletries better than a single cabinet, since items do not pile behind each other. Wall shelves above the toilet or beside the mirror add capacity without floor space.
Keep daily toiletries in a small tray or caddy that can move from bathroom to bedroom when needed. Shared bathrooms in couple studios need separate trays or shelves per person to prevent daily friction. A clear glass shower screen, where building rules allow, improves sightlines and perceived space.
Entry storage and drop zone
Create an entry drop zone near the front door with hooks, a small bench with storage, and a tray for keys and mail. An entry zone prevents coats, bags, and shoes from migrating into living and sleep zones. A bench with hidden storage doubles as seating for putting on shoes.
Keep the entry zone shallow and tidy, since a deep entry unit can block the door swing or main walkway. Wall hooks work better than a floor coat rack in a narrow entry. A mirror near the entry adds light and a last look before leaving, without taking floor space.
Studio Layout for Couples
Couples in a studio need separate storage, separate routines, and negotiated privacy more than they need a larger sofa. Two people share one bathroom, one kitchen, and one open room, so small frictions compound fast. Plan storage and schedules before move-in, not after the first argument.
Split closet and drawer space evenly and explicitly, with each person owning named zones. Shared storage for linens, cleaning supplies, and guest items should sit in a third zone, not inside one person’s closet. Clear ownership prevents daily debates about space and clutter.
Use a divider that respects both people, such as a bookshelf with storage on both sides or a curtain that closes for sleep privacy. A divider that only benefits one person, such as a desk wall that blocks light for the other, will create resentment. Test divider placement with both people in the room.
Separate storage for each person
Give each person a wardrobe section, drawer set, and personal shelf that the other person does not borrow without asking. Personal storage boundaries matter more in a studio than in a larger home, because there is no spare room to absorb overflow. Label personal zones lightly, without making the home feel like a dormitory.
Keep shared items in a central, labeled zone, such as a linen cabinet, kitchen pantry, or entry closet. Shared zones need a simple return rule: use it, clean it, return it to the same place. A shared zone without a return rule becomes a dumping ground within weeks.
Different sleep schedules
Different sleep schedules need light control, sound control, and a late-night zone away from the bed. A curtain divider, eye mask, earplugs, and a white noise machine help, but they do not replace a plan. Agree on lights-out times, late-night activities, and where the night owl can read or work without waking the sleeper.
Use low, warm lighting for late-night movement, rather than bright overhead light that wakes a sleeping partner. A small reading lamp with a focused beam beats a room light for night use. Keep late-night snacks and water near the kitchen zone, not beside the bed, to reduce trips past the sleeper.
Different work schedules
Different work schedules need a call calendar, headset rule, and quiet hours that both people respect. One person on a call while the other cooks, cleans, or watches TV creates noise and background distraction. Agree on quiet hours, call zones, and a backup spot for loud tasks.
Use soft surfaces and closed doors where possible to reduce noise bleed, including rugs, curtains, and a closed bathroom door during calls. Headphones with a clear microphone help the caller, but they do not silence the other person’s activities. Schedule loud chores outside call blocks when possible.
Guest hosting as a couple
Guest hosting in a couple studio needs a convertible sleeping plan that does not require rebuilding the room. A sofa bed, daybed, or air mattress with a real bedding set works when guests stay occasionally. Keep guest bedding in closed storage near the living zone, not in a personal closet.
Agree on guest limits before guests arrive, including stay length, work call impact, and bathroom schedule. A guest in a studio affects sleep, work, and privacy for both residents, so a short, clear plan prevents resentment. A guest who understands the plan enjoys the stay more, too.
Studio Layout With Pets
Pets need a dedicated zone in a studio, not a bed that drifts into walkways or a feeding station that blocks the kitchen. Place pet zones where cleaning is easy, ventilation is good, and the animal feels safe. A pet zone that blocks circulation will be moved daily, which stresses both pet and owner.
Place a dog bed in a quiet corner away from the entry door, so visitors do not startle the dog on arrival. Keep feeding bowls on a washable mat near the kitchen, but not in the main cooking path. A dog crate, when used, should fit under a table or against a wall, not in the middle of the living zone.
Place a cat tree near a window with a view, since cats use vertical space and window watching for enrichment. Keep litter boxes in a ventilated, private corner, such as a bathroom nook or closet with airflow, not beside the bed or dining table. Clean litter daily, since smells travel fast in one room.
Use washable covers and rugs in pet zones, since accidents and shedding happen in small spaces. A washable sofa cover, rug, and pet bed cover make cleaning faster and protect furniture. Keep pet supplies in one closed bin near the pet zone, not scattered across the apartment.
Lighting, Color, and Mirrors
Lighting in a studio should vary by zone, time, and task, not rely on one ceiling fixture. A single overhead light flattens the room into one lit box, while layered lighting creates rooms within the room. Use ambient, task, and accent light together for depth and comfort.
Use warm light around 2700K for living and sleep zones in the evening, and brighter neutral light for kitchen and work zones during the day. Tunable bulbs let one fixture shift color through the day, which suits a studio where zones share the same ceiling. Avoid harsh cool light in the sleep zone at night.
Choose a light, cohesive palette for walls and large furniture, with one accent color repeated in at least two places. Light walls reflect daylight and make the room feel larger, while a cohesive palette prevents zone fragmentation. Bold color works best as an accent in art, pillows, or a rug, not on every wall.
Place mirrors opposite windows to bounce daylight deeper into the room, and opposite a light wall to expand sightlines. Avoid mirrors that reflect clutter, a bed, or a bathroom door directly, since they double visual noise. A large mirror near the entry can add light and a last look before leaving.
Use sheer curtains to soften daylight while preserving privacy, especially in ground-floor studios. Heavy blackout curtains suit sleep zones at night, but they darken the room during the day when left closed. Layer sheers with a blackout panel for sleep zones that need both options.
Renter Friendly Studio Changes
Renters need studio changes that leave no damage and can move to the next home. Freestanding dividers, rugs, curtains on tension rods, and rolling storage work without drilling or renovation. Check lease rules before installing tracks, shelves, or wall beds that need anchors.
Use freestanding bookshelves, curtain rods on tension mounts, and rolling carts when drilling is not allowed. A freestanding shelf against a wall gives divider and storage benefits without holes. A tension curtain rod can close an alcove temporarily, but it may not hold heavy curtains safely.
Photograph the apartment before changes, and keep original hardware, doors, and fixtures when you swap them. Store removed items labeled by room, so move-out restoration stays simple. A missing door, handle, or light fixture at move-out can cost more than the layout improvement was worth.
No-drill dividers and storage
No-drill options include freestanding shelves, folding screens, tension curtains, and over-door organizers. Folding screens move easily and need no installation, but they offer little storage and can tip in high-traffic paths. Anchor freestanding shelves to a wall only when the lease allows it, and use anti-tip straps for safety.
Use adhesive hooks only for light items, such as keys, headphones, and small organizers, and test one hook before loading a full system. Heavy books, plants, or shelves need proper anchors or freestanding support. A falling shelf damages walls, equipment, and trust with a landlord.
What to check in the lease
Check lease rules for drilling, painting, divider installation, wall beds, and pet zones before starting work. Some leases allow small nail holes, while others forbid any wall changes. Ask the landlord in writing when the rule is unclear, and keep the reply with your lease documents.
Check occupancy limits, guest stay limits, and pet rules in the lease as well, since studio occupancy and guest rules affect layout choices. A layout designed for two people plus frequent guests may violate lease terms in some buildings. Lease clarity prevents costly moves or fines later.
Reversible changes only
Choose changes that can be reversed in an afternoon, such as rugs, curtains, freestanding furniture, and lamps. Paint, built-in platforms, and removed doors are harder to reverse and may cost a deposit. A reversible layout also moves with you, which suits renters who change cities or buildings often.
Budget Tiers: Renter, Mid, and Built-In
Budget tiers help you spend on what changes daily life first, not on decor. A good mattress, a correct sofa size, and good lighting matter more than a premium divider finish. Spend in that order, then add storage and style as budget allows.
Price figures below are planning ranges from competitor guides, not current quotes. Wall bed and furniture prices vary by size, mechanism, finish, and installation, so check current listings and install quotes before budgeting. Do not treat a tier as a guaranteed price.
Buy the bed, sofa, and lighting first, since those affect sleep, seating, and mood every day. A wall bed or permanent bed decision should come before rug and decor choices, because it decides floor area. Lighting should come before paint, since light changes how color reads.
Skip oversized sectionals, credenzas, and second guest seating in a small studio. Those pieces look impressive in a larger home but crowd walkways and lock layout in a studio. Skip open shelves for messy supplies, since they become visual clutter fast in one open room.
Daily Life: Entry, Laundry, and Guests
Daily life in a studio depends on small systems that prevent clutter migration. Entry, laundry, and guest systems fail quietly, then suddenly the whole room feels chaotic. Build each system with a home, a routine, and a limit.
Create an entry routine that takes 30 seconds on arrival: shoes off or on a tray, coat on a hook, bag on a bench, keys in a tray, mail sorted. That routine prevents entry clutter from spreading into living and sleep zones. A bench with storage gives seating and a home for shoes in one piece.
Plan laundry with a hamper that fits the closet or bathroom, not a pile on the bedroom floor. A slim hamper, a laundry bag on a door, or a rolling hamper that moves to a laundry room all work when sized correctly. Wash on a schedule, since laundry piles grow fast in a studio with limited closet space.
Plan guest hosting with a bedding set, towel set, and clear sleeping surface ready in closed storage. Guests should not need to move your work, clothes, or personal items to sleep. A short guest guide, with Wi-Fi, bathroom, and morning routine notes, helps guests feel welcome without constant questions.
Mistakes to Avoid in a Studio Layout
The most common studio mistake is buying furniture before measuring the room, door, and walkways. A sofa that fits the wall can still block a door, a rug that looks good online can shrink a living zone, and a bed that fits the alcove can leave no side clearance. Tape first, buy second, every time.
Another common mistake is using a solid divider in a small studio under 400 square feet. Solid dividers block light, sightlines, and airflow, making the room feel smaller and darker. Use a sofa back, rug, or open shelf instead, and save solid partitions for larger studios or sleep privacy needs.
A third mistake is ignoring kitchen and bathroom storage while perfecting the living zone. Kitchen counters covered in appliances and bathroom shelves covered in toiletries spill into living and sleep zones fast. Plan kitchen and bathroom storage with the same care as bed and sofa placement.
A fourth mistake is choosing style over circulation, such as a large coffee table, a deep sectional, or a tall plant in the main path. Circulation is the layout, not an afterthought, and a blocked path makes every other design choice feel wrong. Keep primary walkways clear, even when a larger piece looks tempting.
A fifth mistake is forgetting a reset routine at the end of each day. A studio without a reset accumulates dishes, work papers, clothes, and guest items in shared sightlines. A five-minute reset, with bed made, desk cleared, dishes washed, and entry tidied, protects the layout better than new furniture.
Studio Tour Checklist
Use this checklist on every studio tour, and again after move-in.
- Stand in the doorway and note the first sightline: bed, living zone, or window?
- Measure the main room separately from total square footage, including alcove depth.
- Tape bed, sofa, table, and walkway footprints, and walk every path.
- Check primary walkways at 30 to 36 inches and secondary paths at 24 inches minimum.
- Check window light at morning and afternoon, and note which zones stay dark.
- Check kitchen counter, landing space, storage, and ventilation for smells.
- Check bathroom storage, vanity drawers, and mirror and shelf space.
- Check closet size, wardrobe space, and under-bed storage potential.
- Check outlets, Wi-Fi signal, and a work corner background for video calls.
- Check lease rules for dividers, wall beds, pets, guests, and occupancy limits.
FAQs
What is the best layout for a studio apartment?
The best layout puts the bed first against the longest unbroken wall farthest from entry, defines living with a rug and sofa back, and keeps primary walkways 30 to 36 inches wide. Kitchen stays near entry or along one wall, while sleep stays farthest from entry and closest to quiet light. Test the plan with tape before buying large furniture.
Where should I put the bed in a studio apartment?
Put the bed against the longest unbroken wall farthest from the entry door when possible, with at least 30 inches of clearance on one side. That position keeps the bed out of the immediate entry sightline and makes the room read larger. In narrow rooms, run the bed lengthwise along a wall and dress it like a daybed by day.
How do I separate sleep and living areas without walls?
Use rug zoning, a sofa back divider, an open bookshelf, or a curtain track to define zones without building walls. Choose one tool per boundary, not three at once, to protect light and movement. Lighting per zone, with a floor lamp for living and a bedside lamp for sleep, reinforces the separation.
What is an alcove studio?
An alcove studio is a studio with a recessed nook off the main room, often L-shaped, designed for a bed. The nook feels more private than an open studio, but it remains open to the main space without a full wall or door. A curtain track at the alcove entrance can close the nook at night and open it by day.
What is a junior one-bedroom apartment?
A junior one-bedroom is a larger studio with a more defined sleeping area, sometimes separated by a partial wall or sliding partition. It offers more privacy than a standard studio, but it usually does not meet legal bedroom criteria such as an egress window, minimum size, or full door. Check the floor plan and local rules, not just the marketing label.
Is a junior one-bedroom a real bedroom?
Usually no, in legal terms, even when the sleeping area looks like a separate room in photos. A partial wall, bookshelf, or curtain does not create a legal bedroom by itself. A true bedroom typically needs full walls, a door, an egress window, and enough size to meet local code, so verify with the local building department.
What is the difference between a studio and a one-bedroom?
A studio has one main room for sleeping, living, cooking, eating, and working, plus a separate bathroom. A one-bedroom has a separate bedroom enclosed by walls and a door, plus a living area and kitchen. The closed bedroom gives true privacy, better noise control, and a dedicated rest space even when guests visit or work calls run late.
How big is a typical studio apartment in the US?
Typical US studios in competitor guides range from about 300 to 600 square feet, with many city studios around 400 to 500 square feet. Size varies widely by city, building age, and neighborhood, so check the actual floor plan rather than relying on an average. Main room size matters more than total size, since entry, bathroom, and kitchen eat floor area.
What is the smallest comfortable studio size?
Many competitor guides place comfortable solo living around 300 to 350 square feet, where a bed, sofa, table, and clear circulation fit without constant compromise. Below 250 square feet, living works only with wall-mounted or folding furniture and strict discipline about possessions. Comfort depends on shape, storage, and routine as much as total area.
How do I layout a 300 sq ft studio?
Use a clear circulation spine along the longest axis, with the bed farthest from the door and tall pieces flat against walls. Choose a wall bed, daybed, or convertible sofa for daily living, and keep possessions strictly edited. Tape footprints before buying, since every inch affects walkways and zone definition.
How do I layout a 400 sq ft studio?
Place a permanent bed farthest from entry, a living zone in the middle with an apartment sofa, and a kitchen along one wall or near entry. Use a living rug and a bed runner to define zones without a solid divider. A 72 to 78 inch sofa plus one chair gives flexibility without locking the layout.
How do I layout a 500 sq ft studio?
Define separate zones that feel like rooms, with a bookshelf divider, a proper dining table, and a work corner. Couples can work at this size with separate storage and clear routines, but work calls still need a schedule and headset rules. A full dining table becomes realistic, not just a bar or fold-down surface.
How do I layout a 600 sq ft studio?
Use a floor-to-ceiling bookshelf or wardrobe divider to separate bed from sight, with a bed, nightstands, and small dresser in the sleep zone. The living zone can hold a sofa, media unit, and dining table, while entertaining feels more natural. Remember that one bathroom and one open core usually remain, even at this size.
How do I layout a rectangular studio?
Follow a sequence from entry to window: entry, kitchen, dining, living, then sleep at the far end. Keep the middle clear for movement, with furniture along walls and zones marked by rugs. A coffee table in the middle should leave at least 24 inches of secondary path around it.
How do I layout a square studio?
Anchor corners separately, with bed in one corner, living in the opposite corner, and kitchen along one wall. A central dining or work table can anchor the middle without blocking all paths. A round dining table often improves circulation around corners compared with a rectangular table against a wall.
How do I layout an L-shaped studio?
Use the architecture as zoning, with kitchen and dining in one leg and living and sleeping in the other leg. The corner transition often holds entry or bathroom, creating a clear break between zones. Watch for uneven light, since one leg may have windows while the other stays dark.
How do I layout a loft studio?
Place a raised sleeping platform over a low-use area, such as above a closet or storage, when structure and ceiling height allow. Keep a guardrail, safe stairs or ladder, and comfortable headroom above the mattress. Plan for heat rising to the sleep level and sound traveling easily in open volume.
Should I use a room divider in a studio?
Use a divider when you need sleep privacy, work background control, or storage plus separation, and when the room stays above about 400 square feet. Under 400 square feet, a solid divider often blocks light and sightlines and consumes floor space. Use a sofa back, rug, or open shelf instead in very small studios.
What is the best room divider for a studio?
The best divider depends on need: open bookshelf for storage plus separation, curtain track for flexible sleep privacy, sliding partition for stronger visual separation, and sofa back for light, open zoning. Choose the lightest tool that defines the zone, and check lease rules before installing tracks or tall units.
Is a wall bed worth it in a studio?
A wall bed is worth it when daytime living quality matters and the bed would otherwise dominate floor area, especially under about 320 square feet. The key condition is behavior: if the bed stays down, you paid for a complicated bed and gained nothing. Test operation with one person, tired, at night, before committing.
Wall bed vs sofa bed: which is better for daily use?
A wall bed is usually better for daily sleep, since it uses a real mattress and folds away cleanly in the morning. A sofa bed suits occasional guests better, since daily conversion disrupts seating and sleep comfort. Choose based on sleep frequency, not just purchase price or sofa style.
Daybed vs wall bed: which is better for renters?
A daybed is better for renters, since it needs no wall installation, no mechanism, and no lease permission. A wall bed needs secure anchoring, clear floor space when folded down, and often landlord approval. Choose a daybed when flexibility and move-out simplicity matter more than a fully hidden bed.
What size sofa fits a studio apartment?
Choose an apartment sofa of 72 to 78 inches wide, with a depth of about 30 to 34 inches, for most studios. That size seats two or three people without locking the layout. A sectional can work above 500 square feet, but it often blocks walkways and reduces rearrangement options in smaller studios.
What size rug should I use in a studio living zone?
Use an 8 by 10 foot rug for a living zone when space allows, so sofa and chairs sit fully or mostly on the rug. A rug under 5 by 7 feet often fails to anchor furniture and looks like a bath mat. Leave a small gap of bare floor between zone rugs, so each zone reads clearly.
How wide should walkways be in a studio?
Keep primary walkways 30 to 36 inches wide, with secondary paths around furniture at 24 inches minimum. A path under 30 inches anywhere on the main route makes the whole layout feel tight, even with open floor elsewhere. Tape walkways before buying, and walk them with bags, laundry, and guests in mind.
Conclusion
Studio apartment layout ideas succeed when the bed is placed first, zones are defined lightly, and walkways stay clear. A rug, a sofa back, a bookshelf, or a curtain can create rooms within one room without blocking light or movement. Size and shape guide the plan, but routine, storage, and reset habits decide whether the layout works every day.
Start with tape on the floor, a room sketch, and a tour checklist that covers sightline, walkway, kitchen, bathroom, storage, and lease rules. Choose a sleep solution that matches daily use, not just style, and test divider, sofa, and rug sizes before buying. A studio that respects bed placement, zoning, and circulation will feel larger, calmer, and more like home.
Measure your studio today, tape the bed, sofa, and walkway footprints, and choose the zoning tool that protects light and movement best. A clear plan, a tidy reset routine, and furniture that earns its floor space will make one room work for sleeping, living, cooking, working, and welcoming guests.
