
6×8 bathroom layout ideas work best when clearances, door swing, and plumbing decide the plan first. Tile, paint, and fixtures cannot fix a toilet that sits too close to a vanity.
A 6×8 bathroom holds 48 square feet, usually a toilet, a vanity, and a tub or shower. That space feels generous with a clear walkway and cramped without one.
Most layout failures come from guessing, not from bad taste. A tape measure, a scale drawing, and a door swing test prevent most of them.
Start with finished walls, not nominal size. Framing, tile, and wall finish eat inches, and those inches decide vanity width.
Keep drains where they are when possible. Moving a toilet drain, especially in a slab home, often costs more than any fixture upgrade.
What a 6×8 Bathroom Is
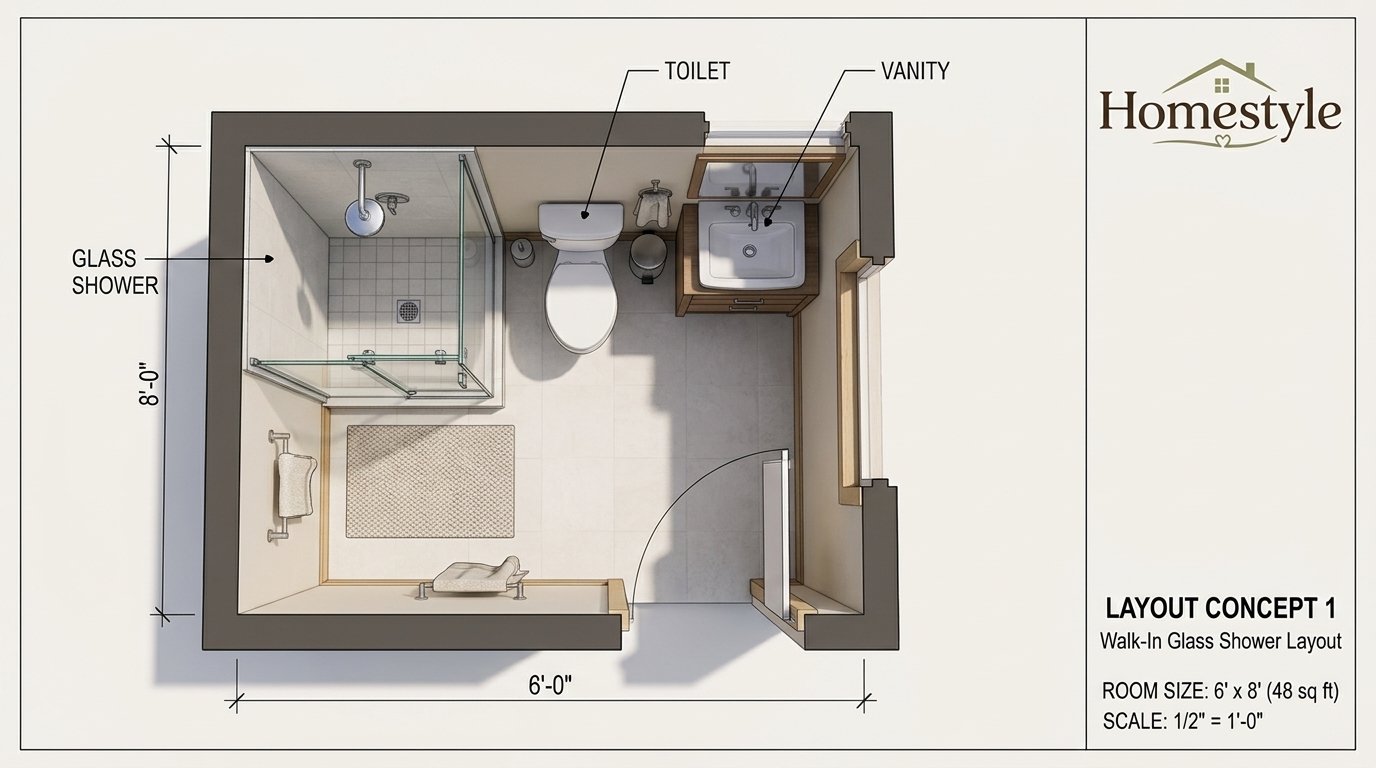
A Full Bathroom in 48 Square Feet
A full bathroom means a toilet, a sink, and bathing. A 6×8 room can hold all three, but it cannot hold all three in every arrangement. Orientation decides what fits.
Nominal size is 72 by 96 inches, yet finished size is often smaller. Measure each wall after tile and framing are accounted for, not before.
A 6×8 bathroom suits guest baths, hall baths, and small primary baths. It also suits older homes, where this footprint appears again and again.
It does not suit a separate tub plus a separate shower in most cases. One bathing fixture, chosen well, gives a better room than two cramped ones.
The 66-Inch Math That Decides Every 6×8 Layout
Nominal Size Versus Finished Size
Nominal 6×8 means 72 by 96 inches on paper. One competitor plan lists 66 by 96 inches, which shows how framing and finish change usable width.
Never order fixtures from nominal size alone. Measure finished walls, door position, window position, and vent position before buying anything.
A 6-inch loss changes vanity choice completely. It can turn a 36-inch vanity into a 30-inch vanity, or force an off-center sink.
Draw the room to scale before ordering. Paper, painter’s tape on the floor, or a simple planner all work, if every clearance is marked.
Why the Extra Foot Goes to Walkway, Not Vanity Width
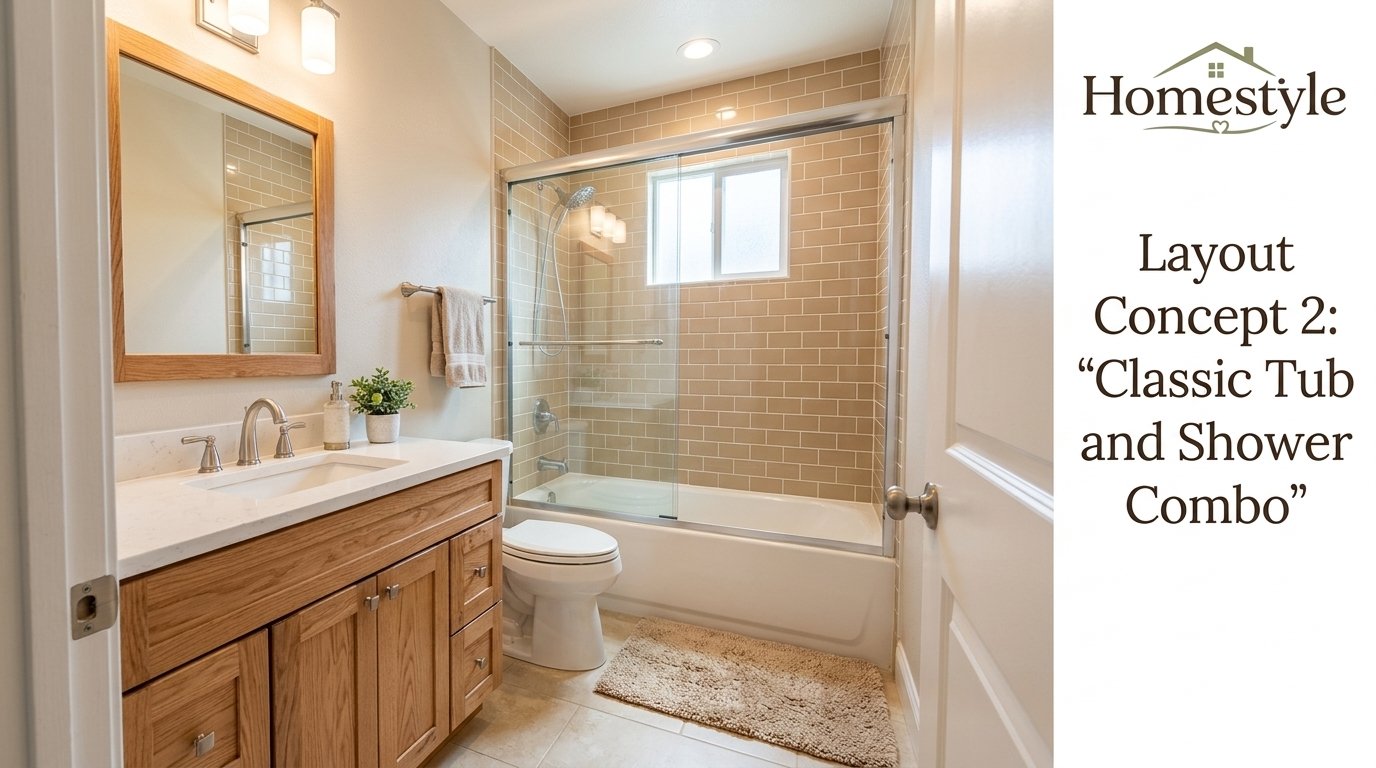
In the classic layout, tub or shower sits across the short wall. Toilet and vanity then share the 96-inch long wall, after 30 inches of tub depth.
That leaves a 66-inch run: 96 minus 30 equals 66. Code fit is 15 plus 15 plus a 36-inch vanity, which also equals 66.
Comfort fit is 18 plus 18 plus a 30-inch vanity, which also equals 66. Do not combine a 36-inch vanity with 18-inch comfort clearances on that run.
LilyAnn reports the walkway result clearly. Seventy-two inches minus a 22-inch vanity top leaves 50 inches of floor, well over the 30-inch comfort figure.
That 50-inch walkway is the real 6×8 advantage over 5×8. A 5×8 room with the same run has only about 38 inches of walkway, so 6×8 feels calmer.
5×7 Versus 5×8 Versus 6×8 Versus 6×10
A 5×7 bathroom leaves only 54 inches after tub depth. That fits a 24-inch vanity at code minimum, and a centered sink can fail side clearance.
A 5×8 bathroom leaves 66 inches, like 6×8, but with a narrower walkway. Vanity choice is the same, while movement feels tighter.
A 6×8 bathroom keeps the same 66-inch run and adds walkway width. That makes it easier to use, clean, and share, without changing fixture sizes.
A 6×10 bathroom leaves 90 inches after tub depth. That extra length can hold a longer vanity, a linen tower, or a double sink, depending on layout.
| Room size | Area | After 30-inch tub | Classic vanity fit | Walkway advantage |
| 5×7 | 35 sq ft | 54 inches | 24 inches, tight | Narrowest, check sink center |
| 5×8 | 40 sq ft | 66 inches | 30 to 36 inches | About 38 inches with 22-inch top |
| 6×8 | 48 sq ft | 66 inches | 30 to 36 inches | About 50 inches with 22-inch top |
| 6×10 | 60 sq ft | 90 inches | Up to 60 inches | Room for linen tower or double sink |
| 7×9 | 63 sq ft | Varies by layout | 48 to 60 inches | Galley layouts become possible |
Clearances First: Code Minimum Versus Comfort
Toilet, Vanity, Shower, Tub, Door, and Ceiling
Codes set minimum clearances, not room size. Local editions and amendments vary, so every figure below needs a local check before building.
LilyAnn cites IRC and NKBA figures side by side. That pairing is useful, because code minimum and comfortable use are different targets.
Toilet side clearance is 15 inches by code from centerline to a side wall or fixture. NKBA recommends 18 inches for comfort, and that difference changes vanity width.
Clear floor in front of a toilet or sink is 21 inches by code. NKBA recommends 30 inches, which is why a 6×8 walkway feels so much better than a 5×8 walkway.
Shower interior minimum is 30 by 30 inches by code, with 900 square inches of area. NKBA recommends 36 by 36 inches, and most adults find that size far more usable.
Clear floor in front of a shower entry is 24 inches by code. NKBA recommends 30 inches, so a shower door should never open into a tight toilet zone.
| Measurement | Code minimum, verify locally | NKBA comfort recommendation |
| Toilet center to side wall or fixture | 15 inches | 18 inches |
| Sink center to side wall | 15 inches | 20 inches |
| Between two sink centers | 30 inches | 36 inches |
| Clear floor in front of toilet, sink, or tub | 21 inches | 30 inches |
| Clear floor in front of shower entry | 24 inches | 30 inches |
| Shower interior size | 30 by 30 inches, 900 sq in | 36 by 36 inches |
| Shower door clear opening | 22 inches, per Prime Construction Florida | 22 inches or wider for comfort |
| Separate toilet compartment | 30 by 60 inches | 36 by 66 inches |
| Door clear opening | Set by state or local code | 32 inches |
| Ceiling height | 80 inches, IRC R305.1 | Same as code |
The Overlapping Clearance Trap
Clear floor zones can overlap in a small bathroom, but they must not be double-counted carelessly. A 30 by 30-inch zone serving two fixtures needs a real plan, not a guess.
A toilet zone overlapping a shower entry zone can fail inspection or daily use, even when each fixture looks fine alone. Draw every zone on the scale plan.
Door swing must never block a fixture or another door. IRC guidance cited by LilyAnn states that rule plainly, and small rooms violate it often.
Check the door against the toilet, vanity, and shower door in both open and closed positions. A door that clears the toilet but blocks the shower still fails daily use.
How to Measure Rough-In, Drain Center, and Door Swing
- Measure finished wall to finished wall on every wall, plus ceiling height, door width, and window position.
- Find the toilet drain center and measure from the finished wall behind the toilet to that center.
- Record rough-in as 10, 12, or 14 inches, with 12 inches as standard, before buying any toilet.
- Photograph supply lines, vent pipes, and drain positions so a contractor can price the job without reopening walls.
- Tape the door swing on the floor with painter’s tape, then walk the swing path as if using each fixture.
- Tape fixture footprints on the floor too, including clear zones in front of toilet, sink, and shower.
A taped floor plan reveals problems that a paper plan hides. It shows whether a door hits a knee, a vanity blocks a step, or a shower door needs more room.
Keep that taped plan until fixtures arrive. It is the cheapest check in the whole remodel, and it prevents the most expensive reorders.
Choose Your Layout in This Order
Step 1, Wet Wall and Drains
Find the wet wall first, because plumbing drives cost. A wet wall carries toilet, sink, and bathing drains and supplies in one shared wall.
Keeping all fixtures on one wet wall usually costs less. Prime Construction Florida stresses planning around existing drains, especially in slab homes.
Moving a toilet drain in a slab home means cutting concrete. That work adds cost, dust, time, and permit scope, so it needs a strong reason.
Step 2, Tub or Shower Branch
Decide tub or shower before choosing vanity width. That single choice changes storage, walkway, glass, and resale notes for the whole room.
A tub suits family use, bathing children, and resale in a one-bath home. A shower suits daily adult use, accessibility, and a more open feel.
Keep at least one tub in the house when possible. Prime Construction Florida gives that advice for young families and future buyers alike.
Step 3, Toilet Placement
Place the toilet next, with side and front clearances checked. A toilet tucked out of direct door sight feels more private, even in 48 square feet.
A toilet nook of 36 by 48 inches appears in several DesigningIdea plans. That nook gives elbow room, but it still needs front clearance checked separately.
Avoid placing the toilet directly opposite the door when another position works. Privacy matters more in a small room than in a large one.
Step 4, Vanity Width by Orientation
Choose vanity width only after tub, toilet, and door are placed. Width without orientation is meaningless, and that is why competitor vanity figures conflict.
Classic run vanity is 30 to 36 inches, per LilyAnn. Own-wall vanity can reach 42 to 48 inches, per DesigningIdea and Prime Construction Florida.
A centered sink needs 15 inches from its center to a side wall. A vanity under 30 inches wide, jammed against a wall, often fails that rule.
Step 5, Door Position and Swing
Choose door position last in planning, but check it first in use. A door on the short wall, long wall, or middle of the long wall changes everything.
Door on the short wall suits a linear layout, with fixtures along the long wall and a clear entry path. Door swing must still clear fixtures.
Door on the long wall suits a classic layout, with tub at the far end and toilet plus vanity on the opposite long wall. Check swing against the vanity.
12 Layouts for 6×8 Bathrooms
1. Classic Tub Across the Short Wall
Tub or shower sits across the 6-foot end wall. Toilet and vanity share the 8-foot wall, with the door on the opposite long wall or short wall.
This layout keeps plumbing on one wet wall and gives the proven 66-inch run. It is the easiest 6×8 layout to remodel without moving drains.
2. Classic Walk-In Shower Across the Short Wall
A 60 by 30-inch or 60 by 36-inch walk-in shower replaces the tub. Toilet and vanity keep the same long-wall positions, so drain moves stay minimal.
Frameless glass and tile to the ceiling make the room read as one space. Removing the tub apron and curtain also opens sightlines across the room.
3. Full-Width 72 by 36-Inch Shower
A 72 by 36-inch shower takes a full side of the room. DesigningIdea presents this as a spa-style choice, with toilet in a nook and a 36-inch vanity nearby.
This layout trades tub and closet space for shower luxury. It suits a primary bath with a tub elsewhere in the house, not a one-bath home.
4. Storage Corner Shower With 48-Inch Vanity
A corner shower frees a full wall for a larger vanity. DesigningIdea shows a 48 by 21-inch vanity in this layout, with toilet tucked in a corner nook.
That 48-inch vanity does not fit the classic 66-inch run. It fits only because the shower moves to a corner and the vanity takes its own wall.
5. Neo-Angle Open Center
A 36 by 36-inch neo-angle shower sits in a corner, with an angled door that saves floor space. Toilet faces the vanity across an open center.
DesigningIdea reports about 27 inches of open center space in this plan. Clear glass keeps the room feeling wider than a square shower would.
6. Linear All on the Long Wall
Toilet, vanity, and bathing fixture line up on one long wall. EngineerFix presents this linear plan as the most plumbing-efficient option for many rooms.
Door on a short wall works well here, because door swing stays clear of fixtures. Walkway width then depends on fixture depth, not layout length.
7. Split Fixtures, Vanity Opposite Toilet
Vanity sits on one wall and toilet on the opposite wall. Bathing fixture sits at the far end, and clearances must be checked on both sides.
This split suits rooms where the wet wall cannot hold everything. It needs careful front-clearance checks, because two fixtures face each other across the walkway.
8. Door-Wall Layout, Vanity Then Toilet Then Shower
From the door, order is vanity, then toilet, then shower at the far end. Prime Construction Florida notes this order for narrow rooms with a short-wall door.
Toilet sits out of direct door sight in this order. Walkway stays clear, and the shower at the far end gives a clean visual finish.
9. Accessible Barrier-Free Shower
A 60 by 36-inch barrier-free shower has no curb or lip. DesigningIdea shows a 48-inch entry, a toilet nook with grab-bar space, and a vanity with knee clearance.
Accessible vanity knee clearance is at least 27 inches high, 30 inches wide, and 19 inches deep, per that plan. Sink rim height should not exceed 34 inches.
10. Guest Bath With Linen Closet
A 12 by 30-inch linen closet tucks beside the tub in one DesigningIdea plan. That closet holds towels without taking counter or floor storage elsewhere.
Guest baths benefit most from closed linen storage. Guests should not need to search under a vanity for towels on their first night.
11. Shared Bath With Trough Sink
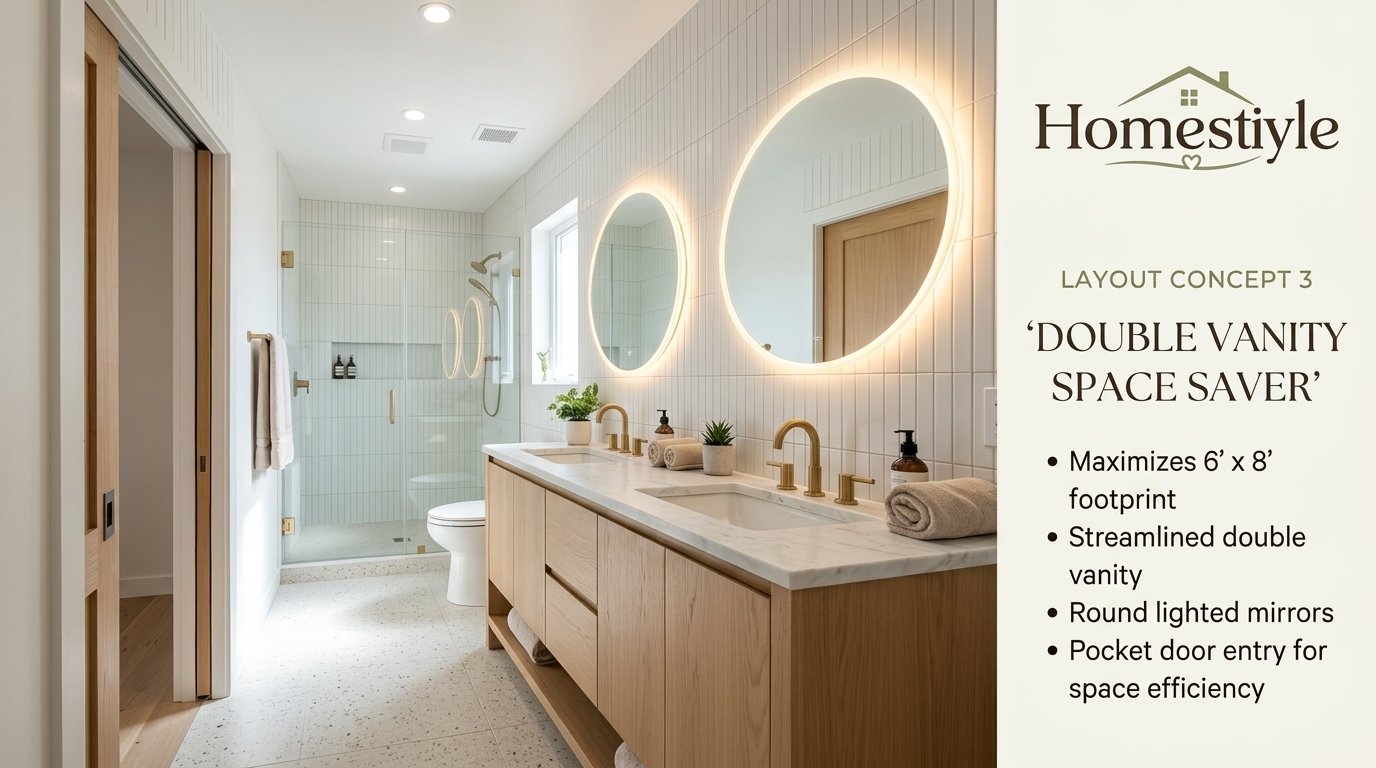
A 48 to 60-inch vanity with a trough sink and two faucets lets two people share one basin. Prime Construction Florida presents this as a space-saving double-use option.
Sink centers only 30 inches apart feel tight for two people. A longer counter with one sink often serves a shared bath better than a cramped double sink.
12. Tub Keep With Petite 54-Inch Tub
A 54-inch petite tub saves 6 inches over a standard 60-inch tub. Kohler and American Standard make shorter tubs, per a low-authority competitor note, so verify models locally.
Those 6 inches can hold a linen tower or widen a vanity. Petite tubs suit smaller adults and guest baths, but tall bathers should test legroom first.
Tub Versus Shower: The One Real Branch Point
Tub Keep, Tub Swap, and Tub Remove
Tub keep means a standard 60 by 30-inch alcove tub with a showerhead above it. It keeps family bathing, pet washing, and resale flexibility in one fixture.
Tub swap means a walk-in shower in the same footprint, usually 60 by 30 or 60 by 36 inches. It gives easier entry, clearer sightlines, and more shower comfort.
Tub remove without a shower replacement is rarely wise in a full bathroom. A full bathroom needs bathing, so removal should mean a shower, not an empty corner.
| Choice | Best for | Main trade-off | Cost signal, competitor reported |
| Tub keep, tub shower combo | Family use, one-bath homes, resale | Shower feels smaller, curtain or glass needed | Same-layout scope, lowest plumbing change |
| Walk-in shower swap | Daily adult use, accessibility, open feel | No tub in that room, resale note needed | Prime Orlando tub-to-shower 10,000 to 20,000 dollars |
| Corner shower | Larger vanity, storage focus | Smaller shower, door swing needs care | Mid-range scope, depends on glass and tile |
| Neo-angle shower | Open center, corner placement | Angled door, harder tiling | Mid-range scope, glass cost varies |
| Full-width shower | Spa feel, primary bath | No tub, no linen closet in that plan | Higher tile and glass scope |
Tub-to-shower cost ranges vary widely by scope and city. Prime Construction Florida reports 10,000 to 20,000 dollars in Orlando, while other guides report lower totals for simpler swaps.
Never present one tub-to-shower figure as a national price. Tile, glass, drain move, and waterproofing decide the real number, not the room size alone.
Resale and Family-Use Notes
A tub in the house matters more than a tub in every bathroom. Keep a tub somewhere for children, pets, and buyers who expect one.
A walk-in shower in a primary bath rarely hurts resale when another tub exists in the house. It often helps daily use and accessibility for older owners.
Document the tub decision for future buyers too. A simple note about the tub elsewhere in the house answers the first question a buyer will ask.
Door System: Inward, Outward, Pocket, Barn
Door on Short Wall Versus Long Wall
Door on the short wall suits linear and door-wall layouts. Entry path stays clear, and fixtures line up along the long wall without door interference.
Door on the long wall suits classic layouts. Tub sits at the far end, toilet and vanity sit opposite, and swing must clear the vanity first.
Door in the middle of the long wall splits the fixture wall. That position can work, but it shortens usable vanity wall on both sides of the door.
Pocket Door Wall Check and Cost Reconciliation
A pocket door slides into the wall and frees swing floor. That saved floor matters most in 48 square feet, where a hinged door can need 5 to 7 square feet.
Pocket door walls must be free of plumbing and most wiring. Prime Construction Florida stresses that check, because a pocket wall with pipes cannot hold a door.
Pocket door costs conflict across earlier small bathroom work. Open-wall installs were reported at 300 to 600 dollars, while finished-wall retrofits were reported at 1,400 to 2,600 dollars.
Those figures measure different jobs, so do not merge them. Open-wall cost suits new construction or open walls, while retrofit cost suits finished walls with repair work.
| Door type | Floor saved | Best use | Watch out for |
| Inward swing | None, swing eats floor | Large rooms, code-simple entry | Hits toilet, vanity, or shower door |
| Outward swing | Frees bathroom floor | Small rooms, hallway space allows | Needs hallway clearance, privacy check |
| Pocket door | Frees swing floor fully | Small rooms, open-wall or planned wall | Wall must be free of plumbing and wiring |
| Barn door | Frees swing floor, needs wall space | Style choice, hallway wall free | Needs clear wall beside opening, privacy gap |
Outswing doors need hallway space and a privacy check. A door swinging into a hallway can surprise passersby, so latch and hallway width matter.
Barn doors need a clear wall beside the opening. That wall cannot hold a towel bar, cabinet, or light switch in the door path.
Vanity, Toilet, and Shower Sizes
Vanity Widths and Depths by Orientation
Vanity width without orientation misleads readers. Classic run, own-wall, corner shower, and full-width shower layouts give different vanity limits.
LilyAnn vanity cabinets are 21 inches deep, with tops at 22 inches deep. That depth plus 21 inches of clear floor needs 43 inches from the wall.
Slim vanities at 18 inches deep buy back 3 inches of floor. EngineerFix recommends 18 inches or less for tight rooms, and reduced-depth models go to 12 inches.
Floating vanities show more floor and ease cleaning. They also help a small room read larger, because the eye travels under the cabinet to the wall.
| Orientation | Vanity width that fits | Why it fits |
| Classic run, tub across short wall | 30 to 36 inches | 66-inch run, code or comfort math |
| Own-wall vanity, corner shower layout | 42 to 48 inches | Vanity takes a full wall, shower in corner |
| Full-width shower layout | 36 inches | Shower takes one side, vanity in corner |
| Neo-angle open center layout | 42 inches | Vanity on its own dedicated wall |
| Galley, fixtures on both long walls | 48 to 60 inches | Needs about 7 feet width, per Prime Construction Florida |
| Double vanity minimum | 60 inches | Sink centers about 30 inches apart, tight for two |
Round Versus Elongated Versus Wall Hung Toilet
Round bowl toilets project less front to back than elongated models. That saving helps front clearance, but comfort differs by user height and preference.
Compact elongated toilets project about 2 inches less than standard elongated models, per Prime Construction Florida. That small saving can matter in a tight zone.
Wall hung toilets conceal the tank in the wall cavity. EngineerFix notes the floating look and visible floor, which help a small room read larger.
Wall hung toilet floor saving was reported two ways in earlier work. One figure was 2 to 3 inches of usable floor, another was 9 to 10 inches of projection, and those measure different things.
Do not merge those two wall hung figures. Projection saving and usable floor saving answer different questions, so Step 2 must label each one clearly.
Shower Sizes and Door Openings
Shower size should be chosen by user, not by leftover space. A 30 by 30-inch shower meets code, but many adults find 36 by 36 inches far more comfortable.
Angled neo-angle doors need at least 32 by 32 inches, per Bob Vila guidance. Square showers with sliding or inline doors tile more easily than neo-angle showers.
Shower door clear opening should be at least 22 inches. Sliding doors save swing space, while pivot doors need swing room checked against toilet and vanity zones.
Frameless glass lets the eye travel to the back shower wall. That sightline makes a small bathroom feel deeper, while a curtain chops the room in half visually.
Wet Wall, Plumbing, and Slab Versus Raised Floor
When Moving Plumbing Is Worth It
Moving plumbing is worth it when layout gains are large and lasting. A better door position, a usable shower, or a safer toilet zone can justify the cost.
Moving plumbing is rarely worth it for a small style gain alone. A few inches of vanity width seldom repay a slab cut, a permit change, and a longer timeline.
Keep toilet, sink, and bathing on as few walls as possible. LilyAnn gives that rule plainly, and it holds for both slab and raised-floor homes.
Slab Drain Cut Cost Warning
Slab homes need concrete cutting and trenching for drain moves. Prime Construction Florida stresses that point for Central Florida slab-on-grade homes.
Earlier 5×8 work reported slab drain cuts at 2,500 to 6,000 dollars per run. That figure came from one local sample, so it must not be presented as a national price.
Raised-floor homes allow easier drain access from below. That access still needs vent, slope, and inspection checks, but it usually costs less than slab work.
| Plumbing situation | Drain move difficulty | Cost signal | Key check |
| Same layout, same drains | Lowest | Same-layout remodel scope | Fixture sizes and rough-in only |
| Raised floor, drain move | Medium | Lower than slab, varies by access | Vent, slope, joist, and inspection |
| Slab, drain move | Highest | Local sample 2,500 to 6,000 dollars per run | Concrete cut, trench, patch, permit |
| Wet wall move | High | Depends on wall, vent, and supply | Vent stack, supply lines, wall structure |
Hidden supply lines matter in older homes. Prime Construction Florida notes galvanized steel and polybutylene lines in older Orlando homes, which are cheapest to replace with walls open.
Plan vent and supply checks before closing walls. A layout that looks perfect on paper can fail if a vent pipe sits where a niche or pocket door was planned.
Storage, Tile, Mirror, and Lighting
Storage by Wall Table
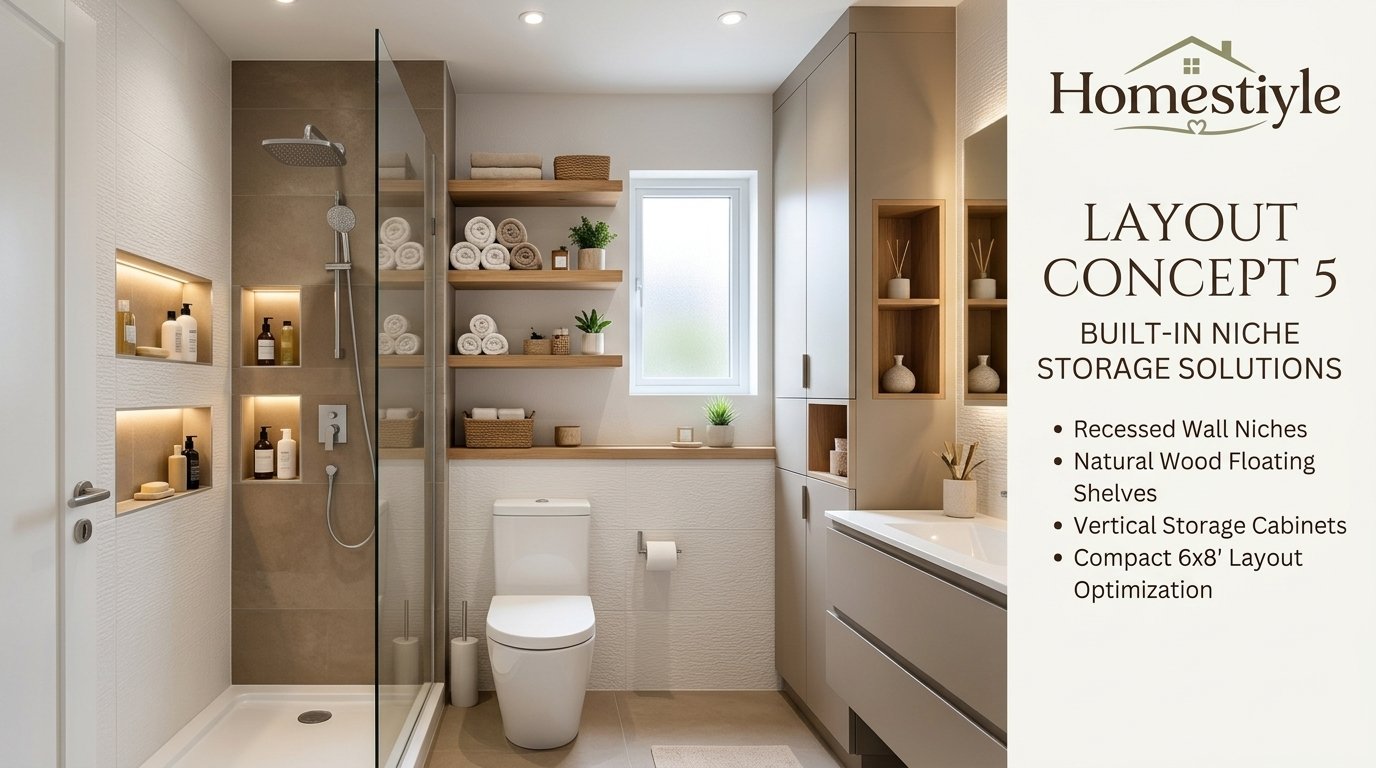
Storage must go vertical in 48 square feet. Floor storage competes with clear zones, while wall storage uses space that clearances do not need.
Recessed storage uses stud depth without taking floor space. Medicine cabinets and shower niches are the two most useful recessed options in a small bathroom.
Prime Construction Florida reports recessed medicine cabinets at about 14 inches wide and 3.5 inches deep inside a 2-by-4 wall. Check for vents and wiring before cutting any wall.
| Storage option | Best wall | Size signal | Watch out for |
| Recessed medicine cabinet | Vanity wall, between studs | About 14 inches wide, 3.5 inches deep | Plumbing vents and wiring in wall |
| Recessed shower niche | Shower back or side wall | Between studs, tile to fit | Waterproofing around niche edges |
| Over-toilet shelf or cabinet | Toilet wall, above tank | Shallow, 12 inches deep or less | Head clearance, falling items |
| Tall shallow linen cabinet | Any free wall | 12 inches deep, floor to ceiling | Door swing and walkway clearance |
| Vanity drawers | Vanity cabinet | 30 or 36-inch drawer bases | Plumbing trap limits drawer depth |
| Linen closet beside tub | Tub end wall | 12 by 30 inches, per DesigningIdea | Tub access and tile edge finish |
Vanity drawers beat cabinet doors for daily use. Drawers bring items forward, while doors hide items at the back of a dark cabinet.
Over-toilet storage needs a shallow depth and secure fixing. Deep cabinets over a toilet can hit heads and crowd the toilet zone, so keep depth modest.
Large-Format Tile and Grout Rule
Large-format tile cuts grout lines and calms a small floor. Prime Construction Florida recommends 12 by 24 inches or larger on floors and walls for that reason.
One floor tile throughout, carried into a curbless shower, reads as one plane. That single-plane read makes 48 square feet feel larger than a broken tile pattern does.
Grout close to tile colour avoids a busy grid. MyBlueBath warns that dark grout on light tile can make a small bathroom feel boxed in and busy.
Small mosaic tile still suits sloped shower floors. Mosaic gives traction and follows slope better than large tile, so use it where drainage and grip matter most.
Mirror Width, Sconces, and Shower Light
Mirror width should match vanity width when possible. A mirror as wide as the vanity reflects light and doubles perceived depth, per Prime Construction Florida.
Sconces on each side of the mirror beat a single overhead light. Side light at face height reduces shadows, which matters more in a small room than in a large one.
Layered lighting means ceiling light, vanity light, and shower light. EngineerFix stresses layered light to avoid dark corners, and a wet-rated shower light is part of that plan.
Tile to the ceiling in the shower protects walls and lifts height. DesigningIdea gives that tip for tub and shower areas, and it also simplifies cleaning at the top edge.
Waterproofing and Ventilation
Shower Pan, Linear Drain, and Slope
A failed shower pan is the most expensive mistake in scope. Earlier small bathroom work flagged pan failure as a five-figure tear-out, so waterproofing deserves priority over finishes.
Linear drains slope to the back and suit curbless showers. DesigningIdea notes textured tile, a linear drain, and a sloped floor for barrier-free shower plans.
Waterproofing must wrap niche edges, bench edges, and curb edges. Those junctions leak first, even when field tile looks perfect, so detail work matters more than tile choice.
Test the shower pan and drain before closing tile. A flood test costs little time and can save a full tear-out later, so ask the installer about testing.
Fan CFM, Ducting, GFCI, and Circuits
Exhaust fan size should match room volume and duct run. Small bathroom guides report 50 CFM as a baseline, with 80 to 110 CFM common for compact baths.
Duct run matters as much as CFM rating. Short, straight, rigid ducting with a proper roof or wall cap works better than long flexible ducting.
Humidity-sensing or timer switches help small bathrooms dry out. A fan that runs after showers prevents fogged mirrors and damp grout, even when users forget it.
GFCI protection is required near water sources. Bob Vila guidance cites GFCI within 6 feet of a water source, and local code should confirm outlet placement.
Bathroom circuits need a local code check for dedicated circuits. Earlier small bathroom work cited a dedicated 20-amp circuit in code examples, so verify that rule locally.
Accessibility in 48 Square Feet, Honestly Scoped
What Fits, and What Does Not
A 6×8 bathroom can be more accessible, but it cannot be fully accessible by default. Honest scoping matters, because overstating accessibility can mislead readers who need real access.
DesigningIdea accessible plan reports about 54 by 36 inches of center floor space. That space helps movement, but it is not a full 60-inch wheelchair turning circle.
A 48-inch entry in that plan is wider than a standard 32-inch door. That width helps wheelchairs, but it needs wall space, door hardware, and hallway clearance to work.
Grab bars need blocking in walls during rough framing. Install blocking even when bars are not fitted yet, because retrofitting bars into finished tile is harder and weaker.
Handheld showerheads on slide bars help seated and standing users alike. Controls should sit within reach from inside and outside the shower, per that accessible plan.
Remodel Cost, Timeline, and Permits
Cost Reconciliation by Scope and City
No single 6×8 remodel price is honest without scope and city. Competitor ranges below measure different scopes, so they must stay separate, not averaged.
Coohom reports 6,000 to 15,000 dollars on one page and 6,000 to 12,000 dollars on another page. That conflict alone shows why scope labels matter more than totals.
Accio reports basic 5,000 to 10,000 dollars, mid-range 10,000 to 20,000 dollars, and luxury over 20,000 dollars. Accio is a sourcing page, not a bathroom contractor, so treat it as a weak signal.
MyBlueBath reports full-gut renovation at 15,000 to 25,000 dollars. That scope means walls open, fixtures replaced, and finishes renewed, not a cosmetic refresh.
Prime Construction Florida reports Orlando same-layout mid-range at 12,000 to 25,000 dollars. Full primary bath work reaches 25,000 to 50,000 dollars, with layout change or luxury finishes higher still.
| Source, scope, and city | Cost range, competitor reported | What it includes, as reported |
| Coohom, 6×8 remodel, scope unclear | 6,000 to 15,000 dollars | Finishes, labor, plumbing relocation variable |
| Coohom, small remodel, US, scope unclear | 6,000 to 12,000 dollars | Fixtures, flooring, vanity, labor variable |
| Accio, basic to luxury, scope tiers | 5,000 to over 20,000 dollars | Basic fixtures to premium finishes and cabinetry |
| MyBlueBath, full-gut 6×8 | 15,000 to 25,000 dollars | Full renovation, material choices variable |
| Prime Orlando, same-layout mid-range | 12,000 to 25,000 dollars | Guest bath scope, Orlando 2026 planning range |
| Prime Orlando, tub-to-shower only | 10,000 to 20,000 dollars | Conversion only, not full remodel |
| Prime Orlando, full primary bath | 25,000 to 50,000 dollars | Custom tile shower, full finishes |
| RenovateCost, small bathroom, US | 4,000 to 8,000 dollars | Small bathroom scope, not 6×8-specific |
Labor often accounts for 40 to 50 percent of a remodel. RenovateCost reports that share, with tile and plumbing as the two most expensive labor categories.
Tile work was reported at 7 to 25 dollars per square foot installed. Flooring was reported at 3 to 18 dollars per square foot, depending on material, per the same source.
Timeline by Scope
Cosmetic refresh work can finish in days, not weeks. Paint, hardware, mirror, and light swaps need no plumbing or tile demolition in most cases.
Same-layout remodels often take 2 to 3 weeks on site. Prime Construction Florida reports that range, after 2 to 6 weeks of design and ordering beforehand.
Full primary bath work often takes 3 to 6 weeks on site. Coohom reports 2 to 4 weeks for a 6×8 remodel, which likely reflects a simpler scope than a full primary bath.
Design and ordering time must be counted separately from site time. Fixtures, tile, glass, and vanities can delay a job more than demolition ever will.
Permit Triggers Checklist
- Plumbing move, drain move, or fixture relocation usually triggers a permit and inspection.
- Electrical move, new circuit, or outlet relocation usually triggers a permit and inspection.
- Wall move, door move, or structural change usually triggers a permit and inspection.
- Fan ducting change, roof or wall penetration usually needs a permit check and proper cap.
- Same-layout fixture swap with no plumbing or electrical move may need less permitting, but local rules still apply.
Permit fees vary by city and scope. Earlier small bathroom work reported 100 to 500 dollars in one sample and 400 to 800 dollars in another, so get a local figure.
A permit timeline is local, not national. One earlier sample reported 3 to 5 weeks in one city, which must not be presented as a national wait time.
Mistakes to Avoid
- Ordering fixtures from nominal size instead of finished wall measurements, which causes vanity and toilet fit failures.
- Combining a 36-inch vanity with 18-inch comfort clearances on the classic 66-inch run, which needs 72 inches, not 66.
- Placing a centered sink too close to a side wall on a vanity under 30 inches wide, which fails the 15-inch sink center rule.
- Letting a door swing block a toilet, vanity, or shower door, which fails daily use even when the plan looks fine on paper.
- Choosing a pocket door without checking the wall for plumbing, vents, and wiring, which can make the pocket impossible.
- Moving a slab drain for a small style gain, which adds concrete work, permit scope, and timeline without a lasting layout benefit.
- Skipping shower pan testing and niche waterproofing, which risks the most expensive tear-out in the whole remodel.
- Using a curtain instead of clear glass in a small shower, which chops sightlines and makes 48 square feet feel smaller.
- Using dark grout on light tile throughout a small room, which creates a busy grid and boxes the room in visually.
- Forgetting ventilation ducting and fan controls, which leaves humidity, fogged mirrors, and damp grout after every shower.
Expert Tips
- Tape every fixture and clear zone on the floor before ordering, and walk each zone as if using it daily.
- Choose tub or shower first, because every other fixture, storage, and cost choice follows from that branch.
- Keep plumbing on one wet wall when possible, and price any drain move separately from fixture prices.
- Use drawers in the vanity, not just doors, so items stay visible and reachable in a narrow cabinet.
- Install blocking for grab bars during rough framing, even when bars will be fitted later, not now.
- Carry one floor tile into a curbless shower when possible, so the floor reads as one continuous plane.
- Match mirror width to vanity width, and add sconces at face height on both sides of the mirror.
- Tile shower walls to the ceiling, which protects walls, lifts height, and simplifies cleaning at the top edge.
- Use a wall-mounted faucet to free counter space, especially on a 30-inch vanity with limited counter area.
- Photograph drains, vents, and supply lines before closing walls, so future repairs and remodels start with real information.
Shopping List in Priority Order
Buy in decision order, not in store order. Measurement tools come first, then layout-critical fixtures, then finishes that can change without replumbing.
| Priority | Item | Why it comes at this stage |
| 1 | Tape measure, scale paper, painter’s tape | Layout decisions need real measurements first |
| 2 | Toilet, with rough-in confirmed | Drain position and rough-in limit toilet choice |
| 3 | Tub or shower unit, with drain position confirmed | Bathing fixture decides wet wall and glass |
| 4 | Vanity, width by orientation confirmed | Vanity width depends on layout, not preference alone |
| 5 | Door kit, pocket or hinged, wall checked | Door type depends on wall contents and swing |
| 6 | Exhaust fan, duct, and controls | Ventilation needs duct route planned early |
| 7 | Tile, grout, mirror, and lighting | Finishes come after layout and plumbing are fixed |
| 8 | Storage, shelves, and accessories | Storage fills remaining walls after fixtures are set |
Keep leftover tile, grout, and paint for repairs. Small bathrooms show damage faster, and matching tile later is often harder than storing a spare box now.
Record every fixture model, finish, and code after install. That record saves time on future repairs, touch-ups, and resale questions.
FAQs
What is a 6×8 bathroom layout?
A 6×8 bathroom layout is a floor plan for a 48-square-foot full bathroom. It usually holds a toilet, a vanity, and a tub or shower, arranged by clearances and plumbing.
How big is a 6×8 bathroom in square feet?
A 6×8 bathroom is 48 square feet nominally, calculated as 6 times 8. Finished usable area is often slightly less after framing, tile, and wall finish.
What fits in a 6×8 bathroom?
A toilet, a vanity, and a tub or shower fit in a 6×8 bathroom. Storage, a linen closet, and a comfortable walkway also fit when layout and door swing are planned well.
Can a bathtub fit in a 6×8 bathroom?
Yes, a standard 60 by 30-inch alcove tub fits in a 6×8 bathroom. It usually sits across the short wall, leaving a 66-inch run for toilet and vanity.
What size tub fits best in a 6×8 bathroom?
A 60-inch tub is standard, while a 54-inch petite tub saves space. Petite tubs suit guest baths and smaller bathers, but tall bathers should test legroom first.
Can a walk-in shower fit in a 6×8 bathroom?
Yes, a 60 by 30-inch or 60 by 36-inch walk-in shower fits well. Larger 72 by 36-inch showers also fit, but they trade tub and closet space for shower size.
What size shower is most comfortable in a 6×8 bathroom?
A 36 by 36-inch shower is the smallest size most adults find comfortable. Code allows 30 by 30 inches, but comfort, elbow room, and door swing favor the larger size.
What size vanity fits in a 6×8 bathroom?
Classic run vanity size is 30 to 36 inches. Own-wall vanities can reach 42 to 48 inches, but only in layouts where the vanity takes its own wall.
Why do vanity widths for 6×8 range from 30 to 48 inches?
Vanity width depends on orientation, not room size alone. Classic run limits width to 36 inches, while corner shower and own-wall layouts free a full wall for vanity.
Can you fit a double vanity in a 6×8 bathroom?
A 60-inch double vanity is the minimum for two sinks. Sink centers end up about 30 inches apart, which feels tight, so a trough sink often works better.
What is the best layout for a 6×8 bathroom?
The classic tub across the short wall, with toilet and vanity on the long wall, is best for most rooms. It keeps plumbing simple, clearances proven, and walkway wide.
Is 6×8 usefully bigger than 5×8?
Yes, 6×8 is usefully bigger in walkway width, not fixture run. Both rooms share a 66-inch fixture run, but 6×8 gives about 50 inches of walkway versus about 38 inches.
How much clear space do I need in front of a toilet?
Code minimum is 21 inches of clear floor in front of a toilet. NKBA recommends 30 inches for comfort, and local code should confirm the figure that applies.
How far should a toilet center be from a side wall?
Toilet center should be at least 15 inches from a side wall by code. NKBA recommends 18 inches, which gives noticeably more elbow room for daily use.
How much clear space do I need in front of a shower?
Code minimum is 24 inches of clear floor in front of a shower entry. NKBA recommends 30 inches, so shower doors should never open into a tight toilet zone.
Where should the door go in a 6×8 bathroom?
Door position depends on layout, but short-wall doors suit linear plans. Long-wall doors suit classic plans, while middle long-wall doors shorten usable vanity wall.
Should a 6×8 bathroom have a pocket door?
A pocket door often helps a 6×8 bathroom by freeing swing floor. It only works when the pocket wall is free of plumbing, vents, and most wiring.
How much does a pocket door cost in a bathroom remodel?
Open-wall pocket installs were reported at 300 to 600 dollars. Finished-wall retrofits were reported at 1,400 to 2,600 dollars, and those jobs must not be merged.
What is a wet wall, and why does it matter?
A wet wall carries toilet, sink, and bathing plumbing in one shared wall. Keeping fixtures on one wet wall usually lowers plumbing cost and simplifies inspection.
How much does it cost to move a toilet drain in a slab home?
One local sample reported slab drain cuts at 2,500 to 6,000 dollars per run. That figure is not a national price, so get a local quote with permit scope included.
How do I measure toilet rough-in?
Measure from the finished wall behind the toilet to the drain center. Standard rough-in is 12 inches, while 10-inch and 14-inch versions exist for older or special layouts.
How much does a 6×8 bathroom remodel cost?
Competitor ranges run from about 6,000 dollars to 25,000 dollars, depending on scope and city. Same-layout mid-range work and full-gut work sit at different ends of that range.
How long does a 6×8 bathroom remodel take?
Same-layout work often takes 2 to 3 weeks on site, after design and ordering. Full primary bath work often takes 3 to 6 weeks on site, plus ordering time beforehand.
Do I need a permit for a 6×8 bathroom remodel?
Plumbing moves, electrical moves, wall moves, and layout changes usually need permits. Same-layout fixture swaps may need less permitting, but local rules still apply.
Should I remove the tub in a 6×8 bathroom?
Remove the tub only when another tub exists in the house or bathing needs have changed. A walk-in shower improves daily use, but family use and resale still favor keeping one tub.
Can a 6×8 bathroom be wheelchair accessible?
A 6×8 bathroom can be more accessible, but not fully accessible by default. Barrier-free showers, grab bars, and knee clearance help, while full turning space needs a larger plan.
Conclusion
6×8 bathroom layout ideas succeed when measurement comes before shopping, and plumbing comes before finishes. The 66-inch run, the 50-inch walkway, and the door swing test together decide whether a plan feels calm or cramped.
Measure finished walls, drain center, and rough-in first, then tape the plan on the floor and walk it. If toilet, vanity, shower, and door all clear their zones without a squeeze, the layout is ready for fixtures. If any zone fails, change the layout now, while changes still cost paper and tape, not concrete and tile.
